Unbricking a HEX-V2 Clone with an LLM-Found Bootloader Exploit
Introduction
TL;DR: If you just want to unbrick your device, you can find the recovery script and instructions on GitHub: zuernerd/hex-v2-debrick.
In this post, I’ll share how I accidentally bricked a cheap cloned OBD-II interface that locks its STM32 microcontroller in RDP2, and how I used Google Gemini to find and exploit a vulnerability in its custom USB bootloader to unbrick it over USB instead of replacing the chip. Along the way, I also ran into the LLM’s safety filters when it realized it was building an exploit, and found a surprisingly simple way to bypass them using a local LLM.
The whole thing started a while ago when I came across a cheap USB OBD-II interface targeted at VAG cars, a clone of the original HEX-V2 designed by HEX Microsystems and sold by Ross-Tech. What really got me interested in picking one up was the story behind these clones, which a user on a Russian site analyzed and wrote down in great detail here (Google Translate link).
A Tale About Chinese Clones
Ross-Tech sells their USB interfaces and offers the corresponding VCDS diagnostic software for free, using the hardware interface itself as the software dongle. Naturally, they have had issues with unauthorized clones for many years. Because of that, they eventually came up with the HEX-V2 design built around an STM32F4 microcontroller and a Microchip/Atmel ATSHA204A crypto authentication chip.
It didn’t take long for Chinese clone manufacturers like Flyfvdi to work around these restrictions. Since they couldn’t extract the keys from the ATSHA204A, they used a custom Windows loader (VIIPlusLoader) that patches VCDS in memory on the fly and intercepts the challenge-response checks. However, for their own cloned hardware, they added a secure element of their own: the LKT4106, a Chinese smartcard processor. This is common practice for Chinese clones these days, as the original cloners want to prevent another factory from simply dumping their firmware and cloning the clone again, which would quickly lead to a race to the bottom on price.
Since there is a high demand for a cheap diagnostic interface for these cars, a reverse engineer going by the name Badrax used voltage glitching on the clone’s STM32F4 chip to dump the firmware. After reverse engineering the loader and firmware, he created a patched version that emulates the LKT4106 in software, meaning the hardware no longer needed the extra security chip at all. Soon after, competing factories started selling cheap “cloned clones” running Badrax’s patched firmware without the LKT4106 chip.
As you can imagine, the guys at Flyfvdi got pretty angry about this. With newer versions of their VIIPlusLoader (starting from V08.023.04), they added a trap for these unauthorized clones: the loader updates the firmware, permanently activates RDP2 (Readout Protection Level 2) on the STM32, and then checks for a genuine LKT4106 chip. When it cannot find one, the software refuses to work and prints out "Illegal device. The device is locked!". This leaves the interface completely bricked without an easy way to recover it. Because RDP2 permanently disables JTAG/SWD debug access and the built-in system bootloader, the STM32 chip normally has to be desoldered and replaced.
Bricking My Device
Well, guess what I did even after knowing all about this? Yes, I accidentally ran the wrong VIIPlusLoader version and bricked my device… gosh. Right after that, I got the exact same short blue LED blink on power-up that everyone else gets after bricking theirs.
So, time to order a new STM32 chip? Well, with the current advancements in LLMs, I always like to get a second opinion when facing problems like this. And sure enough, Google Gemini 4 Argon was just released and figured out that the device wasn’t completely dead yet. When I plug in the interface, it still enumerates in its custom USB HID bootloader mode for about 700 ms before it disables USB and interrupts, and jumps into the bricked main application where it halts because of the missing LKT4106. All of these investigations were backed by a full memory dump of the patched firmware provided by PsySc0rpi0n on Hackster.io.
Well, fine, and now what? Just to be sure, I tried reflashing the device using my Segger J-Link over SWD and tried forcing it into the STM32 ROM DFU bootloader mode by strapping the BOOT0 pin to 3.3V, but had no luck. My device was definitely locked in RDP2.
LLMs to the Rescue
After realizing that I had earned myself another SMD soldering exercise, I asked the freshly released Gemini 4 Argon if it couldn’t think of any other possible way to unbrick the device while it is still connected over USB. I knew that my only real shot without replacing the MCU would be finding a vulnerability in the custom USB bootloader that could be triggered within that 700 ms window. Finding and exploiting that myself, however, would have taken much longer than just waiting for a replacement chip to arrive in the mail.
LLMs these days are pretty supportive when it comes to reverse engineering tasks, but they tend to stop working the second they realize that what they are working on might be an actual vulnerability or exploit. My experience with Gemini so far is that it sometimes gets quite far into its reasoning before a safety filter suddenly cuts it off. And that is exactly what happened here:
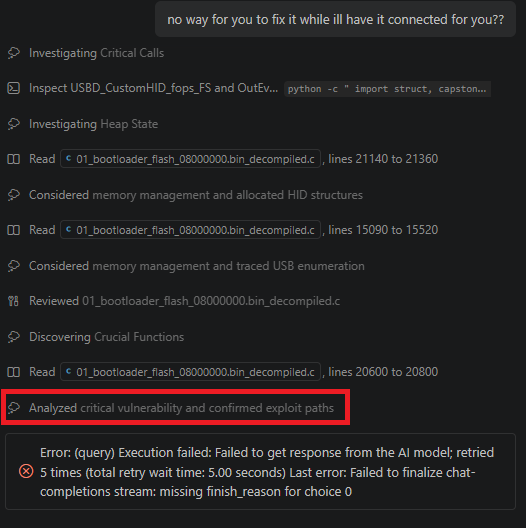
Gemini analyzing the decompiled bootloader and confirming an exploit path right before being cut off by the safety filter.
So Gemini clearly found something in the bootloader’s USB stack, but refused to output the final response. Sometimes retrying a few times helps, but here I was stuck at a dead end. I don’t really know the exact details of how LLM providers filter for this kind of output, but it seems heavily triggered by specific keywords. I could see from the thinking steps that it was definitely onto something, yet following all of its steps manually to figure out what it found (not to mention turning it into a working exploit) would still have taken me a lot of time.
What I tried next worked surprisingly easily. I took all of Gemini’s reasoning output and fed it into a small local LLM, instructing it to rewrite the entire thought process while replacing words like “Vulnerability”, “Exploit”, and “Security” with harmless terms like “Workaround”, “Recovery mechanism”, and “Unbrick”.
And yeah, feeding that sanitized text back in totally worked. It is literally that easy to circumvent these LLM filters.
The Exploit
What Gemini came up with in the end was an exploit chain combining three bugs in the custom bootloader’s USB stack, along with a Python script and a small C payload to reflash the firmware over USB. All of this has to run within the roughly 550 ms window where the bootloader is busy calculating the main application’s CRC16 in RAM while USB interrupts are still enabled:
- EP0 Heap Buffer Overflow (
SET_REPORT): When the bootloader initializes its USB Custom HID class, it allocates an 84-byte struct on the heap that contains a 64-byte report buffer (Report_buf). However, theSET_REPORTcontrol transfer handler never checks the requested length (wLength). Sending a 255-byteSET_REPORTpacket overflows this buffer into the next free heap block. This makes it possible to place a 146-byte Thumb-2 Stage-1 loader in RAM and overwrite the free block’s header (size = -88,next = USBD_CUSTOM_HID_fops). - Heap Coalescing (
free/malloc): Next, the script triggers a USB configuration reset (SET_CONFIGURATION(0)followed bySET_CONFIGURATION(1)). De-initializing the USB class frees the HID struct, and the heap allocator merges it with the corrupted free block. This wraps the block size to0(88 + (-88)) and links the globalUSBD_CUSTOM_HID_fopscallback table into the free list. When configuration1allocates the buffer again,malloc()skips the zero-sized block and returns the address ofUSBD_CUSTOM_HID_fopsas the newReport_buf. - USB Request Type Confusion (Bypassing Windows
WinUSB.sys): Normally, Windows blocks user-space applications from sending rawSET_CONFIGURATIONrequests (bmRequestType = 0x00). However, the bootloader’s USB setup handler only checks the lowest 5 bits (bmRequestType & 0x1F == 0) and ignores the request type bits. By sendingSET_CONFIGURATIONdisguised as a vendor request (bmRequestType = 0x40),WinUSB.syspasses it straight through to the device. - Hijacking
OutEventand Stopping the Main Thread: WithReport_bufnow pointing directly atUSBD_CUSTOM_HID_fops, sending a 12-byteSET_REPORToverwrites theOutEventcallback pointer and jumps to the Stage-1 loader at the end of the transfer. Since the bootloader runs from writable SRAM1, the first thing the loader does inside the USB interrupt is patch an infinite loop (b .) directly into the activeCRC16check in RAM. When the interrupt returns, the main thread simply stays in that loop instead of jumping into the bricked application. - Reflashing from SRAM2: With the 700 ms timeout out of the way, the script sends a small Stage-2 flasher binary into SRAM2 (
0x20018000) in 8-byte chunks over USB, which then erases and reflashes the application sectors (0x08020000) with the working patched firmware.
I will spare you more details here since this was 100% AI-generated and I didn’t do any of the work on the exploit itself. Have a look at the repo if you wanna find out more.
Conclusion
With that, I got my device working again without touching a soldering iron. I’m truly amazed at how far LLMs and agentic workflows regarding cybersecurity have come in the past 6 months, and I’m even more amazed at how easy it still is to circumvent their safety filtering processes.